Every owner of a summer cottage sooner or later wonders how to increase the productivity of the garden and optimize financial and physical costs. As a rule, it is after this that they begin to consider the available greenhouses with their own hands: the best projects and the features of their implementation. This article will discuss successful greenhouse designs, materials for construction and coating, as well as a detailed description of the construction process.
Before you begin building a greenhouse, you need to decide on several fundamental aspects that will determine the size, type and location of the structure. First of all, you should think about what you plan to grow in it. For example, a greenhouse for tomatoes should correspond in height to the growth of adult plants, while growing exclusively seedlings does not require a large structure.

Another important point is the material from which the construction will be carried out. The most popular option, which is used in most cases, is wood. But today, wood has given way to lighter and more affordable modern materials, such as plastic pipes and covering material. But this does not mean that wooden frames were abandoned altogether. Wooden and metal greenhouses can still be found quite often.
In addition, the symmetrical arrangement of all buildings, fences and paths will help give the site a neat appearance. But the most important thing is that the greenhouse is positioned correctly and does not cover the windows of the house, does not block the passage, etc.
Do-it-yourself wooden greenhouses and greenhouses: photos, instructions and material features
Wood is one of the most affordable and popular materials, which is used for various constructions. Of course, it cannot be denied that wood, more than any other material, is susceptible to the influence of external factors, however, this does not stop many owners of summer cottages who want to build a greenhouse with their own hands.

Soft wood species are acceptable for the construction of temporary structures. In this case, pine, alder, spruce, aspen or linden are suitable. For more reliable and permanent structures, it is better to use other deciduous trees or swamp cypress, larch.
In the process of constructing a greenhouse, the frame of which is made of wood, it is very important to prepare a reliable foundation, which will become a solid foundation for the structure.
Foundation options for a greenhouse and a greenhouse for a do-it-yourself cottage
Depending on the design features, you can make one or another version of the foundation that will be suitable for this type of structure:
- foundation made of railway sleepers or timber. To do this, you need to prepare a trench into which sleepers or timber are laid. All these elements are connected using metal brackets. Then, the finished greenhouse frame is installed on top;

- For places where windy weather often occurs, it is preferable to install a columnar foundation. Due to the presence of a concrete base, this structure can withstand severe wind loads, and even hurricanes. For this purpose, pipes with a diameter of more than 20 cm will be required. They are dug in to a depth of 90 to 120 cm so that they do not freeze during the cold season;
- a block foundation is another solution to the issue of installing a foundation for a greenhouse or greenhouse. In this case, sand and gravel are first poured into a previously prepared trench, and then concrete blocks are placed. All this is poured with cement mortar and then a frame of beams is attached on top;
- strip foundations are practically not used for greenhouses, since they are designed for more severe loads. In a not too deep trench there is a concrete pad 30-50 cm thick. The main advantage of this option is its extremely long service life, which allows you to change structures by installing them on the same base.
Assembling a greenhouse frame with your own hands
Having figured out the difference between a greenhouse and a greenhouse, and having installed the type of foundation that is suitable for you, you can proceed directly to the construction of the frame itself. As mentioned earlier, there are several options that you can implement yourself, for example, an arched or gable design. It all depends on your preferences, as well as the characteristics of the area where the installation will be carried out.

Most often in dachas you can find rectangular greenhouses or greenhouses with a gable roof. Making wooden greenhouses with your own hands is quite simple, and their use will be quite comfortable if you think through all the nuances.
Features of each stage of construction. How to choose and secure covering material. Advantages of PVC pipe structures.
Installation always begins with the installation of a support beam, which is attached to the foundation and is usually somewhat thicker than the rest of the wood used for the frame itself. In this case, all elements are necessarily treated with a protective antiseptic.

All fastenings must be reliable, so you can use reinforcement, anchor or metal bolts for this purpose. Another important aspect is the integrity of the timber, which is used as a base. It must be solid, without cracks or signs of rotting, since the stability of the structure depends on this.
The construction of a wooden greenhouse with your own hands is carried out according to the drawing you choose. But, in general, the scheme of work is as follows: it is necessary to assemble two side and two end walls, which are then fastened together with screws, corners, metal profiles or clamps.
When the “box” is ready, you can proceed to installing the rafters. Their number depends on your preferences, however, it is worth understanding that the more there are, the easier it will be to attach the covering material and the stronger the structure in general will be.

When all the rafters are secured, you can proceed to the installation of the roof ridge, which is attached to the upper groove of the rafters. At the same stage, it is worth securing the wind boards, for which the side grooves of the rafters are provided. You can see more details on how exactly to do this in the drawing or diagram. All these elements must be made of solid material.
The final stage of construction can be called the installation of a doorway, as well as a window, which is provided for ventilation. After this, all that remains is to cover the frame with covering material, and you can begin operation.
Helpful advice! One of the most effective ways to protect against rodents is to lay a chain-link mesh with small cells under the greenhouse. This must be done before installing the frame.

The most convenient DIY greenhouses. Photos of models made of polycarbonate and plastic pipes
One of the modern and inexpensive options for building a greenhouse is the use of plastic pipes. Depending on the manufacturing technology, they are divided into polypropylene, metal-plastic and PVC.
The last option is slightly cheaper than all the others. But metal-plastic ones, although the most expensive, can provide a much higher level of strength. Therefore, in this case, you should be guided by your preferences and financial capabilities. As an example, you can look at photos of greenhouses in the country with your own hands.
The main advantages of a plastic greenhouse frame over a wooden one are ease of installation and the ability to give the structure any shape. As in the case of a wooden one, construction must begin with choosing a location and preparing the site. Having decided on the purpose and size of the greenhouse, you can proceed to drawing the diagram and purchasing the appropriate amount of necessary materials.

Often structures made from plastic pipes are made temporary, since they can be easily dismantled and reassembled several times. The type of foundation that needs to be laid depends on whether the greenhouse is stationary or collapsible. In the first case, it is better to use tape or columnar. For a temporary structure, you can not make a foundation at all, but simply dig in metal pins and reinforce the site with boards.
Using pins, the base is made as follows:
- Strong metal pins are dug into the ground. They should protrude approximately 30 cm above the ground surface.
- One edge of the pipe is placed on the pin.
- The pipe is bent in such a way that the second edge can also be put on the pin, which is dug parallel to the first.

How to economically build a greenhouse with your own hands from plastic pipes
Anyone can make a simple greenhouse with their own hands without any special financial investment or effort. To do this, you just need to purchase all the necessary materials, according to the selected drawing and follow a fairly simple algorithm:
- After the base arcs are installed, it is necessary to fasten them together. To do this, you need to use a pipe, the length of which will correspond to the length of the entire greenhouse.
- A long pipe (or two short ones, fastened together) is located in the center of the arches standing on the base, and is fixed as tightly as possible with clamps or ropes. At this point, the frame assembly can be considered certified.
- It is best to use polycarbonate or polyethylene film as a covering. In the first case, the thickness of the polycarbonate must be at least 4 mm, and the sheet size can be any, since this material can be easily cut and adjusted to the size of the greenhouse. In the second case, the film is cut into strips and attached to the arcs using double-sided tape, office binders or special pipe fasteners.
- Fastening polycarbonate or film must be overlapped. To connect sheets, you can use self-tapping screws with wide heads or thermal washers. The main thing is to pay due attention to sealing the joints. You can use a special tape for this.

You can build small ones for greenery with your own hands from scrap materials
Greenhouse made of covering material: which is better, polycarbonate or film
The technical and operational characteristics of polycarbonate have allowed it to take a leading position among the materials used to create greenhouses and greenhouses. It is quite simple to cut and attach, and at the same time it is resistant to external factors. In addition, it has excellent light transmission, providing plants with the necessary amount of sunlight.
It is worth considering that this durable and reliable material is significantly more expensive than the usual and affordable polyethylene film, which is still widely used to cover greenhouses.
Anyone can figure out how to cover a greenhouse with film. The main thing is to fasten it to the frame as securely as possible and fix it at the bottom by sprinkling the edges with earth and laying heavy boards or bricks. When deciding which film to choose for a greenhouse, you should first of all be guided by its strength. But in any case, most likely, it will not last more than one season. The price of greenhouse film is affordable, so you can replace it without much difficulty or investment.

As for the features of fastening polycarbonate, it is worth noting that there are several different methods. So, in addition to ordinary self-tapping screws, you can use aluminum staples or special plastic earrings.
Another option is to use profiles for this purpose. In this case, you need to drill holes in advance that will allow you to attach the coating to the metal frame.
Helpful advice! The use of thermal washers in the process of attaching polycarbonate is a mandatory measure, since this is what allows the material to maintain its integrity and prevents condensation.
Do-it-yourself greenhouse from window frames: how to arrange a place for growing seedlings
In garden plots you can often find small greenhouses made from old window frames. Of course, such a design is unlikely to be suitable for growing tall and large crops, but it will be more than useful as a do-it-yourself greenhouse for seedlings.

The main advantage of this option is financial savings. All you need are old window frames. If they have glass, you can leave them and use them instead of the standard coating. If the frames are empty, then after installation they can be covered with plastic film or inserted into cut polycarbonate sheets.
Even for such a small and light greenhouse, it is necessary to prepare the foundation in advance. For this purpose, a wooden frame made of boards or timber is installed. A 50x50 mm beam or a board 40 mm thick is best suited for this purpose.
The frame will consist of racks, as well as upper and lower frames, which are made from identical boards. The racks, in this case, must be installed at such a distance from each other that the window frame can fit between them.
Timber is best suited for the roof, as it is more durable and minimizes the risk of the greenhouse being destroyed under the weight of snow in winter. Also, gable structures are more durable, which is also worth taking into account.

As for attaching the frames themselves to the supports, this can be done using nails and screws. It must be fixed on all four sides, both from the outside and from the inside. All remaining cracks must be sealed using polyurethane foam.
Like the walls of the greenhouse, it is best to cover the roof with polycarbonate or cover it with film. This will provide the plants with the maximum amount of light.
Helpful advice! It is best to start installing the coating from the roof, gradually moving down. Otherwise, you risk damaging already coated areas by touching them during the work process.
Do-it-yourself greenhouse under a film made of galvanized steel profile
Profile is another material that has recently become actively used for the construction of greenhouses and greenhouses. The main advantage of this method is the ability to give the structure any shape and size, without being limited to any standard sizes.

Helpful advice! In order to build a beautiful and reliable greenhouse with your own hands from a profile, videos, calculations and step-by-step photo instructions offered on the Internet can serve you well. Do not neglect the advice of specialists, as well as the recommendations of users who have already had to work with such buildings before.
To work, you will need the following tools: a measuring tape, a building level and a plumb line, scissors designed for working with metal and a screwdriver.
Installation of the frame begins with fixing the guide profile, which is attached to the foundation using self-tapping screws. One upper beam must connect all sections, which must be at such a distance that the structure is sufficiently rigid. As a rule, the pitch is a third and a fourth of the length of the polycarbonate sheet.

Using the same principle, you can make a galvanized greenhouse under the film. You just need to think in advance about how to attach the film to the greenhouse. Otherwise, the technology is no different from that used for wooden structures and greenhouses made of plastic pipes.
Very often, galvanized profiles are used for greenhouses for tomatoes. It is quite simple to build it with your own hands, and at the same time the structure has the proper strength. Moreover, every summer resident, interested in the question of how to grow tomatoes in a greenhouse, will definitely be faced with the fact that the temperature in a greenhouse for tomatoes should not drop too low. Therefore, it may be worth thinking about a heating system at the design and construction stage.
How to care for the structure and how to prepare the greenhouse for planting
Regardless of whether you chose a greenhouse under film or a more fundamental design using polycarbonate, before you start planting, you need to carry out a number of procedures. First of all, this concerns the preparation of soil and beds in a greenhouse with your own hands. Photos and diagrams of how to correctly arrange everything inside clearly demonstrate that by calculating everything in advance, you can ensure convenience and ease of working with plants.

When wondering how to treat a greenhouse in the spring before planting, it is worth studying in detail all possible methods in order to protect the plants and the building. First of all, it must be a high-quality antiseptic that will destroy all dangerous microorganisms living in the soil.
When considering the question of which is better, a greenhouse or a greenhouse, it is also worth considering that the first option is often installed on open ground, and the structure can be moved to a new location from year to year. But the greenhouse is a stationary structure, and it will not be possible to move it without effort.
Another important point is how to make beds in a greenhouse. Here you need to start from what kind of crop you plan to grow. For example, if you start building a greenhouse for peppers with your own hands, then the width of the bed should be at least 80 cm. At the same time, the paths should be thought out in such a way as to provide free access to each plant.

The most convenient DIY greenhouse: video instructions for making
After watching the video, a DIY greenhouse will no longer seem like an impossible task. By following simple recommendations, you can easily make a greenhouse with your own hands from covering material that will meet all your needs and is perfect for effectively growing vegetable crops.
People who like to dig in the soil at their dacha, supporters of proper nutrition, and those who want to make money selling vegetables and berries usually think about creating a greenhouse with their own hands.
Recently it has become popular to build, but glass and plastic film are also used as materials in the “old fashioned” way. When building a greenhouse with your own hands, the initial drawing should be a drawing: without it, work is unproductive, distortions and other unpleasant moments are possible.
The greenhouse design must also include lighting, without which the process of growing vegetables will be incomplete.
Types of greenhouses:
- "arched";
- “house” with vertical walls;
- greenhouse with sloped walls;
- greenhouse with a mansard roof.
- A lean-to greenhouse is an ideal type of structure when it is important for a dacha owner to save space on his or her personal property.
 DIY lean-to greenhouse
 Most often, lean-to greenhouses are erected against the wall of the house facing south, with mandatory further glazing or sheathing with polycarbonate sheets or polyethylene film (which is less common). Moreover, in modern dachas it can be wall-mounted or as a single independent structure.
- A gable greenhouse is a traditional form of free-standing greenhouse, all of the walls of which are made at right angles to the ground. At the same time, the angle of inclination of the roof is 30-40° and depends directly on the lighting conditions and climatic features in the region. The more snowy the winter, the greater the angle of inclination.
 DIY gable greenhouse
 Greenhouse according to Kurdyumov
Characteristics of an autonomous design or a smart greenhouse with your own hands according to Kurdyumov:
- automatic temperature mode inside the building;
- drip irrigation (without human intervention);
- independent soil restoration in containers or beds.
Mitlider's greenhouse
It is considered a special type of greenhouse. You can also make a Mittleider greenhouse with your own hands. Main characteristics:
- innovative ventilation system;
- durable frame due to the presence of spacers and frequent beams;
- location from east to west, which provides plants with sunlight, warmth and light;
- the use of wood as the basis of the structure, which eliminates condensation;
- large dimensions - 12x6x2.7 m, which creates an optimal microclimate for plants.
The standard type of greenhouse according to Mitlider is a vertical building with a gable roof of different heights. Another common option is in the form of an arch with a two-level roof.
- Three-row greenhouses are classified in size as medium and large greenhouses, with a three-row arrangement of beds and two aisles between them.
- Farm greenhouses are structures under film, which are a metal frame covered with film material. A greenhouse is also installed at the dacha. Advantages: affordable price, waterproof and resistant to biological negative processes.
Dacha owners are interested in ensuring that the costs of building a greenhouse with their own hands are minimal, and that its design is cheap and simple. To summarize, the construction is possible from scrap materials, using double-glazed windows, then the greenhouse will be the cheapest.
How to make a greenhouse with your own hands?
 Glass greenhouse
 So we come to the question of how to build a greenhouse with your own hands - do it at home and correctly. Domed greenhouses are usually built if they want something original.
But most often they focus on a simple and cheap, but warm and good greenhouse. And it is not at all necessary to build a large greenhouse on your personal plot - a mini one, preferably heated, is enough for a family.
How to build a mini-greenhouse with your own hands quickly and on a budget?
 Glass mini-greenhouse
 If you don’t have a summer house, then a mini-greenhouse for an apartment is an ideal option. A design on the balcony is also possible, where small containers with soil are installed and something is grown in them.
Greenhouse options:
- from timber;
- from film;
- greenhouse-thermos;
- with a removable roof for cucumbers and tomatoes;
- glass.
It is possible to build any of these types of greenhouses at your dacha with your own hands, the main thing is to build the frame correctly.
IMPORTANT! The manufacture and installation of greenhouses is a simple type of work if the drawings are drawn up correctly. So we build boldly and excitedly await an environmentally friendly harvest in the garden beds.
Do-it-yourself automatic watering and hydraulic cylinder in a greenhouse
Not everyone can appear at the dacha every day, but ventilating the greenhouse and watering the plants in it is very important. To do this, install a hydraulic cylinder and automatic watering.
How to build an automatic watering system with your own hands:
The essence of the hydraulic automatic machine is as follows: when the temperature in the greenhouse rises, this device opens the vents, and when it decreases, it closes them. The hydraulic cylinder does not rely on electricity.
IMPORTANT! The foundation for a greenhouse and ventilation in it are the key to a rich future harvest.
Make a greenhouse with your own hands - photos of the best projects
 DIY metal greenhouse
 Drawings, diagrams and layouts for arranging a greenhouse with your own hands have been prepared, then we proceed to installation. Best projects:
Do-it-yourself greenhouse from a profile
 Small gable glass greenhouse
 How to make a greenhouse from a profile and what pipes to use? Any homemade design necessarily requires a frame. For its manufacture, different materials can be used, but a drawing and diagram are required.
The reliability of a greenhouse directly depends on the material of the profile frame; the most popular are greenhouses made of PVC, wooden elements and steel profiles.
The algorithm for constructing a greenhouse is almost the same for all cases. Let's consider self-assembly of a polycarbonate structure on timber:
Step 1 - We build the foundation of the greenhouse from timber Step 2 - We fix the lower frame of the greenhouse to the wooden base with bolts Step 3 - We assemble the frame in accordance with the instructionsOn the ground:
Greenhouses are also often built with their own hands from:
- plastic and polypropylene (propylene) pipes;
- aluminum profiles and pipes;
You can build a greenhouse with your own hands from polyethylene pipes.
How to make arcs with your own hands:
How to weld the frame components and how to bend the arcs:
A frame made of HDPE is the lightest of all structures, and the production of a greenhouse using corrugated pipes is possible in any area and geometry.
DIY window frame greenhouse
Greenhouses are built from everything, even from old window frames. A pyramid greenhouse is another type that is very easy to build on your site. In this case, the roof is not needed at all, since there is no need for it with this shape. In order for such a greenhouse to stand firmly on the ground and all its structures to communicate with each other, it should be made according to all the rules.
IMPORTANT! Drawings and correct dimensions are required.
Those who don’t want to bother can build a structure on the windowsill and grow either herbs or seedlings. For example, a mini-greenhouse can be made from plastic boxes or containers.
DIY winter greenhouse: fresh vegetables all year round
A greenhouse for the winter with your own hands is the dream of every owner of a personal plot, building which is not a problem. The main thing is that it is warm.
The greenhouse can be:
- wall;
- thermos;
- snowdrop;
- bread box;
- vegetarian.
 Mini greenhouse made of wood
 The “bread box” shape looks like an ordinary bread box used in everyday life for storing bread. It's not difficult to make. It is ideal for seasonal growing of herbs and vegetables.
DIY greenhouse in the ground
This refers to underground and tunnel types of greenhouses.
An underground greenhouse is considered the most rational option when constructing permanent structures and is excellent for cucumbers.
Tunnel greenhouses (“booths”) have recently become popular. Their design serves as protection from bad weather and gusty winds, which guarantees a high and stable harvest with minimal investment. An excellent option for growing peppers and tomatoes.
Of course, a heated greenhouse preserves and increases productivity. And heated floors are often installed in a thermos greenhouse.
To keep the greenhouse warm, water heating is often used. The soil is heated by a water floor. It is very economical. In this case, heating is carried out using water pipes, which are laid either in the ground or in pallets.
DIY greenhouse made of wood
To build a wooden greenhouse, a detailed diagram and drawings are required. Step-by-step instructions on how to build a frame from 50x50 timber:
An arched greenhouse made of wood, covered with cellophane, is very practical and least susceptible to the influence of winds. Moreover, in winter, snow does not accumulate on its surface due to its shape.
DIY metal greenhouse
To build a metal greenhouse, a corner is used, which allows you to correctly calculate the cost and build it with a minimum of costs.
DIY film greenhouse
Film is used for insulation and side ventilation. Farms also often resort to using film. Another format is insulation made from stretch film; the greenhouse is not exposed to natural irritants, such as fungus and mold. Stretch film is completely non-toxic.
A do-it-yourself film greenhouse made from reinforcement is characterized by convenient installation and low price.
Types of film:
- unstabilized;
- heat-retaining polyethylene;
- reinforced;
- polyvinyl chloride.
The film is attached to the frame in two ways:
- using a clip;
- use of coarse mesh.
Do-it-yourself greenhouse automation
 Wooden greenhouse
 More and more often, greenhouses are being automated and equipped with various systems, including ventilation, for which a window and door opening are provided.
Greenhouse for growing
- tomatoes (tomatoes);
- cucumbers;
- greenery;
- peppers;
- strawberries;
- mushrooms;
- seedlings;
- flowers (roses)
will provide you with vegetables all year round. Just make sure in advance that the beds in it are well-groomed and the floors are warm.
A do-it-yourself winter greenhouse is a very pressing topic for everyone who wants to eat the freshest vegetables in winter instead of canned ones. If you approach this issue thoroughly, study the best designs already available, consider various methods of organizing heating and additional lighting, and the materials from which greenhouses are built, then you can build a complete greenhouse yourself, without resorting to the help of experts.
#video_insert_place
The greenhouse frame is in most cases assembled from an iron profile or wood beams, although iron pipes or a plastic profile are also used. Metal is stronger and more durable, but wood suits the local climate and is easier to work with. Before deciding on the material, it is better to know what plants you need to build this greenhouse to grow. Cucumbers, for example, require very high humidity, which will shorten the life of the wooden frame.
#video_insert_place
The next step is to prepare the soil. Its optimal composition is a layer of sand + a layer of turf soil + a layer of humus. To treat such soil, you need to prepare a mixture of a teaspoon of urea and one teaspoon of superphosphate - this way all pests will be destroyed in winter.
So, just as all the elements of the heat accumulator are laid at the bottom of the pit and its ventilation pipes are installed, everything on top needs to be covered with PVC film. This is necessary to ensure that the soil does not get into the heat accumulator and ultimately clog it. On the other hand, such a coating helps create good conditions in the greenhouse for the accumulation of humus.
Do-it-yourself automatic watering for a crazy-type greenhouse.
Reviews:
Sergey Malygin writes: Why use a pump for irrigation? Is it difficult to place the barrel on top? And the pump is only for filling the barrel...?
vik bulik writes: this is the first time I’ve seen a tap filmed on a phone
Rainbow Miracle writes: well done))))
Vasya Pu writes: It seems to me that this is not a pump, but a gravitational coupling)))
Manya Musick writes: Nah.
Firstly, this is cable heating. When you build a winter greenhouse with your own hands, you place special cables at the bottom of the pit that will supply heat. You lay sand on them, and then soil on top. Such a system should perfectly provide heating for even a large winter greenhouse.
Thirdly, this is infrared heating. Special devices are placed under the ceiling of a winter greenhouse and radiate heat. By the way, it is this type of heating that allows you to warm up the building twice as quickly and spend much less energy. Compared to many heating methods, infrared heating is the most advanced way to create comfortable conditions inside a greenhouse. The best projects have just such heating.
A winter greenhouse should be made with a pitched or gable roof. If you are making a structure that will be attached to a house, the roof should be pitched. It will be easier to remove snow from it if there is a lot of precipitation in winter, and it is more convenient to use.
A greenhouse with an earthen layer and a pitched roof will also be relevant. This design will not let heat out, and its characteristics are no worse than other greenhouses. Another good option for a winter greenhouse is a gable structure, where the key elements of the roof are greenhouse frames.
After all construction and sealing work has been completed in full, you can begin arrangement. So, it is necessary to supply water and electricity for lighting to the greenhouse. It is also important to take care of the shut-off valves, which will ensure a high-quality water supply.
When choosing light scattering sources, it is necessary to take into account the characteristics of growing the selected crops. A more important issue is the soil. The substrate is prepared, fertilizers and special additives (feeding) are added. They will ensure fast and proper growth of all vegetables and fruits that have been selected.
When planning to build a greenhouse with his own hands, a summer resident looks for the best projects and tries to choose an inexpensive and convenient design. In this article we will look at the most popular greenhouse designs and the technology for their installation.
 DIY greenhouses - the best projects
The first thing you need to know when choosing a greenhouse project is the time of its active use. According to this characteristic, all greenhouse projects can be divided into two groups.
Greenhouses for summer use
They traditionally grow heat-loving vegetables from May to September. The construction of such a greenhouse is the cheapest - there is enough summer sun and heat to provide the necessary microclimate. A summer greenhouse does not require a massive greenhouse; it does not require additional insulation or installation of heating equipment.

The frame of a summer greenhouse can be made of any material - metal, wood, plastic pipes. Film or polycarbonate is most often used as a coating - they are lightweight, relatively inexpensive, transmit light well and retain heat.
Summer greenhouses are often collapsible and portable. They are installed at the beginning of the season and removed for the winter. Thanks to the mobility of these structures, it is possible to ensure crop rotation without completely or partially replacing the soil in the greenhouse.
Table 1. Popular summer greenhouse projects.
| Type of greenhouse | Description | Advantages and disadvantages |
|---|---|---|
| The greenhouse arcs are made of a profile pipe or profile. Covering: polycarbonate. The design is non-demountable. The greenhouse is placed on a lightweight foundation made of timber or on a solid foundation made of concrete. The greenhouse can be any size. Suitable for growing all crops. | pros: robust design, stable microclimate, good thermal insulation, long service life. Minuses: high price of materials, special tools are required for manufacturing, the frame is susceptible to corrosion and requires regular maintenance. |
| The frame of the greenhouse is made of a metal profile pipe, the covering is polycarbonate. Improved ventilation conditions and increased strength (compared to arched construction). The greenhouse is installed on a lightweight foundation. The dimensions and height of the greenhouse allow you to grow all crops. | pros: increased strength, resistance to snow and wind loads, snow does not linger on the roof in winter, illumination is higher than in an arched greenhouse. Minuses: the frame is susceptible to corrosion, high price of materials, difficult to manufacture with your own hands. |
| The arcs are made from PVC, HDPE or metal-plastic pipes, the coating is ordinary, light-stabilized or reinforced film. Can be used without a foundation or on a lightweight foundation - a box of boards. The height at the ridge is usually small - up to 2 m. The choice of crops is limited by the height of the greenhouse. | pros: inexpensive materials, simple and quick assembly, a wide selection of coating films, high light transmission, the frame is not subject to corrosion and rotting, low weight and mobility. Minuses: fragility of the film, limited dimensions of the greenhouse, low strength of the frame. |
| The frame of the greenhouse can be made of wood or metal, the covering is film or polycarbonate. The greenhouse is made in the form of an extension to the southern wall of a house or other building. The dimensions of the greenhouse depend on the design of the building. Suitable for any light-loving crops. | pros: the price of materials is lower than for a gable greenhouse of the same area, good insulation from cold northern winds. Minuses: restrictions on placement, harmful effects of high humidity on the wall of the building, poor ventilation. |
| The greenhouse is gable-shaped; the frame can be made of a profile pipe, a galvanized profile for gypsum plasterboard or wood. The coating is polycarbonate or film, in some cases glass. The greenhouse is placed on a foundation made of timber, concrete or brick. The greenhouse can be any size, allowing you to grow tall crops. | pros: strong and durable construction, good ventilation, stable microclimate, high light transmission, large selection of materials for construction in different price categories. Minuses: the frame material requires regular maintenance; in winter, the greenhouse must be cleared of snow. |
| The frame is made of wooden blocks, the covering is film. The pyramidal structure is well lit by the sun, but is not suitable for growing tall crops. Most often used for peppers, eggplants, cucumbers and melons. | pros: high illumination, warms up quickly, does not take up much space, easy to build with your own hands from scrap materials. Minuses: a small area designed for a small number of plants, the frame is susceptible to rotting, the coating is short-lived. |


Greenhouses with increased thermal insulation
Unlike summer greenhouses, such structures can be used in the cold season; insulated greenhouses are used for different purposes:
- for spring growing of seedlings, flowers and early vegetables;
- for different cultures;
- to protect plants from severe frosts in northern regions.

Stable temperatures and a favorable microclimate in spring are achieved in several ways:
- well-insulated or recessed structure;
- installation of a ground and air heating system;
- improved lighting, heating and ventilation conditions;
- correct choice of design to reduce heat loss.
The greenhouse frame for winter or year-round use is made of durable materials that can withstand the weight of the coating and snow. Usually a metal profile pipe or high-quality wood is used.

The coating is glass in frames or double-glazed windows, polycarbonate 8-16 mm thick or double film cover. These materials allow you to create the desired level of thermal insulation and avoid unnecessary heating costs.
Greenhouses with increased thermal insulation are installed on a solid foundation, which avoids soil freezing. Plants are grown on beds or shelves; in the second case, the greenhouse floor can be concreted and insulated.
For ventilation and ventilation in winter greenhouses, it is necessary to provide vents in the upper part of the walls or on the roof to prevent cold drafts in the root zone.

Table 2. Popular greenhouse designs with increased thermal insulation.
| Type of greenhouse | Description | Advantages and disadvantages |
|---|---|---|
| The frame made of a profile pipe in the form of double arcs has increased strength and allows you to stretch the second layer of cover from inside the greenhouse. Due to this, thermal insulation is improved. The size of the greenhouse allows you to grow all crops. | pros: high structural strength, excellent thermal insulation, durability. Minuses: poor ventilation, high price of materials, special tools are needed to make it yourself. |
| A high base made of bricks or blocks on a concrete foundation provides good protection from the cold. The frame of the upper part of the greenhouse is made of wood. The cover can be 6-10 mm polycarbonate or glass. You can use window frames. Suitable for growing any crops on beds or shelves. | pros: excellent thermal insulation characteristics, if there is heating, the greenhouse can be used even in frosty conditions, the wooden frame is easy to assemble with your own hands, good ventilation. Minuses: high cost, complexity of construction, requires a concrete foundation. |
| The frame can be made of metal or wood. Covering – film or polycarbonate. The main difference of the design is the asymmetrical slopes and transoms for ventilation in the upper part of the roof. Thanks to this design, an even microclimate and good ventilation are created in the greenhouse. | pros: optimal conditions for the development and fruiting of crops, good lighting, maximum use of solar energy. Minuses: the greenhouse is oriented strictly from west to east, so there may be problems with placement in small areas; the design is quite complex for self-assembly and installation. |
| A feature of a recessed greenhouse is its location below ground level. This allows you to reduce heat loss and heating costs in winter. The recessed part of the greenhouse is made of concrete, the top is made of wood and polycarbonate or glass. Suitable for winter growing of any crops, which may require lighting. | pros: low heating costs, stable microclimate in the greenhouse, the ability to grow plants on beds or shelves. Minuses: insufficient lighting, difficulty of construction, poor ventilation, design not suitable for areas with close groundwater. |
| Heating heat packs emit infrared rays into the interior of the greenhouse, causing objects in the greenhouse to heat up. The heating operates from the electrical network. The shape and size of the greenhouse can be any at the request of the customer. Suitable for all crops. | pros: installation of a heating system is not required, double-glazed windows have good thermal insulation and light transmission, the greenhouse looks stylish and modern. Minuses: the price of double-glazed windows is high, a strong foundation is required for the greenhouse, installation is carried out by specialists. |


The choice of a specific greenhouse design depends on:
- from the requirements placed on it;
- on the purpose and time of use;
- from financial capabilities;
- from skills in working with materials;
- on the availability of the necessary tools.
Below we describe the technology for assembling two greenhouses - a light arched structure suitable for summer growing vegetables, and a capital insulated structure for spring-summer or year-round use.
The tower-type greenhouse, named with the light hand of the inventor, is gaining more and more fans. Its design is simple and economical; the greenhouse occupies a minimum of garden space and allows you to obtain a harvest of heat-loving tomatoes even in the harsh Siberian summer.

Arched greenhouse made of mesh and film
The design feature is the use of scrap materials and simple assembly in a few hours. A greenhouse is inexpensive, it does not require a foundation - just install it on a flat area and make beds or portable shelving inside.


For a greenhouse 3.8 m long you will need:
- welded reinforcement mesh 200x200 mm - 3 cards measuring 2x6 m;
- PVC or HDPE water pipe Ø20 mm – 10 m;
- block for the door frame and frame 50x50 mm - 8 m;
- polyethylene film, sleeve 2 m (web width 4 m) – 10 m;
- binding wire and electrical tape;
- standard film clips – 50 pcs.;
- transparent tape;
- door hinges;
- wood screws or nails.
Tools you will need are a grinder or metal scissors, a jigsaw and a screwdriver, a tape measure, scissors and a marker.
Step 1. Blanks for the greenhouse arch are made from reinforcing mesh. To do this, two 2x6 m mesh sheets are cut to size (it depends on the desired width and height of the greenhouse). The dimensions of the workpieces are indicated in Table 3.
Table 3. Sizes of reinforcing mesh blanks for different greenhouse dimensions.
| Greenhouse width, m | Height 2 m | Height 1.9 m | Height 1.8 m | Height 1.7 m |
|---|---|---|---|---|
| 2,2 | 5,0 | 4,8 | 4,6 | 4,4 |
| 2,0 | 4,8 | 4,6 | 4,4 | 4,2 |
| 1,8 | 4,6 | 4,4 | 4,2 | 4,0 |
To strengthen it, the bottom of the greenhouse is also reinforced with mesh, for which two blanks equal to its width are cut out of the third fabric. The mesh is cut using metal scissors or a grinder.
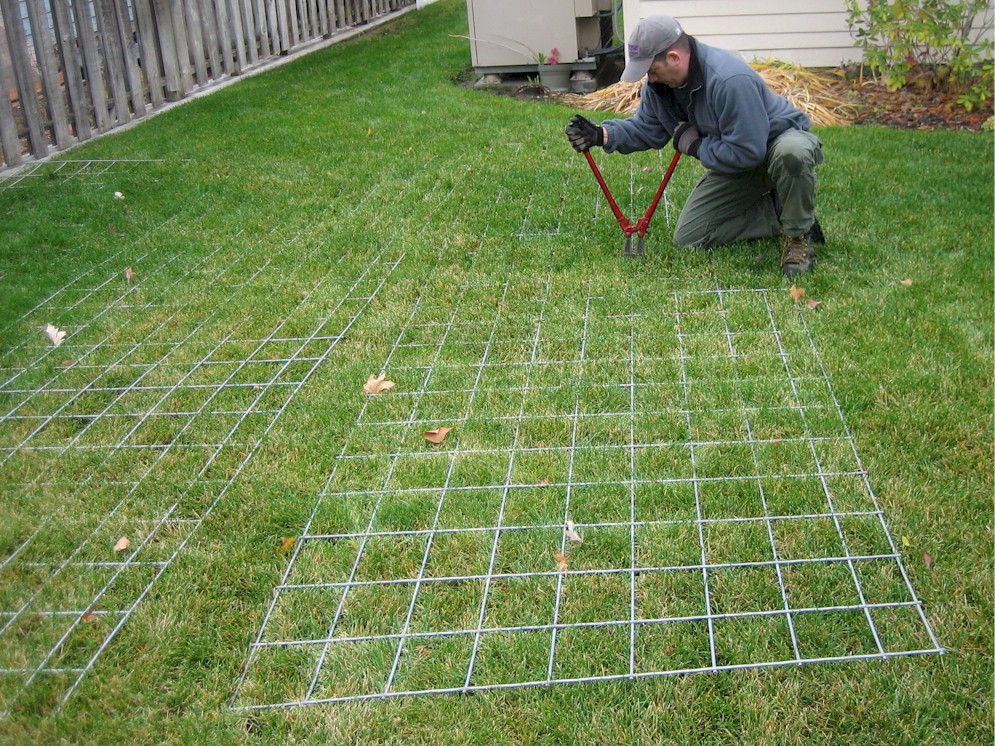
Step 2. The blanks for the lower part are laid overlapping in one cell and tied with wire. Lay the bottom of the greenhouse on a flat area. At the ends, scraps of PVC pipe are attached to it using wire or electrical tape.
The blanks for the arch are connected to each other in a similar way. They are installed in the form of an arc and connected to the bottom of the greenhouse with wire.

Step 3. A doorway and a threshold for one of the end walls are assembled from a 50x50 mm block. The dimensions of the bar are determined locally so that the arch rests on the doorway from above. Set the opening in place.

Step 4. Arches for the end walls are made from PVC pipes according to the size of the arch. Fasten to the mesh using electrical tape.

Step 5. Cut a piece from the film equal to the length of the arch plus 40 cm. Cut the sleeve of the film and get a canvas 4 m wide. Throw it over the arch of the greenhouse, align it so that there are equal allowances on opposite sides. The lower edges are folded under the greenhouse. The film is attached to the end arches using tape, turning it inward and gluing it in several places.

Step 6. Sew up the blank back wall with film. To do this, apply a cloth to it, trace the outline of the arc with a marker and cut out the workpiece with an allowance of 10 cm. The film is secured using standard pipe clamps, the free ends are trimmed and glued with tape.

Step 7 The door frame is assembled from a block and covered with film. Hang in the doorway on hinges. The remaining front end wall is sutured in the same way as the back one.

Step 8 The greenhouse is equipped with beds or shelving. To grow seedlings, you can use straw bales as tables - they will provide additional thermal insulation from the cold spring soil.

Step 9 To create beds, fertile soil is poured into the greenhouse in a layer of 10-15 cm, planting holes are made in it and plants are planted. The mesh located under the fertile layer will not interfere with the development of the root system.
Note! The installation of such a greenhouse takes about 3 hours. In the fall, you can quickly disassemble it and put the parts away for winter storage in the barn or remove the film - in this form it is not afraid of snow loads.

Greenhouse with insulated walls made of wood and polycarbonate
Such a greenhouse can be used not only for summer growing vegetables, but also in spring for seedlings, and in winter for herbs, salads, cucumbers or flowers. The thermal insulation of a greenhouse depends on the lining material and insulation of the lower part. The greenhouse is suitable both for arranging beds and for installing shelves and racks.
 Greenhouse - general view
For the greenhouse foundation you will need:
- concrete grade M200 - 1.1 m 3;
- board 20x150x6000 mm for formwork;
- fittings Ø6 mm.
To build a greenhouse, prepare:
- board 50x100 mm for the frame;
- plywood 10-12 mm thick;
- material for cladding the lower part of the greenhouse of your choice - board, moisture-resistant plywood, OSB board, corrugated board;
- corner metal profile for finishing wall corners;
- metal ridge;
- polycarbonate for lining the top of the greenhouse, you can use, or;
- roofing and wood screws;
- silicone sealant;
- door fittings - hinges, handles, bolts.
You will also need tools: a grinder, a jigsaw with saws for wood and plastic, a screwdriver, a tape measure and level, and a marker for marking.

The overall dimensions of the greenhouse according to the presented drawings are 3.3x3.6 m, the height at the ridge is 2.5 m.
Foundation
A greenhouse for year-round use is a permanent structure, so it is installed on a shallow strip foundation made of brick or concrete. Tape width – 30 cm, height – 30 cm.
Step 1. Prepare the site for the greenhouse - level it, cut off the turf. Mark the foundation with external dimensions of 3.4x3.7 m. Prepare a trench for the strip foundation, 30 cm wide and 20 cm deep. The bottom of the trench is covered with a 10 cm layer of sand, watered and compacted.
![]()
Step 2. Install formwork from boards 20 mm above the ground level by 20-25 cm. They are connected with ties and bevels are placed on the outside. On the inside of the formwork, use a bubble level to mark the pouring line with a marker.

Step 3. Lay two rows of reinforcement from a Ø6 mm bar in the form of a lattice with a pitch of 20 cm, knitting the intersections with annealed wire.

Step 4. The formwork is poured with concrete. Punch it with a rod to remove bubbles. Level the surface according to the markings on the formwork. Cover the foundation with film and leave for 2-3 weeks to gain strength.

Note! In hot weather, the foundation surface must be moistened to avoid cracks.
Step 5. After the foundation has dried, remove the formwork and, if necessary, level the surface with cement-sand mortar. The foundation is waterproofed with two layers of roofing felt or other rolled material, gluing it to bitumen mastic.

Prices for fittings
fittings
Greenhouse frame
The frame is made from a 50x100 mm board, pre-dried in air and impregnated with an antiseptic in two layers. When cutting into individual parts, the sections are also impregnated with an antiseptic.
Step 1. The side walls are assembled according to the sketch: 7 racks 850 mm long, boards of the upper and lower trim 3590 mm are connected using self-tapping screws. The second side wall is assembled in the same way.

Step 2. The rear wall is assembled by analogy with the side ones: 6 racks - 850 mm, boards of the upper and lower trim - 3100 mm, connected according to the sketch using self-tapping screws.

Step 3. For the front wall you need: 4 racks - 850 mm, 4 boards of the top and bottom trim - 1080 mm, 2 door frame racks - 2100 mm, lintel - 850 mm. Assemble the parts according to the sketch using self-tapping screws.

Step 4. The walls are installed on the foundation and connected to each other. Using anchor bolts, the bottom boards of the walls are secured to the foundation.

Step 5. Install the front gable. Boards are cut to maximum sizes: 2 parts 1230 mm each, 4 parts 1220 mm each, 2 parts 1073 mm each, 2 parts 1006 mm each, 1 part 850 mm, 1 part 190 mm. Lay the parts according to the sketch on a flat surface and assemble the pediment, trying on and cutting the sections in place. The parts are connected using plywood overlays or mounting plates. Place the finished pediment in place and connect it to the wall and door frame.

Step 6. Install the rear gable. Parts: 3300 mm – 1 pc., 1220 mm – 4 pcs., 1406 mm – 1 pc., 1403 mm – 2 pcs. Connect according to the sketch, laying the parts on a flat surface. Connections are made using plywood overlays or mounting plates.

When installing a board joint in the center, first attach the middle post. Then, at one end of the struts, a cut is made at an angle of 45 degrees, 108 mm is set aside from the edge and, using a square, a perpendicular to the cut is drawn. The length of the perpendicular will be approximately 19 mm.

Install the assembled structure on the back wall and secure it.
Step 7 Install a ridge beam from a 50x100 mm board with a length of 3490 mm. They are attached to construction corners on both sides.

Step 8 The blanks are cut to maximum length: lower rafters 1220 mm - 10 pcs., upper rafters 1200 mm - 10 pcs. Place the blanks on the outer rafters and mark the oblique cuts.

The rafters are connected to each other using plywood overlays secured on both sides.

The assembled frame is coated with paint or texture impregnation for wood and thoroughly dried, after which you can begin installing the sheathing and polycarbonate.
Sheathing and insulation of the greenhouse
The walls of the greenhouse from the outside are covered with any of the specified materials: OSB, edged boards, corrugated sheets. The top is made of polycarbonate, cellular or monolithic.
Below we describe the technology for installing the most difficult materials to finish - corrugated sheeting for walls and profiled polycarbonate for roofs. You can use materials that are convenient for you.

Step 1. Sheets of corrugated sheet H44-845 are cut using a grinder to the size of the walls: 2 sheets 3950 mm long, 1 sheet – 3300 mm, 2 sheets – 1080 mm. The width of the specified grade of corrugated board corresponds to the height of the walls. You can use any brand of corrugated sheeting, increasing or decreasing the height of the walls.

The sheets are fastened to the bottom frame of the walls every 50 cm, to the racks - after two or three waves of the profile using roofing screws. Attach to the bottom of the wave. The corrugated sheeting is attached to the top trim later, after installing the polycarbonate.

Step 2. The corners are trimmed with a metal corner, it is attached to long roofing screws through the upper wave of corrugated sheeting.

Step 3. Profiled polycarbonate is cut along the length of the walls. As in the case of corrugated sheets, it is better to choose the width of the sheets according to the size of the rafters - 1220 m. In this case, the material does not need to be trimmed. The length of the sheets can be different; it is most convenient to use sheets 4 m long. Polycarbonate is cut to size using a jigsaw with a plastic file or a hacksaw.

Step 4. For maximum thermal insulation, shaped slats cut according to the polycarbonate profile are attached to the rafters. They are fixed with wood screws to the lower part of the profile.

Step 5. Polycarbonate sheets are attached over the profile using roofing screws with a thermal washer in the upper part of the wave. At the fastening points, pre-drill holes with a diameter slightly larger than the diameter of the screws.
The climate of our country is such that it seems possible to harvest some crops only by using greenhouses. Today we have the opportunity to consider a lot of projects, diagrams illustrating designs of different types.
Stationary, prefabricated, arched, single-, double-slope, tunnel... and you also have to be careful with the size. This article will help you decide on the structure of the greenhouse, drawings and projects.


Choosing a greenhouse project
When choosing a structure, you will have to take into account many different factors, from the types of crops that you are going to grow to the layout of the internal space of the greenhouse.
Permanent or temporary?
Let's start with the fact that structures can be collapsible and stationary. The first ones are the most economical option, however, they can only be used in the summer. They are good for growing radishes, onions, dill, lettuce, etc. In addition, they are an option for garden plots that cannot be looked after all year round.
When choosing a greenhouse project made from prefabricated polycarbonate, you must take into account that it is being constructed from a metal profile or polypropylene pipe. This means that when further drafting a greenhouse project, you will have to deal with different types of connecting nodes in the drawings. This is painstaking work that requires close attention and great precision.

Drawing with examples of connecting nodes
A stationary structure is more expensive to construct; it is more difficult to develop a greenhouse project with or without heating. However, this scheme has many advantages:
- The greenhouse can have any size and layout.
- Equipment available inside heating systems allows year-round operation.
- The irrigation scheme can be any - manual, semi-automatic, automatic. The same goes for ventilation.
- The project can be done independently or ordered from a specialized company.

Variant of the greenhouse project diagram, all structural elements are numbered in the drawing
Note: We stop at the diagram of a stationary greenhouse if its estimated area is more than 5 m2. A smaller structure will not justify the construction costs.Arched greenhouse project
Arched greenhouses differ from arc greenhouses in their structure. The design necessarily contains two vertical side walls, which make it possible to use the entire space even when growing tall crops. Such a structure is suitable for both summer and winter use - it all depends on the presence/absence of heating, foundation and frame material.
The design and construction of arched greenhouses is very common. There are several reasons for this: ease of installation of covering material; a properly designed frame can withstand heavy snow loads; The large roof area allows you to create a convenient layout for placing infrared heaters and lighting lamps under it.

When considering project options for all-season greenhouses, it is necessary to take into account the resistance of frames to wind and snow loads
For your information: Inconvenience can only be created by the moment of organizing the roof, as in the diagram above. To bend the profile you will need a pipe bending machine or some other device.Arc greenhouses
Arc or, in other words, tunnel greenhouses can be called the predecessors of arched schemes. Their design and, accordingly, the project will be primitive. Essentially, these are several arcs placed one after another at a certain distance, with or without jumpers. Most often, prefabricated structures of the type shown in the diagram are used to cover greens, early berries, carrots, radishes...
You can also choose a tunnel-type heated greenhouse project. However, it must be taken into account that the required roof height is achieved by increasing the distance between the sides. The height of the greenhouse is always half the width. For example, with a roof height of 1.7 meters, the side walls will be 3.4 meters apart from each other. Consequently, you will have to face a choice: move around inside, bent over, or sacrifice the free space of the local area.

A simple greenhouse project, with your own hands, the structure is assembled very quickly from polycarbonate and metal arcs
Projects of gable and single-pitch structures
This option can be called classic, since before the popularization of arched polycarbonate structures, the design of greenhouses with two slopes was used everywhere. The main advantages of the gable scheme:
- The height can be any, regardless of the width.
- Ventilation under the roof ridge is much better than under the arched greenhouse.
- Snow on a roof made according to this scheme is retained less; it melts off independently.
- The structure can be erected from any materials, wood, metal profiles, old window frames, etc.
You should not choose a project - a gable structure scheme only for summer greenhouses for greenery, up to 1 m high - they will be inconvenient to maintain.

Scheme of a gable frame
The following diagram of a polycarbonate greenhouse illustrates an example of a lean-to building. It has all the advantages of a gable, but we must remember that:
- When placed against the wall, the structure should be located on the south side of the house. This is the only way the plants will receive enough sunlight.
- A free-standing lean-to greenhouse must be oriented with its low side towards where the wind blows most often. Otherwise, the wind loads on the frame will be very high.

Drawing - diagram of a lean-to greenhouse
Preferred sizes
One of the stages of choosing a scheme - a greenhouse project from a profile pipe - is determining the desired dimensions. To begin, let's answer the following questions:
- For what purpose is a greenhouse needed? Tomatoes and cucumbers will require spacious, good-quality shelter, while for growing radishes and herbs, a small greenhouse on arcs will be enough.
- What types of plants are you going to grow? The height of the building depends on the answer. If it’s pumpkins, peppers, berries, we look only at our own convenience; cucumbers and tomatoes can reach a height of 1.5 - 1.7 m, plus the required 30 cm of free space above the tops.
- How much free space is there on the site?
- What perennial plants and trees are located in the immediate vicinity of the assembly site of the greenhouse, the project of which is being created. This, again, is a question of the height of the structure.

Drawing – diagram of a small greenhouse
Note: custom-designed greenhouses can have any size. However, when drawing up a diagram, it is worth adhering to the proportions developed by the experience of gardeners: the length of the building should be twice the width - 3x6, 4x8, etc. We also take into account the width of the beds (from 60 cm), passages (from 80 cm).Greenhouse layout
Now about the layout of the greenhouse inside. When choosing a construction project with a foundation, you need to pay attention to the layout, because the ease of maintenance of plants depends on this. For narrow structures, the best option would be with two beds along the entire length of the sides. If the width of the greenhouse allows, then it would be logical to choose a scheme with three or more rows. The main thing is that the middle rows do not reach the ends of the building to the full width of the passage. The diagram below shows two options for greenhouses of different widths.

The construction of a winter greenhouse, the drawing and project must include the layout of the internal space