Before we dealt with the issue of constructing sauna stoves, we ourselves spent a lot of time studying this topic. Therefore, we know that people who have an idea about the designs of sauna stoves usually do not deign to explain everything from the basics, and most of the texts on the Internet are completely written by those who are not at all in the subject.
Listen to the article
Designs of sauna stoves: general points and differences for different types
So what is a stove? This is a fire built inside a container. But combustion is an oxidation reaction of fuel, therefore, it cannot occur without oxygen. Therefore, we will call a furnace that container through which, at least temporarily, with the dampers open, flowing air moves.
Traction
This movement is called "traction" and it occurs when there is inlet and outlet openings.

Of course, such a definition suffers from incompleteness, because it does not apply to. IN In them, heating occurs due to the passage of current through a material with high resistance. This releases heat.
But let's return to furnaces, where heat is released due to a chemical reaction. The art of the stove maker is to skillfully vary the amount of incoming air and the amount of firewood in the stack in order to achieve them uniform combustion and maximum complete combustion.
What happens if the combustion is still ongoing, but the air is blocked? Instead of carbon dioxide, dangerous monoxide will begin to form - carbon monoxide. But why block the pipe if it is so dangerous? – The draft is blocked so as not to cool the stove when the wood burns out, because heat flies into the chimney along with the air.
So, we know about the role of air. Let's look at a diagram of the simplest draft furnace. What must be present in it? Three things:
- inlet (air vent or firebox door);
- firebox (aka firebox);
- outlet (chimney).
The first division of the stoves can be carried out according to the presence or absence of a blower: Without it, they are called “blind hearth ovens”. In this case, air is supplied through the open firebox door. Here's what both look like in cross-section:

Kamenka
 Now let's ask ourselves: what do all sauna stoves have?, but is missing from the stoves that heat houses? Of course it is heater. All sauna stoves, even electric ones, have a container in which the stones are stored. The stones themselves are used as batteries– they accumulate heat. This is necessary so that the high temperature in the steam room lasts longer. Their other function is creating light steam, but in this capacity they are needed only in the Russian bathhouse.
There are two classifications of heaters according to different characteristics: one takes into account contact with fire in the firebox, the second – contact with air.
If there are gaps between the firebox and the heater through which the flames lick the stones, then this is continuous heater.
If the barrier is solid, then it is called a heater deaf.
When the container with stones is inside.

Stoves are either brick, or metal. There is no other option. The first ones are considered very inertial - It takes hours to heat them up, just like it takes hours to cool them down.. The latter are able to heat up in half an hour and during the same time manage to overheat the steam room. Great property!
When choosing a design, you determine for yourself how inertial its body should be. At your disposal not only “clean” options: pure brick, pure, but also combined. For example, you can increase the inertia of a metal stove either by using internal lining of the firebox and heater, or using external. Moreover, the option with a casing and lining at the same time is not excluded).
Important! Answer the question, what is the optimal time for lighting the stove for you - it is this that determines the degree of inertia of the body.
Smoke
What happens when fuel burns? Heat is released and combustion products are formed - steam, gases and solids. The latter we call soot, soot, and all together - smoke. At the moment of leaving the furnace, this mixture is also heated to several hundred degrees. And if you don’t put some kind of heat-intensive obstacle, all this heat will simply fly away into the chimney to increase the greenhouse effect on our planet.
However, once upon a time, not only were there no obstacles, but there were no pipes either. Because they weren’t made from wood! Therefore, the first method for removing smoke is chimneyless, “black”.
In its simplest version it is pile of stones arched over a fire. In the modern version, it is a brick hearth that keeps the same pile of stones from spreading. But the principle is the same: light a fire under the stones, wait for the wood to burn out, release the smoke into the street through or - and you can steam by pouring water on the heated stones.
Then it appears smoke collector– akin to a kitchen hood – the same separated from the stove. A similar option can still be found in the bathhouse today.
Then appears chimney pipe. And if it is simply inserted into the stove (into the firebox or heater - it doesn’t matter), then such a stove will be called direct flow. Heat here is not taken from the furnace gases, so it has the lowest efficiency.
But heat is a pity, so the inventors’ idea went this way: what if we increase the path that the smoke travels inside the stove? This is how the system appeared smoke circulation, where the smoke runs with obstacles inside channels that lead it up and down, or horizontally to the right and left. The system is excellent for heat extraction, but with its drawbacks - channels, especially horizontal ones, must be cleaned regularly, otherwise there will be no traction.

An alternative to the smoke circulation system is bell stove. It has no channels and is practically independent of traction. Hot furnace gases, leaving the firebox, end up under the hood, where they actively share heat with the furnace mass. New portions of hot furnace gases rise, displacing cooled ones down and into the chimney.

However everything said about the chimney primarily applies to brick stoves. It's rare to see a metal stove with smoke circulation. Usually they are primitive - direct-flow, except that they have flame dividers. And their sizes are much smaller than brick ones, there are no passages, and there is no heat-intensive material - where to take the heat?
The stove ends at the chimney. What remains is optional - tank or heat exchanger, which can also be indicated on the diagram of the sauna stove. But it is better to talk about this when analyzing specific structures, to which, in fact, we are moving on.
Scheme of a stove for a brick bath
From the above it already follows that there are several basic diagrams of a brick kiln:
- direct flow;
- with smoke circulation;
- bell-shaped
However, each allows for many implementation options. In other words, the above diagrams clearly demonstrate the characteristic, but do not exhaust the possible.
Bath stove design: direct flow

Metal furnace with lined fuel core
Lining is the lining of the inside of the stove with fireclay or simply refractory bricks. At the same time, the inertia increases sharply, and with it the heating time. So, if you need to overheat the steam room in half an hour, the lining will be superfluous.
BUT! It has one important advantage: it increases the service life of the furnace, because its body is subjected to lower temperature loads. And this is in addition to the fact that such a stove retains heat longer.
We show the simplest diagram with a firebox lining and a closed heater:

Options for placing a water tank on a metal stove
You have already seen above that you can simply place the tank on top of the stove and everything will heat up. But you can do it differently.
Below - schemes for combining a heater and a tank, from the simplest ones, where a bucket is buried in stones or the heater is placed in a separate container where stove gases enter, and the tank stands directly above the fire (the water will boil before the stones heat up) to variations on the theme of rational use of the top of the stove, where you can separate the space for the tank horizontally or vertically, or you can go around the heater on both sides, leaving an air pocket on one of the opposite sides, which is said to promote heat exchange. Full information is provided.

Options for the location of the tank and heater:

Yes, and of course, always, when there is a need for hot water, you can replace the tank with a heat exchanger of one type or another. If you are interested in learning more about this, read.
Metal heater made of pipe
On our website you can find information about how to make such a heater. Here we will only present the diagrams themselves with some comments.
So, the owner has two options for a pipe stove:
- vertical;
- horizontal.
Usually they take a pipe of half a meter diameter. The figure shows that the pipe can be lined from the inside(or you can leave it as is, then it will burn out faster). The fireclay along the walls is shown in yellow.
The owner is also free to choose a stove with a blind hearth or ash pit. The difference between them was discussed above. But pay attention to the oven door with a blind bottom- in order not to keep it open, holes are drilled in it, which provide air flow if the pipe is not blocked by a damper at the top. If you lengthen it a little due to the blower, then the draft will be regulated by opening blower door. Then the holes become redundant.
The water tank is shown in both pictures, but is actually optional. Some make it lower by welding a metal box with a lid on the side of the stove - this for ease of pouring in the absence of cold water supply in the bathhouse.

The horizontal stove has a completely different structure - it turns out to be a heater open. This is a welded basket for stones - With such a stove you won’t be able to get good steam.

Yes, and in the picture we depicted the grate (under the flame) as recognizable, but in reality its grate perpendicular to the direction you see here.
The water tank is welded to the back wall of the stove.
Useful video
Not just diagrams, but also a description of the advantages and disadvantages of vertical and horizontal structures (not necessarily made of pipes). Plus interesting life hacks.
Even more diagrams, even more explanations about them. However, the main concern of the author of the video is that you succeed. So sauna lovers don’t have to watch it).
We hope that you have received some kind of holistic understanding of what a sauna stove is. Other things can only be learned from practice and experiment. Good luck to you!
Where can I buy
It is also possible to obtain useful information from professionals - employees of different types.
In contact with
Even a solid assortment of ready-made sauna stoves made of metal could not reduce their popularity traditional heaters, built of brick.
Fans of bath procedures, who have experience in using both brick stoves and their metal analogues, unanimously claim that it is brick that can create in a steam room comfortable atmosphere.
The steam is intense, but not scalding, breathe easily, and throughout the entire space of the bath there is a pleasant and soft warmth. Owners of a brick sauna stove are also attracted by the opportunity to choose a design to their liking and create a unique interior with its help. However, not only its magnificent appearance is important for a brick stove-heater.
The first priority of this structure is to heat the room and water and produce high-quality steam. To do this, the sauna stove must be built according to all the rules, using the most suitable high-quality materials. Only in this case will its characteristics meet the requirements for brick.
The most important characteristic brick kiln is power. This characteristic is directly related not only to its size, but also to the quality of the brick and mortar used for masonry.
The sauna stove is built from red heat-resistant brick grade M150, and the combustion space is lined with refractory fireclay bricks.
Important: It is not recommended to use fireclay bricks for laying stove walls, since they are not able to retain heat for a long time.
The thicker the walls of the oven, the longer it will retain heat, but the longer it will take to heat it up. Masonry mortar made by mixing sand and clay, without adding cement, since the seams will collapse when exposed to high temperatures.
The design of a brick sauna stove provides for a closed heater and space for installing a water tank. Stones placed in the space of the heater warm up well, and after watering them with water, the steam room is filled with steam having a comfortable temperature and humidity.
 A well-built brick oven stays hot at least 8 hours, and the heat in the room remains for more than a day. The brick sauna stove warms up for 4-5 hours.
Since the walls of a brick oven have a lot of weight, and the heater included in the design increases it even more, then first stage of construction always becomes the foundation.
Materials and tools
Before starting the construction of a brick sauna stove, you should prepare the tools and materials required for the work. Will be needed following materials:
- red ceramic brick;
- fireproof brick (fireclay);
- fire-clay;
- sand;
- waterproofing material;
- asbestos cord;
- wire for fastening accessories;
- stove fittings (doors, valves, grates).
It is necessary to ensure availability the following tools:
- building level, square and cord plumb line;
- furnace hammer and trowel;
- grinder with abrasive wheel;
- container for preparing the solution.
Special attention attention should be paid to the quality of the sand and clay used to prepare the solution. To work with refractory bricks, it is better to purchase a ready-made mixture for fireclay mortar.
The rest of the masonry is done with a mixture of 1 part sand and 2 parts clay. Sand can be used river or quarry, before preparing the solution, it must be sifted through a sieve.
The clay must be extracted from a quarry with a minimum depth of 2 meters. Before use it requires preparation. The clay must be soaked in water and then rubbed through a sieve twice.
Technology for constructing a sauna stove with your own hands
 It is not so important what design the brick kiln is chosen; it is always built in in a certain order– foundation, stove laying, chimney installation.
The first step is always pouring the foundation.
The best option This work will be completed in advance, along with the construction of the foundation of the bathhouse itself. The foundation is poured in the following order:
- First you need to decide on the location, where the sauna stove will be located. When choosing a site for the foundation, you need to keep in mind that the foundation of the stove should not be adjacent to the base of the bathhouse, but be located at a distance from it. The dimensions of the site must correspond to the dimensions of the base specified in the selected project. The foundation pit is dug to a depth of about 60 cm. To increase the resistance of the future foundation to soil movements, 10-15 cm of its lower part should be slightly expanded. Then the pit area, expanded by 5-10 cm, is filled with sand and compacted.
- The next part of this stage will be filling the crushed stone. Its layer should be filled to a depth of approximately 10 cm and compacted. Next, formwork is assembled from the boards, and then a reinforcing mesh made of steel rods is installed. The mesh should have cells measuring 15 x 15 cm, obtained by fastening the rods with special clamps or knitting wire. The mesh must be fixed so that there is a gap of about 5 cm from it to the walls and bottom of the pit. After installing the reinforcing mesh, a concrete solution is prepared, consisting of M400 cement, sand, crushed stone and water. The pit is carefully filled with mortar so that its surface is 150 mm below the ground of the site. In about a week, the concrete will gain the necessary strength.
- It's your turn dismantling the formwork and filling the resulting voids with fine gravel, carefully compacted. The work on the creation is completed by the creation of two waterproofing layers made of roofing felt filled with molten bitumen. A starting row of bricks is laid in the gap between the concrete base and the surface of the site.
Construction of the foundation is usually no problem even those who do not have special construction skills. Laying a sauna stove with your own hands is much more difficult. A drawing of one of the stove options for a brick bath is shown below. 
Furnace craftsmen not only lay out furnaces of a given configuration without any problems, but are also able to improve its design. Bathhouse owners who decided to do this work on one's own, they usually use ready-made diagrams, on which each row of the future furnace is indicated separately, the number of bricks and even the location of each of them is indicated.
 All that remains is follow exactly according to the existing diagram, carefully install the grates, doors and valves in the intended places, carefully securing them.
Attention! To ensure fire safety, the wooden wall of the bathhouse should not be adjacent to the stove. The distance must be at least 25 cm, and filled with non-flammable material.
Many masters recommend The bricks of each row are initially laid without mortar in order to accurately adjust them to size. Only after such fitting do laying work using mortar. In order for the brick to set better, it must be immersed in water for a few seconds before laying.
When laying it is important to follow for its verticality and thickness of the seam. The horizontal masonry joint should have a thickness of 0.5 cm, the vertical one no more than 0.3 cm. All upper parts of the openings must be reinforced with a metal corner during the masonry process. Having completed the laying of all the rows indicated in the diagram, including the chimney, we can consider that the first experience in independently constructing a brick stove for a bathhouse has been obtained.
 You can make sure that the oven is of high quality only two weeks later. It will take that much time for the solution to dry and for the stove to become one with the chimney. Before you begin to fully use the stove, you should heat it several times in a gentle mode.
When creating a bathhouse, the question of heating it always arises. When choosing from ready-made options, it is better to give preference to the one that will not only be of high quality, but also economical. If you don’t have the funds to build a stone heating source, you can make a sauna stove with your own hands.
Requirements for metal heat sources
When making a stove yourself, it is important to keep on hand the necessary tools, a set of drawings for the construction of homemade sauna stoves, and have experience as a welder. When working with steel sheets, keep in mind that at a temperature of +150 degrees, a change in the properties of iron occurs, at +250 its endurance under constant loads disappears, and at +550 the steel becomes dark brown, which indicates a change in linear properties.
You need to work especially carefully when heating the metal to +900 degrees! At this temperature, unwanted deformation of the future furnace is possible.

Taking these nuances into account will ensure:
- long-term accumulation of thermal masses;
- warming up the bath and raising its temperature in a short time;
- high level of safety for people washing themselves.
In addition, these ovens do not require much space due to their small size.
Pros and cons of metal stoves
The bathhouse must maintain a temperature of +50 degrees. For this purpose, it is recommended to install homemade metal sauna stoves. Their use has the following advantages:
- small-sized structures, which is important for small rooms;
- you cannot suffocate, since such an iron “homemade product” removes combustion products through the chimney pipe;

- Due to the high heat transfer coefficient, the steam room quickly warms up. On average about 1.5 hours;
- shelf life, which directly depends on the quality of the work performed and materials;
- absence of smoke when lighting a bath with raw wood;
- low cost.
Such homemade metal stoves also have some disadvantages:
- small dimensions of the structure exclude use in spacious bath rooms;
- rapid cooling period. In order for the stove to heat, the heat must be constantly maintained;
- high probability of ignition of objects located near the walls of the structure.
Types of metal furnaces
There are 3 options:
- Open – with a small volume water tank and an open heater. To enhance the heat capacity coefficient of such a sauna stove, you will need to cover the stones with a galvanized lid.
- Closed. To increase the heat capacity, the outside and inside are laid out with refractory bricks using metal fasteners, and a special grate is placed.
- Combined. With this option, a complete set is formed: 2 valves, a firebox, a grate, 2 pipes (10 cm and 14 cm in diameter), a blower and 4 holes are provided for a pipe and a bypass elbow. For this, steel sheets about 0.5 cm thick are used.

Sauna stoves also come in cold and hot types. The first is suitable for heated rooms. It is impossible to get burned on its walls, since they only warm up to +50 degrees. The second option does not allow you to control the temperature in the bathhouse and is used when using the steam room irregularly.
Types of stoves depending on the type of fuel:
- electrical - housing with heating element and special elements for heat insulation;
- wood-burning A lot of wood is needed as fuel, a long time to warm up the room and constant monitoring;
- gas. They are convenient and reliable thanks to the presence of a safety device that reacts when the gas supply level decreases or when it is completely turned off.
 Metal wood stove
 Features of heating sources for baths and saunas
In a traditional Russian bathhouse, it has long been customary to provide a lot of steam and less heat. For this purpose, a closed heater is used, located above the firebox. It is lined with heat-resistant brick on the inside while maintaining a small air gap. For such a bath you need to heat the stones up to +500 degrees.
The Finnish sauna requires a low level of humidity - 5-15% and a temperature range of up to +85 degrees. The heater is used open, with slightly heated stones. To supply steam, just pour water on it.
Main components of metal furnaces
Their presence is provided in all bath structures.
Firebox
This is a two-chamber device. The upper part (furnace) is necessary for burning fuel, and the lower part (ash pan) is necessary for accumulating and collecting ash. These two compartments are separated by a grille, and each of them has a door. Often the lower compartment is left open for air flow, using it as an ash chamber. You can also make holes in the firebox door (dimensions 20x25 cm) with a damper to regulate the air supply.
Kamenka
Above the firebox door, located opposite the entrance, rods measuring 1 cm or more are fixed. The door of the heater itself should “look” at the steam room. Next, stones without mica content are placed in it. It is undesirable to use granite. The more cobblestones, the larger the hot surface.  Firebox
It is better to mount a hatch in the upper part of a sauna stove made of metal with your own hands to create access to the bottom of the compartment and ensure maintenance of the heater. A chimney cover is installed above it. The last stage is the installation of a water tank.
Chimney
This is a pipe for removing the resulting smoke and heating the water supplied to the stones. The chimney must be insulated, as due to its high temperature it is easy to get burned.
Its dimensions must correspond to the dimensions of the iron stove. The thickness of the passages should be equal to half a brick.
It is better to purchase a chimney already assembled with an outer pipe, an internal chimney, and a deflector.
Tank
It is mounted above the firebox. A tap is built into its lower part to gradually supply liquid to the hot stones. On the chimney side, the tank is covered with a steel semicircle with a hole for the chimney pipe. A lid with a handle is mounted on the part of the container that will be filled with water. Just like the chimney, it is better to buy a ready-made tank.
Additional items
These include doors and grilles. To save time, they are purchased ready-made.
Making metal stoves with your own hands
There are many drawings and options, but the set of constituent elements is approximately the same.
Tools
To get started you will need to prepare:
Grate for the furnace
Important nuances
You first need to determine the location for the future structure. If necessary, a foundation and two rows of bricks are laid. A pit 70 cm deep is made under it. Its bottom is sprinkled with sand and broken bricks on top. Next, the frame and formwork are installed, after which the surface is filled with concrete.
 Foundation for a metal sauna stove
 Important to remember:
- the gap between the stove and the wall is at least 1 m;
- Foil must be attached to the wall near the structure;
- it is better to make a chimney from a sandwich pipe with a heat-insulating layer;
- at the junction of the roof and the chimney it is necessary to form a passage unit;
- It is better to surround the structure with bricks to prevent burns.
Stove-heater
This simple variety has several ways to create it.
Option 1
Using an iron barrel without a bottom or top. The resulting container is half filled with bricks placed on edge and a grate laid on top. Stones are placed in the remaining 2/3 of the space and a chimney is installed. At the end, such a homemade stove in the bathhouse is covered with a lid made of sheets of steel.
Option 2
Bricks are not used for the construction of the stove. Sequence of work:
- Prepare diagrams and necessary tools.
- In a long pipe, cut a hole for the blower with dimensions of 5x20 cm. Inside the pipe above it, fix the mount for the grate.
- For the firebox, make a hole 25x20 cm. Above it, mount fastenings for rods, the size of which is about 1 cm.
- On the other side of the oven, create a hole into which the liquid will flow. Place stones in the heater.
- Make a slot for the chimney. Install a tap at the bottom of the pipe.
- Form a lid on the heating tank with a slot for the chimney, a hinge and a handle.

Option 3
This stove has 2 heaters. It is made by analogy with the previous ones. The difference is that 4 plates are used to connect two heaters.
Other possible varieties
In addition to stoves, the following are relevant: 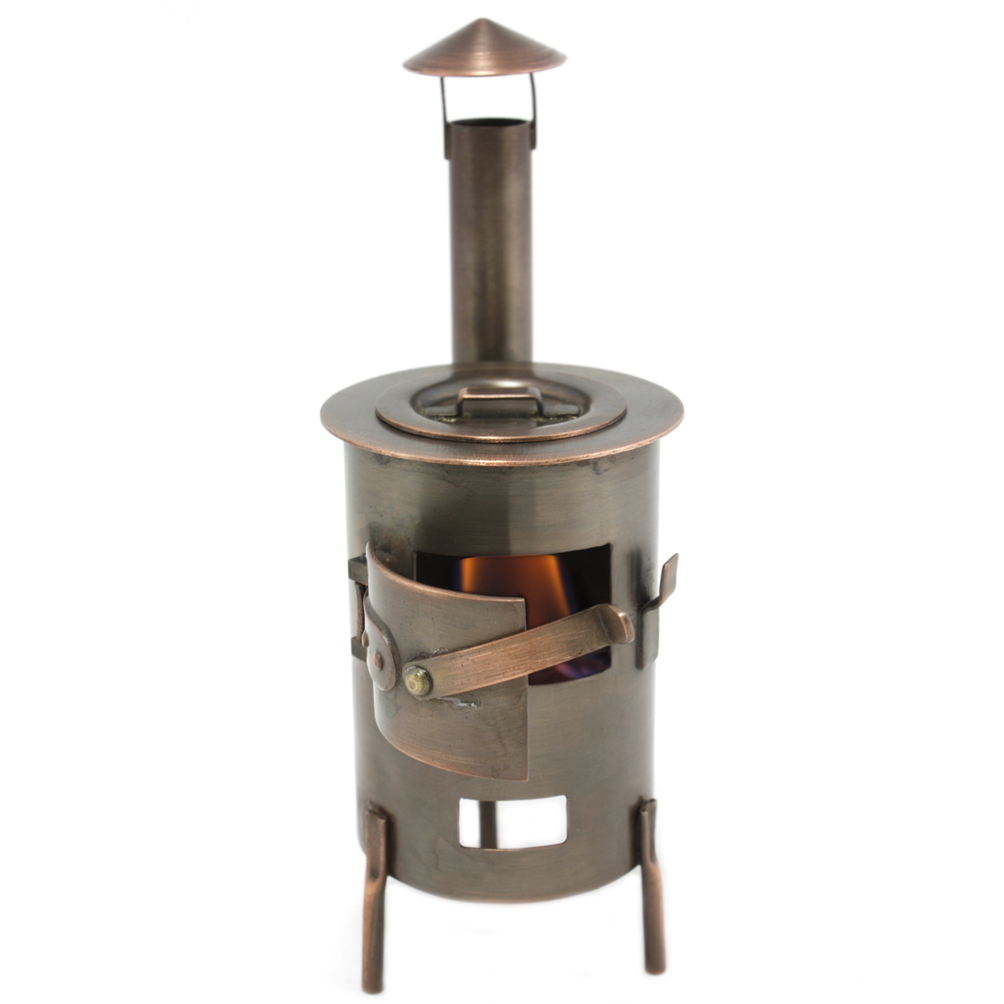 Potbelly stove
- a conventional horizontal oven. A propane cylinder and scrap metal scraps are used. Openings for the doors and chimney are cut, a grid of grates is fixed to the corners, and the lid is installed in its original place. Legs and doors are installed;
- vertical boiler for a bath. It consists of a firebox, a water tank and a closed heater. It will be necessary to pre-form blanks for the bottom of the lid and partitions, and carry out the process of welding round grates. The constituent elements are made according to the scheme described above.
Many drawings of sauna stoves made of metal provide for horizontal and vertical design options with the firebox opening into a separate room, with a closed and open heater. A homemade potbelly stove is also common. This is an ordinary metal box with a door and a pipe. It requires a lot of fuel with a low heat transfer rate.
Final finishing
Regardless of the type and size of the sauna stove, the structure must be treated with heat-resistant enamel. To do this, the surface is degreased, and then the organic composition is applied in several layers. 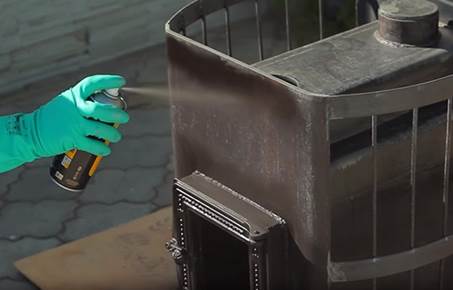 Application of heat-resistant enamel
Finished furnaces cannot be put into operation immediately. First of all, forcefully or naturally dry the bathhouse.
By following these tips and having experience in welding, you will get a stove that will bring you joy for many years. Choose an option that will optimally fit into the bath room and will not “eat up” additional space.
Convenient and easy-to-use metal stoves have become widespread in recent years. But most sauna lovers and connoisseurs still prefer classic brick stoves. This is not at all surprising, because it is a stove made of classic and familiar brick, and even made by hand, that provides the greatest comfort and soft warmth when visiting the steam room. In addition, the appearance of brick stoves, with due attention to this issue, can provide additional aesthetic pleasure. As a result, despite all the wonderful properties of metal stoves, they are still significantly inferior to brick stoves in terms of frequency of use and popularity among steamers.
Types of brick stoves for baths
Before answering the question of how to fold a stove, you need to decide on its type and design features. A brick stove for a bath can be one of four main types:

The main types of brick sauna stoves are listed above. Domestic craftsmen have come up with many combined options, but listing them would take a lot of space. The main points are shown below in the photos and drawings:

The dimensions of a brick stove for a bath are chosen by the owner independently. Most often, structures are made whose base has the following dimensions:
- 890*1020 mm, which is 3.5*3 bricks;
- 1020*1290 mm, which is 4*5 bricks.
The height of the stove is usually taken to be 1.68 m or 2.1 m (excluding the height of the chimney). The second option can only be used in baths with a high ceiling in the steam room.
The most common furnace design is a type in which there is a water circuit in the form of a tank for heating water (an example is shown in the photo below).

It can be located either at the bottom of the structure or at the top. Another option is to have a hob on which water is heated in large containers. This option is characterized by faster heating of the room, but is much less convenient to use compared to a storage tank.
Safety requirements for the location of the furnace
The design of any stove implies the presence of two factors at once that affect the safety of people’s lives: the combustion process and the very high temperature of some elements. Therefore, in order to ensure the safe operation of the stove in the bathhouse, the following requirements must be met:
- the position of the stove is on the wall opposite the shelves;
- the minimum distance from heating structural elements to combustible materials is 0.3-0.4 m, when insulating from asbestos cardboard - 0.15-0.2 m;
- the assembly of the chimney passing through the roof/ceiling must be insulated using some kind of fire-resistant material, and covered on top with a special metal cover;
- the area in front of the furnace firebox is additionally protected with a steel sheet at least 1 cm thick.
The list of requirements required to comply with safety is not limited to the items listed above, but these are the most important activities.
Materials and tools for laying a brick oven
When performing masonry work on building a brick kiln with your own hands, you will need the following materials and tools:

After preparing all the necessary materials and purchasing tools, you should proceed directly to the work.
Stages of work production
Before starting work, you need to decide on the type of furnace. There are a huge number of different project options. An approximate order of one of them is shown in the figure.

Foundation and foundation construction
The foundation is usually already completed by the time of construction of the furnace, since it must be designed initially and carried out together with the rest of the foundation structures. It is necessary to waterproof it, which is necessary for the normal operation of the structure. The dimensions of the foundation must exceed by 0.1 m the dimensions of the planned furnace in all directions.

If there is no foundation, work on its construction is done with your own hands in the following order:
- a pit is dug 0.5 m deep;
- a base is made of sand 10-15 thick, which is spilled with water;
- The next layer is crushed stone, broken brick, and stones. It is poured with a concrete solution consisting of 1 part cement and 3 parts sand;
- another layer of crushed stone, broken bricks and stones is completed. If necessary, formwork is carried out and concrete is poured to the required height;
- the top layer of the foundation can be made of brick with mandatory waterproofing.
Two layers of roofing felt are laid directly on the foundation. Then a continuous row of bricks is laid out. But these works are considered in one of the subsequent stages.
Preparation of masonry mortar
Clay-sand mortar is used for laying the furnace, since cement has low resistance to high temperatures. First, the clay is kneaded, then water is added to it and, using a puncher from mixers, it is mixed until it becomes thick sour cream. After this, sand moistened with water is added. The total ratio of solution components in the final version of the finished solution should be approximately 1/1.
It is necessary to prepare the solution as needed, as it quickly loses its quality.
Furnace laying. 1-5 rows
Before you start laying bricks, you need to install the first cleaning door using wire. Also, ordinary galvanized wire with a diameter of 3 mm is used to install the remaining elements of the furnace: furnace doors, etc. To ensure that the wire does not interfere with the masonry, it is possible to cut special grooves in the brick.

- the brick must be soaked in a container of water before laying it;
- the solution must be applied to the previous row of bricks made earlier;
- lay the bricks with the smooth side towards the chimney;
- before laying on the mortar, carry out a trial laying of bricks;
- It is necessary to clean up the remaining solution every 3-4 rows. The solution is not removed from the inside, but washed off and then wiped dry;
- The laying of each row ends with checking its verticality and horizontality.

Installation of a water tank, grate and fire door
Depending on the chosen project, after completing a certain row of masonry, it is necessary to install a water tank and a grate. Elements can be purchased ready-made or made by yourself. This work is not particularly difficult; for greater reliability of the structure, you can also use the wire mentioned above. Particular attention should be paid to the fact that the grate should not rest against the brick on its sides, since after heating and expansion it can deform the adjacent rows of bricks.
When installing a fire door, the same principles apply as for an already installed cleanout door.
Furnace laying. 6-8 rows
At this stage, as perhaps earlier, adjustment of the bricks may be necessary. Its necessity is caused by the discrepancy between the actual dimensions of the brick and the standard ones.
Installation of the stove
The main rule is that the slab must be positioned in such a way that its edges overlap the bricks by at least 20-25 mm.
Furnace laying. 9 row
In fact, the construction of the stove itself ends with the laying of the ninth row. Next, the chimney is laid.
Chimney
The selected stove design must also include a chimney. It should be taken into account that its dimensions should generally correspond to the size of the brick kiln structures. The folded chimney is installed on the roof and must rise above it by at least 0.5 meters. As a rule, the chimney design involves an asbestos pipe lined with brick.

An example of laying a brick stove in a bathhouse is shown in the video:
After all masonry work is completed, the resulting furnace structure is allowed to dry for several days. Then a test fire is carried out with a small amount of firewood. Once the excess moisture is completely gone, normal operation of the oven is possible.
Conclusion
Laying a brick stove in a bathhouse is one of the most important and significant stages in the construction of a structure. Its correct and competent implementation guarantees the comfort and convenience of visiting the bathhouse, as well as the efficiency of its operation.
When asked how a metal stove differs from a stone stove, many answer with a smile and without the slightest hesitation - the material of manufacture. For such an answer you can give a three on the five-point knowledge assessment system. To get a higher score, familiarize yourself with the main and fundamental differences; this knowledge will be very useful to you when making a metal sauna stove with your own hands.
The stone oven is made of heavy bricks and therefore has a large mass. And all bodies with a large mass are characterized by significant inertia - they heat up for a long time and give off heat for a long time. This is not bad for a bathhouse, but only under one condition - the firebox design must ensure the maximum combustion temperature of the wood, otherwise you will have to heat the premises for a long time.
A metal stove, on the contrary, has a low mass, heats up quickly and cools down just as quickly. These features put forward fundamentally new requirements for the firebox; the wood in it must burn for as long as possible. This is the only way to keep the oven hot for a long time.

Another important requirement for the firebox is related to the characteristics of the steel. When heated to just +150°C, martensite begins to decompose, it recrystallizes and polygonizes, and the physical properties of the metal change.

Look at the table, at this temperature the metal furnace does not change color, it seems to us that everything is normal, but this is no longer the case. Low-temperature tempering occurs at metal temperatures up to +250°, steel loses its resistance to dynamic loads.

The dark brown color of the furnace indicates that the metal has heated up to a temperature of +550°C, and at these temperatures medium-temperature tempering of steel begins, martensite turns into ferrite and cementite. Crystalline transformations of a metal change its linear characteristics. Have you noticed that sheet iron does not return to its original size after strong heating and cooling? It may swell, lose linearity, etc. The appearance of the stove becomes “very original” and far from the original.

But quite often the metal stove heats up even more and turns bright red. This color appears at a heating temperature of +900°C. And this is already a high tempering, the metal becomes very soft and ductile, and the phenomena of residual deformation increase significantly. The stove may warp, and the welds may not withstand the static forces that appear. How to prevent such negative phenomena? It will not be possible to completely get rid of them, but there are ways to minimize them. They will help increase the operating time of a metal stove and improve the comfort of bathing procedures by increasing the time it takes to maintain a favorable temperature in the room.

We are confident that this knowledge will help you minimize the negative consequences of heating a metal stove too much. This can be done in two ways: special preparation of the metal and the peculiarities of the firebox design.
Preliminary metal preparation
After all the individual elements of the furnace have been cut out, first release the most heated parts. The sides and top parts and the firebox door heat up the most. Heat them in any way until red and cool slowly. After the holiday, the sheets may warp a little, this is not a big deal; use a hammer to straighten them to their original state. Check the dimensions again, if they have changed within noticeable limits, cut to the required parameters. This simple method will prevent the stove from warping during its operation.


Design features of a metal furnace firebox
Most metal stoves produce the maximum amount of heat in a minimum time, firewood burns out very quickly, and surfaces heat up to high temperatures. It is impossible to maintain a normal and stable temperature in the steam room - you have to often add firewood. The room is either too hot or too cold. Why is this happening? Such ovens in most cases have grates. Their presence is justified in stone ovens; we have already mentioned that these ovens need to be heated quickly. Strong combustion of the flame is ensured by a large amount of air entering the flame through the grate.

Grate bars are made of metal rods, sheet metal with numerous drilled holes or cast iron, differ in hole sizes, etc.

The firewood lies on the grate, the air flow is not regulated in any way; on the contrary, all measures are taken to increase draft, which automatically speeds up the combustion process. The top part of the oven heats up the most, a little less than the side, and the bottom and front heat up slightly.


Sheet steel prices
Sheet steel
This combustion mode has an extremely negative impact on both the longevity of the stove and the comfort of staying in the steam room. You have to periodically fill the fire with water; if there is not enough water, the flame will quickly flare up again; if there is too much, the combustion may stop altogether. In a word, a bath day brings a headache instead of pleasure.
What do we offer? The solution is very simple - do not make grates with a ash pit, let the firewood lie at the bottom of the stove, and not on the grate. Seal the firebox door as much as possible; you can use asbestos cord or mineral wool around the perimeter.

Make holes in the firebox door with an ordinary movable damper to regulate the amount of air supplied. One load of firewood in such a stove will burn for more than an hour; it is possible to regulate the heating temperature of the surfaces. In addition, the entire area of the stove will warm up. Due to the absence of a grate and ash pan, the work on making the stove was simplified, and the efficiency and ease of use increased.


As you can see, all the knowledge was useful to us; it can be used not only during the manufacture of a stove for a bath. We've sorted out the theory, it's time to move on to practice.
Brief description and dimensions of the metal stove
Our design will have a separate tank for heating water and a heater built into the top of the stove. The flame heats the heater from all sides, this significantly increases the efficiency of the stove. You can take arbitrary sizes, take into account the parameters of the steam room and the number of people washing at the same time. We give the dimensions of our stove as an example.
- External heater. Width 50 cm, length 50 cm, height 80 cm.
- Internal heater. Width 40 cm, length 40 cm, height 50 cm. The distance between the walls of the inner and outer heater is five centimeters around the perimeter.
- Bake. Width 50 cm, length 90 cm, height 50 cm. You can change the length of the stove, make it only for an external heater 50 cm long (then the water tank will have to be mounted on the side on stops) or increase the length to increase the volume of the tank.
- Water tank. Width 40 cm, length 50 cm, height 60 cm. The tank holds 120 liters of water, which is enough to wash three or four people. Of course, hot water needs to be diluted with cold water.
Instructions for making a metal furnace
Step 1. Prepare materials. For manufacturing you need sheet steel, the thicker the better. But this can be very expensive, we recommend using sheets with a thickness of 1.5÷2.0 mm.

Metal sheets 2 mm
Step 2. Make a sketch of the stove indicating all dimensions and parts. Count the number of parts and their total area. This will help you decide on your sheet metal needs.


Diagram - example of a sauna stove
Step 3. Transfer the dimensions to the metal, cut out all the elements of the stove. Strictly observe the angles, they should be equal to 90°, make the opposite sides as identical as possible. You need to cut metal with a cylindrical grinder, follow safety rules. The grinder is a very dangerous tool, you shouldn’t joke with it, you can end up with too serious injuries. Burrs should be removed after cutting the workpieces. Before starting welding, double-check the quantity and dimensions of all parts.
Welding the furnace
Carry out work on a level surface, free the workplace from foreign objects. Let's start with making a heater for the stove.
Step 1. Place two sidewalls on the edge at right angles and start making tacks.

Adjust the current strength; the electric arc should not overheat the metal - the seam will be uneven and fragile. Tack a few millimeters at a time; 4–5 tacks are enough for one corner. Constantly check the position of the sidewalls. After cooling, the weld seam moves the sheets to the side; align their position. Check the corners with a square. In the same way, grab the two remaining sides of the heater.

Step 2. Place the two prepared pieces together, adjust the corners if necessary and grab the opposite edges of the heater. You now have a heater box, all that remains is to make the bottom and lid.

Four connected blank sheets forming a box
Step 3. Grab the bottom and lid. When cutting blanks by hand, it is impossible to achieve ideal dimensions; there will always be deviations. This is not scary; before gripping the bottom and lid, install them in such a way that the difference in size is approximately the same on all sides. Gaps of a few millimeters will be welded without any problems. To prevent the lid from falling into the box, place one side on any stand, the main thing is that it is thin and does not disturb the desired position of the part. Make several tacks on each side of the heater; as always, pay attention to the position of the elements and, if necessary, correct deviations.
For the bottom of the internal heater, it is better to take a sheet 10 mm thick. This accounts for the main “blow” of the flame; a bottom that is too thin can burn out quite quickly and smoke will begin to flow into the steam room. When the heater frame is completely sealed, apply full seams.

Step 4. Make a door in the heater. Lay the box horizontally and mark it. You can cut a hole with a grinder or welding.


In our version, the heater consists of two parts: internal and external. The outer one should have dimensions around the perimeter larger than the inner one by about 10 centimeters for the passage of flame and smoke into the chimney. The internal heater is installed in the external one on pipes, the diameter of the pipes is arbitrary.
Step 5. Make holes in the lower part of the outer heater for the pipes, on which the inner heater will stand. If you don't have pipes, you can use metal rods or fittings. Make sure that the holes are horizontal and at the same height on both sides of the sides of the outer heater.

In the same way, grab the outer heater, stove firebox and water tank. Cut holes in the firebox for firewood. We recommend making holes in such a way that the cut parts of the sheet can be used as doors. To do this, make holes in the firebox 1 cm larger than in the heater; from this blank you can make a door for it - material is saved.
Video - Making a metal stove for a bath (part 1)
Assembly of individual furnace elements into a single structure

Step 1. Prepare four plates for welding two heaters. The dimensions of the plates in length must correspond to the dimensions of the opening of the external heater.
Step 2. In the upper part of the outer heater, cut holes for the chimney pipe. The dimensions of the hole must correspond to the pipe you have and provide the necessary draft in the firebox.
Prices for chimney pipes
chimney pipe
Step 3. Weld metal strips approximately 2 centimeters high around the perimeter of the hole in the stove under the heater; the dimensions of the opening should correspond to the dimensions of the external heater.

Weld a 45x45 m corner from the inside of the firebox; one side of the corner should go into the hole under the heater and form a square. The side of the square should be 0.5÷1 cm smaller than the size of the heater. The structure will rest on these shelves in the oven opening. To increase the sealing of the heater installation, use sheet asbestos, cut strips two centimeters wide from it and place it between the bottom of the heater and the corner stops. The detachable connection will make it easier to install the stove in the steam room. The stove structures are made of thick steel, are large in size and weight, and it is impractical to weld the heater to the stove. It is much more convenient to make it collapsible/dismountable, this will facilitate transportation and installation.
Step 4. Weld the firebox door on the hinges. Double weld all pre-made structures. It is better to lay the seam from the outside and from the inside.

Step 5. Insert the inner heater into place, it should stand on the pipes and be in a vertical position. Using prepared plates, connect the holes of the inner and outer heater. If the fastening of the internal heater is in doubt, secure it on top with pieces of metal, angles or fittings. These fasteners will be hidden; you can use any scrap metal.


The hole is closed by a door. There is an asbestos cord around the perimeter of the door, the lid is secured with bolts


Step 6. Weld the top cover of the outer heater. Cut a hole in it for the chimney pipe. Check the quality of all seams and correct any gaps if necessary.
The heater is almost ready. The only backward thing is to make a technological hole to clean out the soot falling from the pipe and think about installing the furnace. Soot will accumulate on the lid of the inner heater. Make a hole in the side of the outer wall of the heater, close it with a bolted lid, and use asbestos cord to seal it. Carefully grind all corners with a grinder and remove burrs.
We suggest installing the stove on metal legs. The height of the legs is at least 40 centimeters, asbestos must be placed below, and a metal sheet on top. These are fire safety rules.
Video - Sauna stove (stages of assembling a double heater and installing it on a welded combustion chamber)
Video – Sauna stove (final part)
We have already mentioned that each master can make his own changes and adjustments during the manufacture of the stove, taking into account his own preferences and individual characteristics of the steam room. The changes concern not only the size of the furnace, but also its design. We give some tips for possible use.
It is better to make the legs in the form of longitudinal slides - the pressure on the flooring is significantly reduced, the loads are distributed evenly over several floorboards. This is very important, the stove itself is quite heavy, and you also need to keep in mind the weight of stones and water. To make the legs, any available metal of suitable size is suitable, and for the slide, you can take a 50x50 mm square. The ends of the slide should not protrude beyond the perimeter of the stove, otherwise your legs may be injured.


You can put refractory bricks on the bottom and sides of the stove - the metal heats up less and the heat lasts longer. There are two types of firebricks: heat-conducting (heavy) and heat-insulating (light). The latter are used for laying smelting furnaces; they keep the surfaces cold, despite the enormous temperature inside. Make no mistake, do not take such materials. Fire-resistant bricks for a sauna stove must conduct heat well, pay attention to this. If you plan to lay bricks, then increase the size of the firebox by the size of the brick.

Prices for refractory bricks
fire brick
The doors of the firebox and heater can be made from plates obtained after cutting out the holes. To do this, make the cuts as even as possible; to reduce the width of the cut, use thin disks. Working with them is more difficult and longer, but in the end you will still save time - you won’t have to waste it on making individual doors. It goes without saying that metal is also saved.

The dimensions of the doors will be smaller than the dimensions of the openings by the width of the cut; the doors may “fall” inside the firebox or heater. To eliminate such situations, stops for the doors should be welded on the back side of the holes. You can use narrow strips of metal. It is advisable to weld the stops along the entire perimeter of the holes, and not at several points, this way you will increase the tightness of closing the doors.
It is better to make it from stainless steel; to weld stainless steel you need to use special electrodes. Adjust the current of the welding machine specifically for stainless steel; remember that it is more difficult to weld and requires some experience.

Prices for stainless steel tanks
stainless steel tank
If small children wash in the bathhouse, be sure to make a protective fence around the stove. It can be portable or stationary, it doesn't matter. The main thing is that the fence guarantees the safety of children.


If during operation of the stove it turns out that its power is not enough to heat the room, do not worry. The heat transfer performance of the stove can be significantly improved by increasing the effective area. Weld any metal plates on the sides and top, they will act as radiators and heat exchangers. There is another way to increase heat transfer. To do this, you will need curved pipes with a diameter of approximately 50 centimeters. Weld them to the sides of the stove, one end of the pipe should be located under the stove, and the other above it. As a result of the temperature difference, a draft will appear in the pipes; cold air is drawn in from the floor under the stove and thrown out hot above it. The stove will work on the principle of the Buleryan stove.

We recommend making an adjustable air supply on the firebox door. The easiest way is to make a blower from a pipe. You will need a piece of pipe approximately 10 centimeters long and a piece of sheet metal of the same size. Make a hole in the middle of the door to fit the diameter of the pipe. Cut a circle from sheet metal with a diameter several millimeters less than the nominal diameter of the pipe. Drill two holes in the walls of the pipe; they should lie strictly on the same line and on the axis of the pipe. The distance of the holes from the end of the pipe is at least half the diameter, otherwise the damper will not completely block the gap, which will impair the ability to adjust the amount of fresh air supply.
Insert a piece of wire rod of the appropriate diameter into the holes, bend the upper end into a handle. Weld a circle cut from sheet steel to the wire rod, fix the manufactured damper to the hole in the firebox door.

There is another way to make adjustable door openings. Drill holes with a diameter of 10÷20 mm in the lower part, the centers of the holes should lie on the same line. Weld a metal plate at the bottom and top of the holes; the distance between the plates and the door should be equal to the thickness of the valve. The plates will serve as guides for the valve. As necessary, open one or more holes when firing the stove.

These are not all the possible improvements to a metal stove; think for yourself and engage in technical creativity. This process brings real pleasure, trust the professionals.