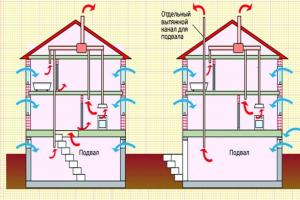
Everyone who owns a private house or cottage has personally encountered, or at least heard of, cases of basement flooding with groundwater and melt water. Mold on the walls coming from the basement, food and things spoiled by moisture, gradual destruction of the foundation of a wooden house - the foundation, this is not the entire list of troubles that can happen to a house in the absence or improper installation of such an important engineering structure as wall drainage.
In an area with a high groundwater level, a depth of only one and a half to two meters will lead to the appearance of moisture in the basement of the building. And the best protection can only be provided by an integrated approach to solving the problem - waterproofing the basement and installing wall drainage of the building.
It is also impossible to do without installing a drainage system on the site in the case where the structure is located on an area with clay soil or loam, and in places where the soil is capillary moistened. According to the requirements of SNIP (building codes and regulations), drainage installation is carried out at the stage of forming a pit for pouring the foundation.
Precipitation and spring melting of snow often lead to excessive moisture in the top layer of soil in a personal plot. Under normal conditions, evaporating from the surface of the earth and seeping into the lower layers of the soil, moisture disappears, taking part in the endless cycle of the water cycle in nature.
However, with a certain soil structure, it is possible for natural waters to hide and, as a result, swamping of the area, up to the formation of small lakes and ponds. Most often, this picture can be observed in areas with clay soil or containing a large amount of loam.
The water-impermeable layer is located at a depth of fifty centimeters to several meters, retaining enormous masses of water and making it impossible to carry out any construction work without first draining the site.
Drainage system is a complex of engineering and technical construction structures, the main purpose of which is to protect buildings and structures from  harmful effects of moisture, built in areas and areas prone to waterlogging.
Groundwater and meltwater, having reached the clay layer, no longer stagnate, but are collected and removed from the site by a complex and carefully calculated system of traps, water conduits, storage and pumping wells.
The most reliable and effective system for protecting a house built on a site with clay soil is wall drainage. The simple design and relatively low financial costs required to install this type of protection contribute to its popularity and widespread use.
Structurally, it consists of drainage pipes laid around the perimeter of the entire building - drains that are used to drain water. They are located at a depth of thirty to fifty centimeters below the level of the foundation cushion. Inspection wells are installed at the corners of the building, at the junctions of pipes. The system of pipes and wells is closed to the last pumping well, located in the lowest place of the site. From it, water flows into a storm drain or natural reservoir.
In the case where the outlet point is located above the level of the pumping well, it is necessary to install additional pumping equipment responsible for pumping out water. In all other cases, water leaves the well by gravity.
Calculation of the wall drainage system of a building
Designing a drainage system requires compliance with certain conditions, on which its efficiency and performance directly depend. Drains should be located with a slight slope, two centimeters per meter of length, towards the pumping well or collecting manifold. Inspection wells are located no further than forty meters from each other on straight sections, and twenty meters from the place where the pipes turn around the corner of the house. Depth  the elements responsible for drainage must be greater than the depth of soil freezing in a given climatic zone. The drainage system of the foundation slab should be three or more meters away from the house.
As an example, you can solve a simple problem. The length of the house is twenty meters and the width is ten. The distance from the house to the pumping well is fifteen meters. At what minimum possible slope will the system be operational?
The length of the system’s drainage pipes will be forty-five meters (ten plus twenty and plus fifteen meters from the corner of the house to the pumping well). The minimum possible slope will be ninety centimeters (two centimeters per meter of drainage pipe length). A typical wall drainage project usually contains a similar calculation.
But the installation of wall foundation drainage is not limited to calculating the required slope. The design of such a system also takes into account the diameter of the pipes - drains, filter materials, the nature and quality of the soil, and the overall throughput of the system.
Structural elements and materials for the construction of a drainage system 
The development of modern technologies significantly simplifies many types of construction work, in particular, the installation of wall drainage of the foundation. The use of plastics and polymers, artificial insulation and synthetic filter fabrics turns what was once a complex and time-consuming task into a one-day job.
Drainage pipes made of polyvinyl chloride, low-density polyethylene or polypropylene are used as water conduits. Unlike earlier plastic pipes, polymer structural elements are flexible, ductile and much less fragile.
The drainage pipe is a polymer structural element with two perforation zones located opposite each other. The total area of the holes ranges from one-half to one percent of the pipe surface area. Drains are available with filters made of geotextile fabric or coconut fiber to protect the perforated holes from clogging with soil particles, or without filters at all. In the latter case, before laying in the ground, the pipes should be wrapped in several layers of geotextile.
The connection of the water pipeline elements to each other, their coupling with inspection and pumping wells, is carried out using elbows and couplings made of polymer material. The main advantages of this type of structural elements are their low price, low weight, ease of installation and durability.
As additional wall drainage, the project often involves the use of profiled polymer membranes. PPM is a polyethylene film equipped with protrusions formed by hot pressing. The height of the protrusions can vary from eight to twenty millimeters. Two-layer membranes are equipped with a layer of geotextile fabric, and three-layer membranes additionally include a smooth polyethylene film.

The membrane is installed on the waterproofed surface of the house foundation, with a layer of geotextile fabric to the ground. By filtering water from the soil and directing it into the pipes of the drainage system, the PPM layer increases the efficiency of the drainage system, while simultaneously increasing the level of waterproofing of the building foundation.
Artificial insulation serves to prevent freezing of the soil at the site where drainage pipes are laid, thereby protecting the system from breakdowns and ruptures due to the formation of ice plugs.
Also, the installation of wall foundation drainage requires the use of natural materials such as sand, gravel and small crushed stone. Of these, at the final stage of work, the main filter layer is formed, directing water from the surface to the drainage pipe system.
DIY drainage system
If, contrary to the requirements of SNIP, a drainage system was not included in the design of the house, and during the construction of the building no one noticed this serious miscalculation, there is an opportunity to correct the situation. On the Internet you can easily find a project for wall drainage of the foundation. Photos and video materials will help you see the stage-by-stage drainage installation performed by experienced builders. And people for whom designing such systems is a job, not a hobby, will be happy to talk about all the possible difficulties and nuances.
The installation of wall drainage begins with preparing a place for laying drainage pipes - drains. At this stage, it is very important to maintain the slope necessary for the effective functioning of the system. Using a laser level, it is necessary to measure the area and mark the places of height difference with poles. Using the stakes as a guide, you should arrange the bed with the calculated slope, adding sand if necessary. As a result, you should get a sandy bed for laying drains, located at the desired angle to the collector or pumping well.
If drainage pipes with industrially installed filters made of geotextile or coconut fiber are used, installation can be carried out directly on the sand bed.
When using drains without filters, a geotextile sheet is laid on the sand bed. It will act as a filter. A layer is laid on the canvas  fine gravel, the main purpose of which is to increase the filtering drainage surface. Next, the drainage pipe is laid, and the orientation of the perforated holes is very important.
They should be located on the right and left sides of the pipe. The non-perforated part should face the sand bed. A layer of gravel three to five centimeters thick is also poured on top of the laid drain.
The protruding edges of the panel are folded overlapping and secured using plastic tension tapes, nylon cord or thread made from any synthetic material. The fact is that plastic and synthetics are not susceptible to the destructive influence of moisture, unlike materials of organic origin.
The resulting roll is covered with sand, which is one of the best soil options for backfilling. In addition, the filtering properties of the sand bed significantly increase the efficiency of the drainage system as a whole.
One of the important conditions for the long and trouble-free operation of the drainage system is good perforation of the perforated holes in the drainage pipes. To comply with this condition, it is necessary to pay special attention to the tightness of the geotextile wrapping of the pipes and the reliability of the fixation.
At the junctions of drainage pipes, in the corners of the building, inspection wells are installed, which are also prefabricated wells. Their main purpose is visual inspection and, if necessary, cleaning of the drainage system.
You can build an inspection well yourself by making a concrete casting, use large-diameter plastic pipes, or use factory-made plastic wells. The simplest and cheapest option is plastic pipes. The most functional are factory-made hatches and wells.
If the water drainage point is located above the level of the pumping well, it becomes necessary to use additional pumping equipment.
When installing wall drainage for the foundation, it is important not to forget to lay a layer of insulating material and make a concrete blind area at least fifty centimeters wide from the wall of the house.
The wall drainage is ready. Step-by-step photos will help you understand each stage of the work performed and will make it much easier to understand the process as a whole.
Suburban areas with ideal hydrogeological conditions are extremely rare. Mostly they come with natural flaws, which can and should be dealt with. So, to withstand groundwater and flood water, wall foundation drainage is installed. It perfectly drains water from underground structures if properly constructed. Agree, for an excellent result you need to know the specifics of the device.
We invite our readers to familiarize themselves with practice-tested information about the principles and rules for constructing wall drainage. Reliable information will be useful to independent craftsmen who want to do the water drainage themselves. The article will also be useful for those who order the organization of drainage from a specialized company in order to control the quality of the work performed.
Here you will find a detailed step-by-step description of the technology for constructing a wall drainage system, as well as recommendations for the operation of drainage. Photo and video applications will provide effective assistance in analyzing a difficult topic.
Purpose of wall drainage
A fairly simple, but accurately designed drainage system performs several important functions.
For example, it effectively protects the ground floor (if there is one) or basement from flooding, which is usually equipped in both cottages and small country houses for temporary residence. A decision on the need for construction measures should be made based on two “signals”: the location of water horizons at a distance of less than half a meter from the lowest point of the foundation or the likelihood of perched water dangerously close to the building.
Another reason for installing wall foundation drainage is the aggressive composition of groundwater. Substances dissolved in a liquid medium have a negative effect on the foundation material, destroying it over time. In this case, it is necessary to calculate the feasibility of double protection - drainage and reliable waterproofing.
Made in accordance with all rules and regulations, the wall drainage system drains a large area around the perimeter of the building, while simultaneously draining nearby decorative and small architectural forms of the landscape
If the arrangement of the blind area is disturbed or there are constant water leaks in the foundation area (for example, due to improper installation of drainage equipment), heaving soils saturated with excess moisture begin to move. To prevent deformation of concrete or brick structures, drainage is also necessary.
Sometimes during the construction of a building it is necessary to carry out measures that provoke a change in the location of groundwater. Accordingly, in these cases it is also necessary to take care of a functional drainage system. Here is a list of some undesirable design decisions:
- installation near the construction of closed areas without proper pumping of liquid;
- an insufficiently thought-out system of drains and storm sewer elements;
- equipment near the house of a swimming pool, pond or other body of water with a broken filtration and emergency drainage system;
- violation of building construction technologies (the filtration coefficient of the backfill is not thought out);
- Retaining walls are installed in the ground to prevent the outflow of water.
Each of these factors can cause foundation flooding at any moment, which will be difficult to deal with in the future.
 If we take into account statistical data, wall drainage is the most common type of drainage in private properties. It protects structures better than others from destruction by water, which inevitably appears during heavy rainfalls or spring melting of snow.
Measures for the installation of drainage structures are carried out based on the provisions of SNiP 3.07.03-85 (specifically on drainage) and SNiP 3.05.05-84 (on pipelines).
The principle of operation of the drainage system
The effect of drainage is fully consistent with its main purpose - removing excess moisture to a safe distance. It would be a mistake to assume that one pipe laid around the perimeter of the house can cope with this problem. In fact, this is an entire engineering and construction complex that combats excess moisture, protecting foundations and basements, but without drying out the surrounding area.
The wall type of drainage is advisable in conditions of clayey soil and loams, when melt, rain and groundwater cannot independently leave the area located around the building. A complex structure of pipes, wells and outlets removes excess water quite effectively, despite the budget cost.
 One of the simplest wall drainage designs: installation of drains around the perimeter of the building, inspection wells in the corners (sometimes two are enough), drainage outside the garden area (+)
One of the popular schemes involves connecting two systems - drainage and storm water - in the area of a storage well, which is usually located at the lowest point of the territory adjacent to the house. In practice, the option is often used when the drainage pipeline is cut into a storm drain, but this is only possible under one condition - if the total volume of drainage does not exceed the standards calculated for the installed equipment.
If the drainage zone is located above the water level in the storage tank, pumping equipment must be installed. A popular option is a submersible drainage pump, selected according to power.
There are two options for arranging drainage around the foundation: traditional and more reliable. Traditional is the installation of pipes with gravel backfill, a filter and a clay lock. Its performance has been proven for decades.
 The clay castle, which is one of the important elements of the system, is compacted in layers to increase water resistance. It cuts off groundwater from the foundation, thus creating an insurmountable barrier for water (+)
More reliable modern drainage is distinguished by the design of the foundation. A geomembrane is fixed across its entire width, the characteristics of which are not inferior to a clay castle.
 Installation of a geomembrane is more economical in terms of construction: there is no need to dig a deep ditch, look for the right type of clay, transport heavy loads to the construction site, or remove excess soil (+)
The installation process is much simpler, if only because there is no need to make calculations and calculate the angle of inclination of the clay “plug”. Now almost all wall drainage schemes include the use of a geomembrane, because it is reliable, practical, fast and effective.
Arrangement technology step by step
The process of installing foundation drainage can be divided into several stages. The first step is drawing up a project, which is best entrusted to a professional engineer. The project must contain general drawings and diagrams, a detailed description of drainage equipment, an action plan, and an estimate.
Step #1: Planning and Executing Calculations
According to the standards, drains are laid along the walls of the building at the level of the foundation base or 0.3-0.5 m below it. This prevents the accumulation of moisture in the upper layers and provokes the drainage of groundwater to the lower levels. The slope parameters are standard - 0.02 m for each meter of pipe. Suppose, taking into account the norm, the difference between the beginning and end of a 40-meter pipeline is 0.8 m (2 cm x 40). These calculations are important for trench equipment.
If the house has a simple rectangular configuration, inspection wells are installed only in 2 corners. Larger buildings with a more complex shape are equipped with 4 wells.
 Throughout the entire pipeline, a slope should be maintained from the highest points towards the storage well, which is located at the lowest point of the relief in relation to the entire section. The outlet from the well is also laid with a slope - but towards the drainage ditch (ravine, reservoir)
When calculating the total length of the pipeline, do not forget that it will be located at a certain distance from the foundation, that is, the length of the branch along one wall will be at least 2 m greater than the length of the wall itself.
If it is not possible to provide a gravity system, it is necessary to connect pumping equipment. When choosing a drainage model, pressure (height of water rise) and performance are important. The optimal power of household models is 400-1000 W.
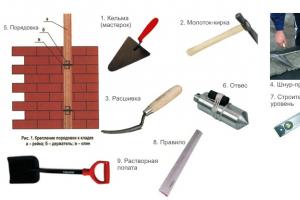
Step #2: Preparing materials and tools
With the advent of new building materials on the market, designing a drainage system has become much easier. Polymer pipes and fittings for them, elastic insulation, geomembrane, geotextiles - all of the listed products can be purchased at a construction supermarket. There is no need to prepare, as before, special solutions for waterproofing the foundation or look around for clay with special technical characteristics.
So, to make a trench you will need the following tools:
- level;
- perforator;
- shovel;
- bucket;
- pickaxe or crowbar;
- wheelbarrow;
- tamper for compacting the backfill.
The main tool is working hands; the more of them, the faster the process of digging and backfilling will go.
 If necessary, you can rent a mini-excavator and a truck for removing soil. Equipment is usually necessary for digging a deep pit, but for drainage of a country house, ditches can be dug manually
To install a pipeline, you need polymer pipes (HDPE, polyvinyl chloride, polypropylene), as well as couplings and elbows made of similar material. Exterior sealant wouldn't hurt either. If the pipe laying area is not below the freezing level, as recommended by SNiP, but at a shallow depth, artificial insulation may be required to prevent the occurrence of ice and ice plugs.
The filter layer is constructed using geotextiles and crushed stone (gravel) backfill with a fraction of 0.3-0.4 cm; coarse sand will also be needed. For waterproofing, you can use traditional bitumen mastics or a profiled membrane, but it is better to use a combined method of protecting the foundation.
Photo review of materials and structural elements:
Coarse river sand
About pipes - in more detail.
Step #3: Selecting Drain Pipes
We will focus separately on the choice of drainage pipes, because they are the main parts of the drainage system.
According to the recommendations of SNiP, ceramics, asbestos cement and plastic can be used, but recently the first two options are practically not used. They are heavier than their polymer counterparts and have a more fragile structure. Plastic pipes (drains) are distinguished by their low weight, which is welcome during transportation and installation, as well as their high strength and wear resistance.
Materials for the production of pipes are PP, HDPE and PVC. Plastic drains do not deform under soil pressure, tolerate the aggressive composition of groundwater, and have a long service life (up to 40-50 years).
 Along with polymer pipes, fittings made of the same material are also used: couplings, adapters, tees. A set of shaped elements should be purchased together with drains
The main difference between drains and conventional pipes is the cuts, which are located on the sides during installation. To protect the holes from clogging with pieces of soil and silt, an effective filter is used - geotextiles. There are smooth and corrugated types, the latter are more elastic and at the same time rigid.
The choice of type, cross-section and method of installation of drains depends on the type of soil and volume of water. For example, if the building construction site is dominated by crushed stone soil, there is no need to take additional measures to create a filter - just dig a trench and install a pipeline.
An economical and practical option for drains is pipes with a geotextile layer. Factory filter winding reduces installation time and increases drainage efficiency
For pipes located in clayey soils, crushed stone bedding with a thickness of 0.20-0.25 m is required, and in loams additional protection against siltation is required in the form of geotextile wrapping. Structures placed in sandy soil require maximum attention: both crushed stone and geotextiles are needed.
Image gallery Photos from Corrugated pipes with perforation Geotextile wrapping to prevent clogging Coconut fiber - natural filtration Drains filled with polystyrene foam
Step #4: Construction of trenches - excavation
Having prepared the material, you can begin marking the place for laying drains. To make it easier to determine the scope of work, pegs are placed along the contour of the trenches and string is pulled between them. Excavation is the most labor-intensive part of drainage installation.
When digging trenches, it is necessary to ensure that the bottom slopes slightly towards the storage tank. For accuracy, a level and poles are used, with the help of which it is easy to determine the height difference. To more accurately comply with slope standards, sand is usually used, which is part of the filter. By the way, when using factory-made drains equipped with a geotextile layer, you won’t need another “cushion” - a sandy one will suffice.
After excavation work, a large amount of soil will remain. Part of it is useful for backfilling; the rest of the soil can be used to decorate a garden plot, lawns, vegetable garden or flower garden
Having built a trench along the foundation, it is necessary to dig a pit for a storage well and another ditch to drain water beyond the fence (if all the water is not planned to be used for irrigation or technical needs).
A few tips based on SNIP:
Image gallery Photos from a clean area in the development area The depth of the trench is greater than the freezing level Trenches or pipes are insulated with geotextiles Crushed stone of various fractions The pipe is laid on a layer of sand A trench around the perimeter of the house A well for drainage - at the lowest point Drains are laid at an angle
Step #5: Waterproofing the foundation with membrane and bitumen
Waterproofing of concrete foundation parts is necessary in any case: even if there is no utility room or storage for canned vegetables inside the basement. A dense layer of protective material will increase the strength of concrete structures and protect them from regular erosion by groundwater if the drainage system cannot cope with their volume.
To treat foundation walls, bitumen mastic is traditionally used - to increase its water-repellent qualities, it is applied in several layers. At the joints of concrete structures, additional fiberglass reinforcement can be made. The thickness of the bitumen layer depends on the laying depth: up to 3 m, a 2 mm bitumen layer is sufficient, more than 3 m - up to 4 mm.
When the bitumen dries, a PPM, a roll-type profiled polymer membrane, is fixed across the entire width of the foundation.
PPM is a dense waterproof polyethylene film with a corrugated surface. Protrusions with a height of 8 mm to 20 mm increase the strength of the material and allow water to roll down freely
More expensive types of PPM are initially equipped with a layer of geotextile. There are also three-layer products, additionally reinforced with polyethylene film. The roll is rolled out along the length of the foundation, trying to leave as few joints as possible.
Layout of drains and waterproofing. The membrane is mounted with its spikes facing outward, towards the ground. If there is no factory layer of geotextile, it is fixed separately, on the side of the protrusions
The principle of operation of membrane protection is simple: water seeps through geotextiles, collides with waterproof polyester material and rolls down to the drainage pipes.
Depending on the method of waterproofing the foundation and laying drains, it is necessary to prepare separate building materials:
Image gallery Photos from Coarse and clean river sand Drainage backfill made of crushed stone Gravel - river or sea pebbles Geotextiles for pipe protection and filtration Coating waterproofing - bitumen mastics Fused or glued roll waterproofing Penetrating compounds - Penetron, Hydrotex Profiled membranes for waterproofing
Step #6: Laying the Perimeter Pipeline
Let's assume that the required slope of the trench bottom (2 cm/1 m) is taken into account at the excavation stage. The generally accepted method of laying pipes looks like this:
- Pour a layer of sand (0.15-0.20) m onto the bottom.
- Rolled geotextiles are spread along the entire length of the trench, the edges of the fabric are secured in the upper part of the trenches.
- A thick layer (also at least 0.15 m) of clean crushed stone is poured onto the canvas. After each event, check the slope.
- Pipes with a diameter of 0.11-0.20 m are laid with holes to the sides, short fragments are connected with couplings.
- If the pipes do not have a protective layer, they are wrapped in geotextile and secured with polymer twine.
- At turns, in places of differences and connections of drains, inspection wells are installed. It is possible to use wide-section pipes equipped with covers (they will be required in the future for flushing the pipeline).
- The drains are covered with a layer of clean crushed stone (0.15-0.20 m).
- The free edges of the geotextile are laid with an overlap on top, and for fixation they are covered with a heavy layer of clean river sand (in some cases, up to the level of the ground surface).
At the very end, when all the pipes are laid and technical wells are installed, backfilling is carried out - part of the soil is returned to its place, lightly compacting it.
The patency of the slots or holes in the drainage pipes is an important condition for the operation of the system. Make sure the holes are smaller than pieces of crushed stone or gravel, otherwise the filter media will clog the perforations
When installing pipes, do not forget about the concrete blind area - a necessary protective element that is laid along the wall of the house. The width of the blind area is from 0.5 m to 1.0 m.
Step #7: Installing a drainage (collector) storage tank
The simplest scheme is considered to be one in which the main line is taken outside without the equipment of a drainage well. However, its presence is still necessary if:
- drainage water removed is necessary for irrigating crops or plantings;
- the additional storage device is a backup storage facility for process water;
- There is no possibility of discharging water beyond the boundaries of the site.
In the latter case, they often equip not a storage tank, but a filter well, which, instead of a bottom, is equipped with a powerful filter made of gravel and sand backfill.
For the construction of a tank, bricks and concrete rings are used, but due to progress in the production of special equipment, ready-made factory containers made of polymer material are increasingly being installed.
If it is not possible to arrange water drainage by gravity, the well is equipped with a drainage pump. It is installed under water, at some distance from the bottom surface (submersible) or next to the well (surface)
A durable plastic barrel is mounted on a leveled bottom and covered with soil. There is a hatch in the upper part through which it is easy to access water and equipment.
If you follow the rules listed below, there will be much fewer problems with the functioning of the drainage system.
- Drainage pipes are installed along the lower border of the foundation base. The permissible step up/down is from 0.3 m to 0.5 m. If you lower the drains lower, groundwater and rainwater will systematically wash away the soil from under the foundation, which can lead to subsidence of the building.
- If it is not possible to protect the foundation with a geomembrane, you will have to build a clay castle.
- The level of accumulation of drainage water (drain zone) must be below the level of the finished floor in the basement or cellar.
- Backfilling with river sand is more effective than backfilling with “native” soil.
Considering the dynamic movement of groundwater, be sure to secure geotextiles when installing the pipeline. It should cover the filter “roll” tightly, without gaps.
A properly equipped drainage system lasts 20-30 years, so after installation is complete, you can begin choosing a method for landscaping the local area. One of the popular options is a flower garden
To more effectively remove excess moisture, along with wall drainage, a drainage system and a storm drain are installed - underground or external.
Drainage next to and under the slab
Every person who has encountered a private house knows that sooner or later it is necessary to repair the foundation - the foundation. This happens, as a rule, due to the influence of groundwater on concrete and, accordingly, its erosion.
Properly installed drainage will drain groundwater and protect the foundation of the house.
To prevent this from happening, a water drainage system is used.
Drainage, if done correctly, will completely protect the slab on which the building is located and will not have any negative impact.
As a rule, such a system is installed before the foundation is poured, but not everyone does this, and the situation must be corrected later.
A shallow foundation is popularly known as a slab foundation, which is cast as a monolith under the entire area of the building. Such a foundation is used for small buildings that do not have a very large mass. The biggest disadvantage of such a foundation is the considerable shrinkage that occurs over time. Partly because of it, there is a rapprochement with groundwater.
Ring drainage
Drainage diagram.
- bayonet shovel;
- shovel;
- soil wheelbarrow;
- drainage pipe 100 mm in cross section (ideal);
- crushed stone;
- gravel;
- sand;
- mortar (1 cement, 3 sand, as much water as requested);
- concrete rings;
- concrete ring cover;
- resin for coating the concrete cover and top of the rings.
Types of foundation for a house.
If you do everything according to the rules and pour the foundation on time, then the scheme will be as follows.
- A hole is dug for a slab foundation.
- Dig a trench about 30-50 cm deeper around the foundation pit so that pipes can be laid there.
- A drainage pipe is laid at the bottom of the dug trench. Its characteristic feature is that it is perforated and has a corrugated shell, which allows it not to lose its properties for a long time and perfectly collects water.
- After this, you should fill it with large crushed stone or gravel to close it from the external soil and at the same time leave a passage for water.
- The next layer is sand. You shouldn’t feel sorry for it and you need to compact it quite tightly, but at the same time try so hard as not to damage the structure from below. The sand will simultaneously serve as a filter and extract water from the sides.
- Gravel is poured to the top of the foundation, which will provide free passage for water and remove it away from the foundation.
- From above everything is covered with a concrete blind area.
- Near the blind area, a narrow strip is dug to the level where the gravel begins. Everything is covered with crushed stone on top. This will not spoil the design, and in the rainy season it will remain relatively dry, because... all the water will immediately go into the pipes, and from them into the collector.
Head drainage
Head drainage diagram.
It is installed between the water flow and the room. As a rule, its design is not complicated; the task of drainage is to divert the flow away from the foundation. This is horizontal drainage, but there are also combined types where wells are used. It is used not only for shallow, but also for very deep levels, which makes this protection system universal.
With a closed type of drainage, artificial materials that can wear out over time should be avoided as much as possible, because there will be no way to replace them. The drainage itself should not touch the foundation, but should have direct contact with the top of the underlying underground - this will allow you to complete the direct task and at the same time do everything as efficiently as possible. This type of drainage for a shallow foundation works exclusively proactively, so that not only does it not wash away, but there is not even an approximate possibility of such a possibility.
With a mixed system, this results in a unique structure, because you can organize the flow along the flow of water and you will get an artificially created channel, which simply rises slightly above the main one and then returns to normal. The problem arises precisely because of the manner of the underground flow - water flows not only down, but also up, because... There are two forces acting simultaneously here - thrust on one side and pressure on the other.
Some clarifications
There are some peculiarities during construction. The very first thing is collectors. Many people prefer modern manholes, but experienced people still prefer to see concrete circles with a standard manhole cover in front of them. The reason for this is the maximum available volume. In addition, they no longer need to be placed at a distance of 3 meters, as it is necessary to do with inspection wells, but here it will be enough to place 2-4 on the sides or corners of the house.
All types of drainage systems for shallow foundations have a dominant number of similarities and can be interchangeable or complement each other. For example, if the area of the building is less than 100 m2, and the distance to the water is more than 10 m, then it is not necessary to build a head version and you can get by with a stratum version. Ring drainage is completely replaced by wall drainage in small buildings.
Experienced people immediately purchase electric pumps after installing drainage systems. After the rain, there is no point in watering the garden or filling the shower, but the water does not go away in one day. This is what serves as an additional convenience, because... you have access to soft water that has been filtered simultaneously by several filters - evaporation, gravel and sand. It may be better not to drink such water, but as an analogue of city running water it is quite suitable.
Often people make a mistake and do not remember about the winter period, and this is one of the most important issues - drainage is installed below the freezing level, even if in some cases it turns out to be quite deep.
Main types of drainage systems
There are different drainage systems. However, to eliminate excess water, in any case, you need to install either a well or a common watercourse.

- Closed or as it is also called deep drainage. For its construction, a network of drainage pipes is used, which are buried in the ground. Water from them is drained into special wells. For this purpose, polyvinyl chloride pipes are now used. Their diameter should be 6.3 or 11 cm. The pipes should be corrugated on the outside and smooth on the inside. There are special holes along their entire length. Then the pipes need to be wrapped in geotextile materials or sheets of coconut fibers. Carrying out these activities is necessary to create filtration of sand and soil particles.

- The simplest open drainage. To equip it, open ditches should be dug around the perimeter of the entire site. The depth of each channel should be about 70 cm, and its thickness should not be more than 50 cm. It is better to make the walls beveled, with a slope of approximately 30°. The collected water will flow into one drain, provided for several areas at once. This type of drainage is very convenient during the period of snow melting and precipitation, especially if the area is under a slope. The ditches, which are located across the slope, intercept the flowing water from above, and then direct it into a common watercourse running longitudinally. Then the liquid is removed outside the garden plot.
- Backfill drainage is similar to its closed form. However, in this case, instead of pipes, a trench is simply dug, subsequently filled with gravel or small stones. The top layer of the drainage system is covered with soil.

It is worth considering that backfill drainage is very silty. To prevent this, an additional filter layer of geotextile should be created.
Linear method
Surface drainage can be linear or point. The linear system provides more serious protection. To install it, it is necessary to create an accurate plan for all lines. Usually they are carried out in accordance with the parameters of the perimeter of the site. The point system includes ladders for transporting water, rainwater inlets and drainage systems.
These elements should be installed in the lowest places of the site, under the drainpipes of the roof of the house and in front of the entrance to it.
To install linear drainage, you should dig ditches measuring 50x50 cm or 50x70 cm.
The edge from which water will drain must be cut at an angle of 30°. This will improve water drainage during operation.
All ditches must be connected to a common one leading to a drainage well, which is a buried container into which all collected liquid flows.
At this stage, the ditches should be filled with crushed stone or other material to drain the soil. For example, some craftsmen make fascines from coniferous or birch brushwood. To do this, the twigs are tied into bundles 30 cm thick. Afterwards, they are laid on crossed pegs, which are placed along the length of the dug ditch, and moss is placed on top of the bundles and on the sides. Such drainage can last more than ten years.
As for crushed limestone, it is not worth filling the drainage ditch with it. The fact is that when wet, this type of stone cakes, turning over time into a monolithic structure through which water does not pass. Instead, it is better to fill the ditches with coarse sand.

To create aesthetically pleasing linear drainage systems, the bottom and walls of the trench should be concreted. After the base hardens, trays are installed in the trench, which are subsequently covered with decorative grilles. Such a simple set for open drainage is sold in every hardware store. For better water drainage, place the gutters at a slight slope.
To avoid clogging the catch basin with small debris, install a sand trap directly in front of it, which involves installing a mechanical filter.
This method is, of course, more complex than without using trays, but such a system will last you much longer.
Sometimes volumetric drainage is carried out in areas. It resembles a layer cake consisting of sand, gravel, geotextiles and lawn grates, as well as soil. However, the soil remains loose. This helps absorb excess moisture, which goes into the lower layers.
Installation of a closed drainage system
In order to create closed drainage, you need to purchase special pipes designed for this. For many years, ceramic products were used here, in which holes were already prepared for water drainage. True, today they are practically not produced. Asbestos-cement pipes became an equivalent replacement. True, in this case the holes must be made with your own hands at a distance of approximately 1.5 cm from each other. However, laying such a drainage system is quite expensive.

The more modern type of soil drainage pipes is, among other things, much easier to install. We are talking about a corrugated pipe. If the soil is sandy or loamy, then the best option would be to lay special drainage blocks. They are perforated polymer pipes wrapped with geosynthetic filler, which is laid in polyethylene film. The diameter of the pipe is 5 or 11 cm, and the finished block is 15 and 30 cm, respectively. This way, you will save time on winding pipes yourself. If the soil is crushed stone, then filter material is not needed; you only need polymer pipes.
We define the tasks of geotextiles and drainage wells
Why do experts recommend using geotextiles? It's simple! After all, this material serves as an excellent filter that traps small debris. Among other things, it also absorbs moisture very well. It is used for gentle drying of soil. The material is especially desirable for draining soils with a lot of moisture.
To drain the water accumulated in the drainage system, a container or well buried in the soil is required. This is where water accumulates and is evenly distributed. Moreover, this structure provides the opportunity to monitor the serviceability of the drainage system and carry out preventive work on it. In truth, it is more reliable and easier to buy a plastic well for drainage in a specialized store. But if you really want, you can make the container yourself using reinforced concrete rings.
The well should be located 0.5 m below the level of the pipes. At the top of the water collector you will need to make a pipe to remove excess water or install a pump for this purpose.
Now your finished drainage system can be tested against the natural moisture reserves on the site!
Types of drainage systems
Depending on the severity of the problem of flooding in the area, there are several ways to make drainage around a private house.
Surface drainage
This type includes storm drainage (storm drainage). The advantage of such drainage is that its arrangement is simpler and accessible after most types of work on the site have been completed. Surface drainage systems can only remove rain and melt water; they cannot cope with groundwater.
There are two types of surface drainage devices: linear and point.
Linear drainage
Focused on draining storm or melt water from the entire site and from the house in particular. Water flows into channels dug in the ground and is discharged into a drainage well. As a rule, the channels have a straight linear shape and are closed with gratings.
Point drainage
Focused on the rapid removal of water generated from local sources (for example, under roof gutters, watering taps, etc.). Point drains are covered with decorative metal gratings to prevent clogging of the channel with debris and leaves. Drainage pipes are laid from each point and connected to the main main pipe leading to the drainage well.
Combined drainage combines the two above-mentioned systems: point and linear drainage.
According to the method of installation, drainage can be open or closed
Open drainage
A system of trenches, gutters, drains or drainage trays.
This drainage is a trench that is designed to drain storm and melt water from the house and the site.
The principle of an open drainage system
A ditch up to half a meter wide and 50-60 cm deep is dug along all sides of the site and around the house. All these trenches are connected to a common drainage trench.
In order for water to flow freely into the trench from the side of the house, a bevel is made in the ditch at an angle of 30°, and a slope towards the main water intake trench (or drain well) will allow water to be drained by gravity in the desired direction.
The advantage of an open drainage system is the low cost and high speed of work. But, if you need to drain a large amount of melt and rain water, you will have to install a deep drainage line into which someone could fall. Unimproved ditch walls are destroyed. Such a system spoils the appearance of the site.
The service life and safety of such a system can be increased by using special trays (made of plastic or concrete), which are covered with gratings on top.
Open drainage around the house
Closed drainage
It has a more aesthetic appearance compared to the previous one, as it is equipped with a protective grille, but the receiving ditch is much narrower and smaller. Their types are presented in the photo.
Closed drainage around the house
Backfill drainage - a system of backfilled trenches
It is used when the area of the site is small and it is impossible or impractical to make open drainage. The disadvantage of this system is the inability to carry out maintenance of the trench after installation without dismantling.
Proper drainage around a house of this type is achieved in several stages.
- a trench is dug to a depth of about a meter with obligatory observance of a slope towards the drainage well;
- Geotextiles are laid at the bottom of the trench;
- the trench is filled with gravel, crushed stone, etc.;
- A layer of turf is laid on top. This stage is optional, but allows you to give the site a more aesthetic appearance.
Backfill drainage
Deep drainage
Disposal of a large amount of groundwater requires the construction of a solid system - deep drainage of the site. The device of a deep drainage system is used in areas with clay soil, located in lowlands and characterized by a high groundwater level.
The installation process is labor-intensive and consists of laying pipes (the diameter depends on the amount of water drained) from perforations into deep trenches (depending on the height of the soil water).
Closed drainage - pipe system
Diagram of a closed drainage device, pipes and installation method
How to make drainage around the house with your own hands
Step-by-step instructions for installing closed drainage
- Determine the location of the closed drainage system, which can be implemented in two options:
- pass only near the foundation, i.e. around the house (wall drainage), preventing water from penetrating directly into the house.
- be located throughout the site, thus protecting the basement of the cottage, as well as plantings and other outbuildings.
Closed drainage device (solid, wall)
The drainage diagram around the house is shown in the photo
- Mark the location of drainage ditches on the site. Typically, devices such as a laser rangefinder and a level are used for this. But, you can make it simpler, trace where the water grooves remain after the rain - that’s where drainage trenches should be laid.
- Dig trenches. When digging, be sure to observe the height difference. After all, water should flow to the drainage well, and not accumulate in pipes.
Digging a trench for drainage of a country house site
Advice. To check the “operability” of the trench, it is better to wait for heavy rain and see if there are any places of significant accumulation of water.
- Lay a layer of geotextile. Its role in drainage is to filter water from impurities that could clog the drainage pipe perforations.
Laying geotextiles at the bottom of the trench for drainage
Advice. If you have clay soil, geofabric is a must; if you have crushed stone or sand, then it is not necessary.
You can use any geotexyl, the main thing is that it allows and filters water well. It is better not to use dense needle-punched geotextiles, because... it does not pass water well.
- Fill the bottom (bottom) of the trench with gravel.
Laying a perforated pipeLay a perforated pipe - the basis of the drainage system. Pipes can be ceramic or plastic. But any type of pipe must have perforation to receive water (perforation can be done independently, using a drill). The pipes are connected to each other using a cross or tee. Material prepared for the website www.moydomik.net
Advice. The pipe perforation should be smaller than the size of the smallest gravel particle.
- Lead the ends of the pipe into inspection wells. Such wells are installed at all turns so that the system can be maintained. For example, clean a pipe with water pressure or evaluate changes in water level.
Advice. Collecting pipes over a large area of the site must converge into a main pipe (with a diameter of more than 100 mm), which will carry the collected water to the drainage well.
Lead the ends of the pipe into the drainage well. This is the last component of a closed drainage system.
Exiting pipes into inspection wells
According to their functional purpose, drainage wells are divided into two types:
- accumulating. This well has a sealed bottom. Water is accumulated in it and then used for irrigation;
- absorbing. A well without a bottom, the water in it gradually disappears into the soil.
- Fill the geofabric with crushed stone without reaching the top ground level of 200mm.
- Fill the drainage pipes with crushed stone to a height of 300mm.
- Wrap the pipes with geotextile overlapping and secure the joints with rope.
- Fill in sand, soil and/or lay turf.
Absorption well and geotextile wrapping of drainage pipe
Advice. A surface drainage system (storm drainage system) can be installed on top of a closed system and also drained into a drainage well.
The finished drainage system is shown in cross-section in the photo.
Sectional diagram of the drainage system
Conclusion
Which of the listed types of drainage is right for you can only be determined by knowing the characteristics of the site. In general, you should choose the drainage around the house whose cost of installation and operation is the lowest, and of course, which you can do yourself. At the same time, it must perform the role of drainage efficiently and reliably. After all, according to experts, proper drainage around the house will extend its service life by more than 50 years.
To prevent a residential building in the private sector within the city or beyond from flooding, wall drainage of the foundation should be done. Such a structure makes it possible to limit the height of groundwater flow so that it does not flow through a critical level, flooding the basement or cellar (or inspection hole in the garage). In addition, in addition to flooding of certain premises, a lot of other troubles can occur. Dampness and mold will appear on the walls, ceiling and floor of the premises, the decoration and equipment will be damaged, and the foundation will be destroyed.
What does the drainage scheme look like? Below the foundation level, respectively, below the level of the basement floor (or any other room that is located lowest), a structure is constructed that is necessary to prevent groundwater and rainwater from penetrating into the basement. Let's consider what a foundation wall drainage device is.
Properties

In fact, today few people will say that a drainage system is not needed. For those who have a house with a basement or a building with a basement, moisture removal near the wall is simply necessary. Of course, it would be better to take care of it during construction, when the foundation is just being laid. Well, in the case when the building has already been built, but there is no moisture drainage, you will have to find time and money to create a groundwater protection system. The beginning of the drainage installation will be digging a pit around the house.
Drainage pipes, also known as drains, are placed around the entire perimeter of the building. At the corners of the house, where the pipes join each other, inspection wells are made. A pumping well is installed in the lowest place of the dacha plot. Its purpose is to remove excess moisture beyond the boundaries of the territory into the nearest storm sewer system or some reservoir.
If you lay a clay castle at a distance of half a meter from the foundation, you can additionally protect it from water.
Arranging moisture protection against a wall means that several types of drainage elements will be used:
- Linear. It is made from sections made of polyvinyl chloride. Such sections have several gutters, as well as protective grilles, which are mounted throughout the blind area around the house. Getting into these grates, the water passes through the pipes into the receiving well.
- Plast. This type of drainage is installed directly under the foundation, placing it on the same level as the sand bed. As a result of this, all excess liquid flows into the receiving well through perforated drains, on top of which sand from the river and crushed stone (pre-washed) are poured. Crushed stone and sand are needed because they play the role of a protective filter.
Carrying out calculations for drainage installation

When deciding how to waterproof the base of a building, you need to remember several important factors:
- Foundation laying depth. The depth of the drainage depends on it, which should be located at the level with the pillow or even slightly below it.
- Drainage slope. If you lower the drainage system evenly in the direction where the collection manifold is located, giving the pipeline a slope of 2 cm per linear meter, then you can ensure the removal of excess water without interruption, preventing it from stagnating in the pipes and acquiring an unpleasant odor.
To properly perform drainage, it is necessary to mark in advance the points of the system located at the very top and at the very bottom. The depth mark at which the upper level of the system will have to be laid directly depends on the location where the point of water collection and drainage will be located. As a rule, the corner of the house is taken as this mark, and the drainage well can serve as the lower mark.
To understand how drainage is performed and related calculations are made, let's look at a small example. Let us take, for a clear example, a house 8 m long and exactly 5 m wide. The well will be located at a distance of 9 m from the building, while its upper level will be a mark rising 28 cm above the ground.
We calculate the length of the trenches. The length of individual sections of the trench to the place where the water will be drained is 13 m (the sum of the width and length of the house, equal to 5 and 8 m, respectively). The total length of the trench to the receiving well is 22 m (13 m calculated above, and 9 m to the well). As a result, a value equal to 44 cm (2 cm × 22 m length) will be considered an acceptable slope.
If the point where the water will be discharged turns out to be too high for certain reasons, it is necessary to install a drainage pump, which can be used to ensure pumping from the receiving well.
Regardless of what is required in your case, the drainage around the foundation slab should be located at least 3 m from the building. And the fillers - sand and gravel - are poured to a depth that will prevent these materials from swelling if the groundwater freezes. In addition, a blind area of at least a meter wide must be constructed around the building.
Layout

By and large, it is not difficult to carry out wall drainage; the main thing is to carry out all the work step by step, in the following order:
- When creating a sand cushion, it is necessary to carefully measure the differences in height in different places, using a level (a geodetic instrument that measures the difference in heights at different elevations). Markers or milestones are installed at the marked places. Where the depth is less than necessary, add sand; where it is greater, cut off the soil. This will create a uniform slope along which the pipes can be laid so that water flows through them evenly, without the use of a pump.
- It is necessary to spread a geotextile fabric on top of the sand layer, and then pour the washed gravel onto it. When the gravel is scattered, a depression is made in it, in which drainage will be laid. During installation, it is necessary to ensure that the slope is the same along the entire length of the trenches.
- Perforated polyvinyl chloride pipes must be laid on the gravel. The holes in them should be of a size that will prevent small particles of gravel from forming a blockage.
- Upon completion of all connections, we check the overall slope as a whole. This can be done by pulling the cord. For every couple of meters, the slope should increase by 2 cm. That is, after 2 m the drainage outlet will drop by 2 cm, after 4 m - by 4 cm, and so on.
- We use tees at the corners to make corner joints, and bring up a vertical pipe that will have a tightly closing lid. Thanks to such outlets installed at each corner, the system will be easy to flush from trapped debris or sludge.
- Pipes laid in trenches are wrapped with geotextile, and the wrapping must be without gaps. Also, no gravel or sand should get into it. To prevent the geotextile from unwinding, it is tied with nylon thread.
- After the winding, it is backfilled with clean gravel, a layer about 17 cm thick. The resulting gravel cushion must be covered with the same geotextile to prevent soil from getting into the holes.
- Coarse river sand is poured on top of the gravel, which will make it possible to additionally filter wastewater.
- The outlet of the sewer pipe leaving the house must be insulated. For this, you can use foam plastic with a thickness of at least 20 cm.
Actually, this is the last stage in the construction of wall foundation drainage. In the photo at the end of the article you can see what certain stages of arranging such protection look like. The finished system can be used for several decades if it is looked after and serviced in a timely manner.
Photo


Video
All about foundation drainage.
Those who have ever been involved in construction know that the initial stage is the construction of the correct foundation that will correspond to the conditions and type of soil. The foundation is the basis of the entire building. It is necessary to take care of the correctness of its construction and protection from groundwater at the construction stage. Drainage is the best protection against groundwater. It will prevent the destruction of walls and flooding of the basement under the house, if there is one there. Experience has shown that it is much cheaper and more profitable to plan and make drainage before construction begins than to correct the consequences of its absence later.
Drainage of a building can be accomplished in several ways:
Drainage around the house (wall, ring);
Organization of drainage of the territory on which the house stands;
Storm water drainage system;
Special membrane and complete waterproofing.
Mechanism for laying the drainage system
Groundwater is not always useful. They often flood buildings, which leads to the destruction of the foundation, and therefore the building gradually. To avoid this, high-quality drainage is necessary. This is an engineering system that protects walls from excess moisture in the ground.
The main thing in drainage is the pipe. It is laid around the building, and always below the foundation for greater efficiency. If there is no ventilation in the pipe you are laying, then you should cover it with geotextiles and sprinkle gravel on top. This guarantees the “breathing” of the system. Geotextile is a practical modern composite that will not become a barrier to water, but at the same time will retain small soil particles. It is not afraid of fungus and mold, and lasts for a very long time, as it resists the process of rotting.
Once the pipe is in place, the trench can be backfilled. There is a need to compact sand, but this can be done manually. The pipes must be connected to wells installed at the corners of the building. Through the wells it is possible to clean the system. Wall-mounted
Wall drainage is a building-protecting system that is laid in close proximity to the foundation walls of the house. The drainage is laid below the foundation level and consists of pipes covered with a layer of coarse gravel. Next, the wall drainage of the foundation is covered with sand, and to better protect the basement with a layer of fine gravel, you can also install a special drainage membrane on the walls. Inspection wells are usually installed at drainage turns. You are allowed to skip one turn. Properly done drainage relieves water pressure from the soil into the void of the basement, thereby preventing water levels from appearing in the basement or sub-house. In addition to drainage, it is also necessary to waterproof the foundation, and to eliminate wetting of the walls from the inside, provide the basement with proper ventilation.
Ring drainage
Ring house drainage is another type of drainage system, which is laid in trenches that extend from the walls of the house, usually from 1 to 3 m, but ring the entire house, which will also protect the foundation from water ingress. Ring foundation drainage is most often used at the stage of a finished house, when there is a blind area.
Such drainage is cheaper than wall drainage, and there is no likelihood of damage to the foundation when digging it back up.
However, if the foundation of the building is made of blocks without good waterproofing, then it is still better to give preference to wall drainage rather than ring drainage.
It is optimal to carry out drainage work at the stage of building a house and excavating a pit; this is the most practical and cheapest solution. Next in cost comes ring drainage, and the most expensive is wall drainage.
In order to prevent flooding of the house on the site, wall drainage should be installed. Such a system will limit the rise in groundwater levels to a critical level, when there is a possibility of flooding of the first floor and flooding of the basement, which can cause destruction of the foundation.
The described system is a whole complex of elements that are located below the basement floor level and protect the structure from storm water and the penetration of underground moisture. You can easily carry out these works yourself; they will not be too costly financially, but you will have to work hard. After all, you have to dig a pit around the perimeter of the house, and then fill it with the components of the system.
Peculiarities
The same slope must be maintained along the entire length of the ditch. Perforated polyvinyl chloride pipes are laid on the gravel. The pipes must have holes that are no larger than the minimum gravel particle size, otherwise clogging will occur.
The wall drainage design must necessarily include the need to connect the pipes to each other. The entire system is equipped with a general slope of 2 cm per 1 m of pipe length. You can check the correct location of the elements using a stretched cord. It is important to provide a vertical pipe that will have a lockable lid. This unit is provided when turning. Such elements will make it easier to flush the system.

The laid pipes are wrapped with geotextile; there should be no gaps between the turns, this will eliminate the possibility of gravel getting into the holes. Fixation can be done using a nylon rope. The wall drainage scheme involves filling the pipes with clean gravel to a depth of 20 cm. The gravel cushion is covered with overlapping geotextiles to prevent soil from getting into the cracks.
Coarse river sand is poured over the drainage, which will serve as an additional filter. Particular attention should be paid to the tight fastening of the textile winding at the ends of the branches. The outlet of the sewer pipe, which will depart from the house, should be insulated. It is covered with a 25 cm layer of polystyrene foam.
General requirements and standards

Wall drainage at home must be arranged taking into account the rules and regulations. The system should be located outside, along the contour of the building. The pitch between the wall and the drainage pipe is determined by the design width of the foundation and the placement of inspection wells. If the foundation of the house is located at an impressive depth, then drainage can be laid above the base of the foundation, however, these recommendations are correct only if measures are taken to prevent subsidence of the drainage system.
If you want to save on sand and reduce the cost of construction, you should use geocomposite materials, which consist of profiled plastic membranes covered with geotextile on one side. The membranes will be able to protect the base of the house from moisture and will cope with the drainage of water to perforated pipes, because they have a unique surface. The geotextile filter will allow water to pass through, but retain soil particles.
Selection of drainage pipes
The installation of wall drainage requires the selection of pipes. The material must be selected taking into account the installation depth and the aggressiveness of groundwater. The most popular plastic pipes are made from:
- polyvinyl chloride;
- high density polyethylene;
- low density polyethylene;
- polypropylene.
Plastic drains have become widespread because they are lightweight, easy to deliver to the site and easy to install. Drains can be selected with full or partial perforation. They are designed for a specific depth, but usually this value does not exceed 6 m.
Features of drain installation
The pipes can be connected to each other using couplings that are made of the same material as the pipes. During installation, it is important to ensure that the water inlets are on the sides. The bottom and top sides of the pipes must be solid and have no cuts.
In order to prevent clogging of the holes, the pipes must be wrapped in geotextile. In addition, this measure will protect the material from silting. The longitudinal slope of pipes should not be increased beyond the minimum standards, as this will increase the volume of construction work. The maximum slope was mentioned above, and it is determined taking into account the permissible value of the water flow speed. This parameter is equal to 1 m per second.
Installation of inspection wells
It is important to provide a gap between inspection wells, which is 40 m on straight sections. Adjacent drainage wells should be 50 m apart from each other. It is important to ensure a distance of 20 m from the turn of the drain. Additional wells are installed through one turn if the system has several turns in a difficult area between two wells.
If you arrange drainage yourself, then you must remember the depth of the drainage and water intake elements. If it is not possible to organize the release of water by gravity from the drainage, then it is important to provide for the presence of a pumping station.
Conclusion
One of the effective ways to protect the foundation of a building from the effects of water is wall drainage. Its design is the key to long-term operation of the building. The problem of water getting into basements can be solved comprehensively, using several methods of protection at once.
If you decide to install a hydraulic abutment, then the clay must be laid with tamping. Several layers should be supplemented with crushed stone. This method will reduce the influx of water from lower horizons. Afterwards, you can begin laying a drainage system around the perimeter of the building. The pipes should be looped, ensuring the presence of drainage wells in the corners.