Unfortunately, heating is not provided for garages (although perhaps fortunately, given current tariffs), so you have to heat yourself. Well, any heating is a stove. In this case, it should be small, but effective - you need to quickly bring the room from a “minus” to a good “plus”. So when choosing a design, do not forget that the garage stove should light up quickly and easily. It would also be desirable that it could be heated with waste - it is very expensive to buy good firewood, and there is nowhere to store it. Well, there is one more requirement - the design must be simple, so that you can easily do it yourself.
What kind of stoves can be made for a garage
It is very unpleasant to be in a cold garage in winter. That's why heating is required. Garage stoves are usually small steel stoves such as potbelly stoves. They are made from thick-walled barrels, pipe sections or gas cylinders. Such garage stoves are simpler to make and require only minor modifications, since the body, and sometimes the bottom, is already there. Stoves are also made from sheet metal, but these are options for those who are close friends with. Brick stoves are not very common in garages - they are still larger in size and heat up less, which is not entirely suitable for this case.
The most common stoves are those that burn wood; everything that burns is stored in them. Such omnivorousness and fast heating are their main advantages. They also have many disadvantages, and one of them is gluttony, which is why recently they have begun to make more economical long-burning stoves. Typically the top combustion principle is used. They are good because one full load (a stove made from a 50-liter propane cylinder) can burn for up to 8 hours. All this time it is warm in the garage.
They walk apart. There is plenty of such fuel in garages, but you have to be careful with the waste - it contains heavy metals and excellent traction is required to prevent them from getting inside.
Potbelly stoves - proven and simple designs
Potbelly stoves were a hit of the 20s of the last century. At that time, these stoves competed with brick stoves and were installed everywhere, even in apartments. Later, with the advent of centralized heating, they lost their relevance, but are used in garages, dachas, and for heating utility or outbuildings.

Potbelly stoves from a cylinder, barrel or pipe
The most suitable material for making a potbelly stove for a garage is propane cylinders or a pipe with a thick wall. Barrels are also suitable, but you need to look for ones that are not very large in volume and have a thick wall. In any option, the minimum wall thickness is 2-3 mm, the optimal is 5 mm. Such a stove will serve for many years.
By design they are vertical and horizontal. It is more convenient to burn horizontally with firewood - longer logs will fit. It’s easier to make one extended upward, but the firebox is small in size, so you’ll have to cut the wood finely.

Vertical
First, how to make a vertical stove for a garage from a cylinder or pipe. Divide the selected segment into two unequal parts. Below is a smaller one for collecting ash, above is the main one for storing firewood. The following is the order of work:

Overall, that's it. All that remains is to assemble the chimney and you can test a new stove for the garage.
Horizontal
If the housing is located horizontally, the ash box is usually welded from below. It can be welded to the required dimensions from sheet steel or a piece of channel of a suitable size can be used. Holes are made in the part of the body that will be directed downwards. It’s better to cut something like grate bars.

Then in the upper part of the body we make a pipe for the chimney. To do this, you can weld a cut piece from a pipe of a suitable diameter. After the piece of pipe is installed and the seam is checked, the metal inside the ring is cut out.
The next step is installing the doors. You can cut a piece of metal onto the ash pan, attach hinges and a lock. There are no special problems here. The gaps around the edges do not interfere - combustion air will flow through them.
There will be no difficulties if you are making a door from metal - welding the hinges is not a problem. Only here, in order to be able to at least slightly regulate the combustion, the door needs to be made a little larger - so that the perimeter of the opening is closed.

It is problematic to install furnace casting. Suddenly someone wants to have a cast iron door instead of a steel one. Then you need to weld a frame from a steel corner, attach the casting to it with bolts, and weld this entire structure to the body.
From two barrels
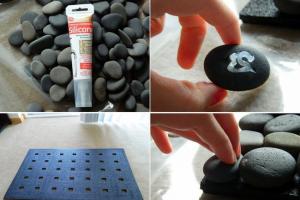
Anyone who has used a potbelly stove knows that very hard radiation comes from its body. Often the walls become heated to a red glow. Then it is impossible to be near her. The problem is solved with an interesting design: two barrels of different diameters, inserted one into the other. The gaps between the walls are filled with pebbles, clay mixed with sand (calcined over a fire, then filled in only after it has cooled). The inner barrel acts as a firebox, and the outer one is just the body.
This stove will take longer to heat up. It will not immediately begin to give off heat, but it will be more comfortable in the garage and after the fuel burns out, it will warm the room for another couple of hours - releasing the heat accumulated in the bookmark.
Long-burning garage stove
From the same gas cylinder you can make a stove for a long-burning garage. There are different designs, but the most proven and stable working is called Bubafonya - after the nickname of the author who invented it and posted it on one of the forums. This was about 5-6 years ago. Since then, many people have had this miracle - a simple and original design, high efficiency and the fact that you can lay not only firewood, but also shavings and even sawdust. You can even modify Bubafonya for water heating in the garage, which has been done more than once (water jacket around the body).

Long-burning wood stove for garage (diagram and photo)
This homemade wood stove has only one drawback - in order to remove the ash, you will have to turn the body upside down. True, there are already improvements that eliminate this drawback. If you have a welding machine, you can make such a stove for your garage with your own hands in a few hours - it’s very easy to make.
Design
This stove uses the principle of top combustion: wood burns from above, the flame spreads down as the upper layers burn out. This explains the long period of time for combustion - the flame spreads downwards much more slowly. However, the heating is effective. Already in the first minutes, a sufficient amount of heat begins to be released.

This stove is traditionally round and vertical. The body is a regular cylinder with a bottom without a welded lid. The main focus is the shape and structure of the moving part. It is often called "cargo", but this is only one of the functions. This part also supplies air to the combustion zone. She represents a metal circle to which a pipe is welded in the middle. On the back side of the metal circle - from the center to the edges - corners or pieces of a small channel are welded. These are air ducts through which air flows to the periphery of the combustion area. There is also a lid with a hole cut out in the center through which the weight pipe is passed. The smoke pipe is welded almost at the very top of the housing. Its horizontal part should not be more than 40 cm, then the pipe rises upward. The height of the chimney is at least 2-3 meters, but it must be determined by the draft - so that in any weather the smoke does not go into the garage.
Principle of operation
Having filled the body with firewood mixed with shavings and sawdust, the firebox is lit. Place a lid on the pipe and, when the flame flares up, place the lid on top. Since the pipe is hollow, air is supplied through it into the combustion zone, which supports combustion.

The diameter of the “load” circle is slightly smaller than the diameter of the body - through this gap, combustion products enter the upper part (labeled “secondary combustion chamber” in the figure). As is known, they themselves are flammable and can generate a large amount of heat. In this zone, with a well-heated oven, these gases ignite. Combustion air comes from a gap in the cover in the pipe passage area. Something can “pull up” in a circle. It's not that important. It is important that the lid should not be made airtight and that because of this, the draft in the pipe must be excellent.
The gases ignited in the upper part produce no less heat than burning wood. This explains the heating efficiency when using this design. Burnt gases exit into the chimney. As it burns, the load drops lower and lower until the entire load is burned out. After the stove goes out and cools down, you can add a new batch of firewood and start the process all over again. You have to remove the ash after several fires - the firewood burns completely, leaving only a small pile of ash and a couple of coals from the lowest firewood.

This is the kind of “wood” that this garage stove is heated with.
Here is a brief summary of the operating principle of this unit. As you can see, there is not only top combustion, but also afterburning of gases. A very simple design that works really well.
Manufacturing process
Most likely you already understand how to do everything, but we will briefly describe the process. First, let's talk about the materials that are needed for this stove. The most commonly used are 50-liter propane cylinders. A barrel with thick walls and a piece of pipe with a diameter of 300 mm to 600 mm are also suitable. The height of the finished case is from 110 cm to 200 cm. In addition, you will need:

These are all the necessary materials. Now let’s talk about what and how to do. We will assume that we make a garage stove from a gas cylinder.

That's all. I made a stove for the garage with my own hands.
Improvements
Improvements to the design improve ease of use. The biggest inconvenience is the need to turn the heavy body over in order to shake out the ash. To get rid of this, an ash pan and traditional grates are made in the lower part. The solution is understandable, but this innovation can lead to the fact that the firewood will burn faster - air will leak through the door cracks. If there is a lot of oxygen in the lower part, the wood will burn quickly, and not in the smoldering mode, as happens in the original design. The solution is to make the door airtight, with sides and a seal.

Efficient and economical garage stove - drawing with dimensions
The second improvement concerns the number and shape of fins on the air duct disk. They are made not from angles or channels, but from steel strips. They are bent and slightly shifted, so that the air passing through seems to twist. 6-8 pieces are welded instead of the original 4. This alteration gives only advantages - the air is distributed more evenly over the combustion zone, the firewood burns evenly over the entire area.
Brick stoves provide gentler heat, but until they heat up themselves, they will not heat the garage. If you plan to heat every day, this option is good. If the garage will be heated periodically, it is better to make a metal stove - heating up a frozen brick stove is long and tedious, and it will start heating in about two hours.
For those who decide to install a brick stove in the garage, we will lay out the order of a small (relatively) stove with a heating shield and a hob (just in case).

The stove is made of solid ceramic bricks (not burnt). Excluding combat, 290 pieces are required. The masonry should be laid using clay mortar, the thickness of the seams is about 0.5-1.8 cm.
This furnace requires a separate foundation - the weight will be about 500 kg. Its dimensions are 15-20 cm larger than the dimensions of the stove.

It is desirable to lining the firebox (laying fireclay bricks on fireclay mortar). Bricks are ground down for furnace casting. The dimensions of the bed for the grate, stove and doors must be larger than the dimensions of the casting. The gap is necessary to compensate for thermal expansion and also for laying a thermal insulation layer around the doors. This will reduce the formation of cracks near them (due to different thermal expansion).
Asbestos cord was traditionally used as a thermal insulation material. If you don't want to deal with asbestos, you can cut mineral wool cardboard into strips. Only it must withstand very high temperatures - up to 1200°C (minimum 850°C).
Installed in the 6th row, the valve allows you to switch the stove into winter and summer modes. This is convenient in the off-season, when full power is not required, but it is already damp.

The height of the oven can be increased by repeating rows 14 and 15.

Watch the video for the process of pre-laying a stove without mortar (recommended in order to select bricks and understand what’s what).
Drawings and diagrams
It would take a long time to describe all the designs. Much can be understood from the drawings.


For car enthusiasts, a garage is a personal space for doing what you love. The space is arranged to suit your own needs, be it a workshop or even a place to relax. That’s why it’s so important to come up with high-quality garage heating. We will try to find the most economical way in this review. With the right approach, the heating system in the garage will be economical and safe.
High-quality heating allows you to create comfortable conditions in any garage
If the outbuilding is located next to the main building, gas heating is often used. In this case, the heating system can be connected to an existing one in the house.
To heat your garage yourself economically, you can use the heating option using different types of solid fuel raw materials. Which can be used as firewood, peat, coal and diesel products. At the same time, you can save on resources, but it is important to think about the storage of raw materials.
For your information! A simple solution is a gas convector. In such equipment, heat circulation occurs due to convection. The device is connected to a cylinder, but it will need to be refilled every few days.
What heating methods are there for a garage?
The most economical way to heat a garage is determined by many factors: availability of fuel raw materials, financial capabilities and distance from the main home.
Heating of the engine shelter can be carried out by the following devices:
- mobile equipment: heat guns and fans for heating;
Related article:
The advantage of such equipment is mobility. After all, you can simply move them wherever you need. Read the article on how to choose this device correctly and what you should pay attention to.
- infrared heaters;
- electric boiler is suitable for spacious rooms; stationary heaters.
High-quality heating equipment is important to create a favorable environment in the garage.
Advantages of electric heating in a garage
- ease of installation and availability of electricity;
- a wide selection of devices of various types;
- you can choose a device with suitable power;
- rapid heat transfer.
The disadvantages of such equipment include its high cost. Keep in mind that the quality of heating depends on the uninterrupted operation of the electrical network.
You can use these methods:
- heat guns are an inexpensive option; after heating, air masses in them are distributed under the influence of a fan;
- infrared equipment heats surfaces and all kinds of objects, and they provide heat. Infrared rays will not harm the car's paint;
- the convector warms itself up and distributes the heat around. It heats the space worse than a cannon, but the heat lasts for a long time;
- The most expensive options include inverter split systems. They allow you to save electricity.
Helpful information! Thermal models are recommended for small spaces. Fan heaters and heat guns not only warm up, but also help dry the wheels and bottom of the car.
Water heating
If the garage is built close to the main building, then the most economical option is to heat the garage in connection with the main heating system.
In this case, you do not need to install a boiler, but you will need to extend the pipeline. This option will lead to loads and an increase in the amount of fuel. If a separate boiler is used, then full power can be used if necessary, and in other cases the equipment operates at rated level.
Note! To avoid defrosting, you should use antifreeze instead of water in the system.
Gas heating
The most effective option is gas. This is a good solution in cases where there is a gas main nearby. To install such a heat source, it is necessary to draw up design documentation and obtain a special permit. Using gas requires compliance with all safety measures. It is prohibited to use a homemade device or connect any equipment.
Using gas, you can create a complete heating system with a boiler and pipes. It is also used for various types of heaters.
Helpful information! Alternatively, you can use liquefied gas for convectors, infrared heaters or guns. When using gas burners and heat guns, do not forget to ventilate.
Solid fuel - a budget option
If you have solid fuel, you can even make a homemade heating structure in the garage. In terms of saving characteristics, coal and firewood are superior to other options. Various industrial waste, combustible waste, and plant residues are used as fuel. This option does not depend on energy lines.
As a heating device, you can make a stove with your own hands from sheet material, a barrel or from fittings. This heating method is more fire hazardous than others. It is necessary to constantly maintain combustion. Some devices are not environmentally friendly.
Wood-burning stoves are available in different options. These are potbelly stoves, long-burning devices, brick structures and pyrolysis devices. A potbelly stove is perfect for small spaces, and it also dries the air. Boilers are a safer option. They can work without the constant presence of a person.
Equipment operating during mining
Devices using waste oils are an economical option. They are used not only in garages, but also for heating private auto repair shops. You can see how to make a heater for heating in a garage with your own hands in the video. Metal pipes, all kinds of tanks and gas cylinders are suitable for this. Even on the basis of a stove, you can make a structure with radiators and pipes.
Remember that such structures require good care. They need to be cleaned of soot at least once a week.
Note! To install the stove, a chimney is required, the height of which should be about 4 meters. Its installation is carried out at a certain slope.
Related article:
A heating device using waste engine oil is an economical and simple solution to the problem of heating a garage, workshop, greenhouse and even a home. We will look at how to make it yourself in the article.
Review of popular models of garage stoves
There are a variety of options for garage stoves on the markets. They differ in the heating principle and design solutions. Some models deserve special attention:
- The Bullerian stove is made to run on solid fuel. The design has a convection mechanism for high-quality heating of air masses that move through the pipes;
- a durable option is the Stavr stove. It is made of cast iron, a similar material can withstand high temperatures;
- Termafor stoves have convection pipes in their design, which are placed in the combustion chamber. Such models are designed for both standard and pyrolysis combustion;
- The Alaska stove has a stylish design and good heat output. The design is equipped with a hob;
- A cheap alternative to Buleryan is the model of the domestic manufacturer Breneran. It can operate on wood and waste from the manufacturer.
| Image | Model | Construction type | Price, rub |
|---|---|---|---|
 | "Delta" D-81G | Heat gun | 3930 |
 | Ballu BHDN-80 | Diesel indirect heating device | 55900 |
 | ELITECH TP 3G | Ceramic gas panel | 2960 |
 | Resanta | Gas heat gun | 6700 |
 | Breneran AOT – 06/00 | Wood stove | 10500 |
How to make garage heating with your own hands cheaply and quickly: choosing the right place
The location for installing the equipment is selected taking into account fire safety. Heating appliances powered by gas can be used in rooms with excellent ventilation. In addition, it is important to consider the chimney device. The selected device should be attached to the main wall. It is important to correctly calculate the performance of the hood. It is important to provide free access to heating equipment.
Note! When using hearths with an open fire, do not close the vent until the fuel has completely burned out. You must remember to turn off heating devices for the garage at night.
Using an economical heating method will allow you to fully use the garage at any time of the year.
The most economical option for heating a garage (video)
You might also be interested in:

 Electric fireplace with a living fire effect: design and nuances of effective use in the interior
  Wood-burning stoves and long-burning fireplaces for cottages and country houses
Often, a full-fledged heating system is not installed in the garage. This is due to the relatively rare use of the premises and its small area. But for long-term work in the cold season, it is recommended to make a garage oven from metal, which is quite possible with your own hands. Design drawings and specifications may vary depending on heating requirements.
Homemade stove for the garage: parameters and operating conditions
It is important to initially determine the location of the structure. It should not take up much space, and during operation it should not interfere with free movement around the garage or the performance of certain operations. Most often, a corner location of the stove is chosen.
The manufacture and installation of the furnace is carried out according to the following conditions:
- Mandatory installation of a chimney. Its height must be at least 3 meters.
- Fuel selection. The best option is to use firewood, coal or diesel fuel. Electric stoves or those running on bottled gas are much less common.
- Preparing the base for installing the boiler, installing heat-resistant materials on the walls.
Before starting this work, you need to choose the optimal stove design for the garage. The choice depends on the volume of the heated area, the presence of a hob and the overall budget. As an example, you can consider the drawings of the most suitable homemade products.
Scheme of a simple “potbelly stove”
This is the best option to save space. Structurally, the furnace consists of a cylindrical or cubic body, divided into a combustion chamber and an ash pan. It can be made from barrels. The thickness of the steel must be at least 1.5 mm. The socket for the chimney pipe is located at the rear of the structure to connect the vertical pipe.

- A gas cylinder can be used as a housing. It is first cleared of paint, holes are made for the doors, and a grate is installed.
- When making a metal case yourself, 1.5 mm thick steel is used, the connection is made by welding.
- The intensity of fuel combustion is regulated by changing the position of the ash pan door. This way the traction is controlled.
- Additionally, you can install a cutter - a shelf at 2/3 of the height of the combustion chamber. This contributes to economical consumption of burned fuel.

The advantage of this design is the ease of manufacture and the possibility of installing a hob. The disadvantage is high fuel consumption.
Long burning mini-boiler
For long-lasting garage heating, it is recommended to consider long-burning. The essence of its work is to use wood gases as fuel. They arise as a result of smoldering firewood. Unlike the option described above, a long-burning metal garage stove has a large chamber for loading fuel, a pressure system consisting of a telescopic pipe and a flat base. This block is located at the top of the structure.

After loading the fuel, it is ignited from below. Restricting the flow of oxygen provokes the process of smoldering. The resulting gas enters the afterburner chamber, where it is enriched with oxygen and ignites.
Features of the design:
- you can use a barrel or gas cylinder as a body;
- to enrich the gas with oxygen, install a low-power fan;
- the pipe for connecting the chimney is located horizontally;
- low temperature in the chimney pipe can cause condensation, so it is recommended to use sandwich structures.
The average operating time on one load of fuel can be 8-12 hours. This depends on the volume of the furnace and the speed of air supply to the afterburning chamber.
Waste oil garage oven
The principle is to use fuel vapor. To make it, you can also take a small gas cylinder. At the bottom there is a fuel container. The vapors rise through a pipe with holes, and a fire occurs there.

It is not recommended to use this model for a garage. This is due to the high probability of gas contamination in the room, since combustion products partially enter the garage before entering the chimney. There may also be problems with fuel storage.
When choosing a stove design for a garage, you should take into account the complexity of its maintenance and frequency of use. But the determining factors are the cost of the design and the complexity of its manufacture.
Ordinary potbelly stoves that can be placed in the garage suffer from one significant drawback - too low efficiency. The outgoing gas simply does not have time to give off heat and flies out hot into the chimney. Meanwhile, there is often not enough heat in a workshop or garage, so it would be nice to make a wood-burning stove that could produce 1.5 times more energy, i.e. raise the efficiency from the region of 35 - 40% to 60%. Achieving this is not so difficult, you just need to slightly transform the known designs, and many have already done so...
Ways to increase heat transfer from a wood or oil stove in the garage
Heating in a garage is usually done without a water circuit. The heat of burnt wood, coal or oil is transferred from the stove body and from its chimney directly to the air. Obviously, if you increase the area of contact of heated parts with air, the heat transfer will increase, and the efficiency will accordingly increase. What can be done?
- To make the heated body of the stove itself much larger - no need to spare any metal...
- Weld fins 3–5 mm thick onto the body, so the heat transfer area can be increased several times…
- To increase the length of the chimney indoors, make an inclined pipe along the wall. Partially equip the chimney with fins and place a heated water tank on the chimney.
- Redistribute infrared radiation from the oven.
Radiant heat reflection in garage
Potbelly stoves often heat up well beyond 300 degrees, which is why the share of infrared radiation is significant. And it spreads from the heated parts in all directions, including into the cold corner, which is of little interest to users.
If you reflect infrared radiation from the corner in which the stove is located in the garage into the center of this room, where there are heated people and objects that can absorb infrared heat, then the increase in useful output from the heater will be significant - probably 1 kW from 20 kilowatt combustion...
It is enough to place a layer of foil on the wall behind the stove, focusing the reflection where needed.
An example of a stove design with increased heat output
The approximate dimensions of a typical wood and coal stove, with a tall body and two gas passages, are shown in the figure. In this case, increasing the height of the body will only increase heat transfer, and therefore the efficiency of the furnace.

Any metal welder can make such a design inexpensively.

Welding on the fins increases efficiency and increases heat transfer...

Features of a solid fuel stove for a garage or workshop.
- The difference from a sauna stove is that it is not permissible to spill high-temperature coals from the combustion chamber onto an open tray or onto the floor. Therefore, the garage structure is always equipped with an ash pan, closed by a door.
How to take energy from a chimney and prepare hot water in the workshop
A chimney stretched along the wall at the upper level, according to various estimates, increases heat transfer by 8 - 15%, i.e. increases efficiency by 6 -7 percent on average. But for many, such a design is not convenient - it clutters up the garage, and is also not cheap - i.e. doesn't seem like a worthwhile undertaking.

But many owners of workshops, and garages too, support the idea of having warm water with which you can wash anything, as well as wash your hands or even take a shower...
A tank with a pipe for the passage of flue gases is inserted between the stove and the chimney, takes energy from the gases, heats the water, and generally increases the efficiency of the device. All that remains is to coordinate the diameters of the smoke pipe on the stove, etc.

But this section of the chimney can also collect dew, so it can become very dirty...
Making it with your own hands is no more problematic than making the stove itself.

New design of oil furnace
Burning waste in a garage is a well-known method of heating; a stove for this action is made immediately, as soon as conditionally free waste oil becomes available. But the stove itself has low efficiency, the body is small, and a sufficient amount of heat is obtained due to the high calorific value of the oil, first of all.


Another design is proposed, which is distinguished by a large body made of a cylinder, which can be additionally finned, high efficiency, and it also implements a drip mode of supplying fuel to the combustion zone. Therefore, water in oil or other impurities will not simply get into the fire and will not cause dangerous explosions with splashing of burning oil as in a conventional oil stove...
Drawing of a productive oil stove.

The operating principle of a garage oil drip stove is shown in the figure.

Another advantage is that you can heat it with diesel fuel, too. Therefore, if you run out of “free” oil, you can switch to purchased diesel fuel instead of freezing.

But the design of an oil stove for a garage is, of course, more complicated than a classic one. The same stove also requires a stable, more powerful draft - therefore, a longer chimney is needed - at least 4 meters in height from the burner level...
A simple do-it-yourself wood-burning garage stove can be made from different materials - brick, an old gas cylinder or a metal barrel with thick walls. A wood-burning stove can also be made from a piece of thick-walled pipe.
The main thing, when installing a solid fuel stove in the garage, is to arrange good ventilation of the room - forced or natural.
It is easy to make the following solid fuel stove designs yourself:
- – reliable and safe, requires some bricklaying skills;
- potbelly stove - easy to make from pipes, cylinders or thick-walled barrels;
- long-burning wood-burning stoves - you will need a cone firebox (cylinder, pipe) and a welding machine;
- waste oil stove - you will need pipes, a drill, welding and a diagram. Be sure to protect the oven from moisture and dampness.
If we compare designs, potbelly stoves heat up quickly, but do not retain heat, unlike bricks. Long-burning stoves require strict adherence to the dimensions according to the diagram, and waste oil stoves cannot be installed in garages made of flammable materials.
Option one - reliable and efficient brick

Sequential scheme for laying bricks in a simple stove for a garage
Brick wood-burning is a traditional reliable heating option. Compared to metal boilers and potbelly stoves, brick is safer, but such a stove takes longer to heat up and also cools down.
In order to build a wood-burning brick oven with your own hands, you will need the following materials:
- fire brick;
- high-fat clay for masonry mortar. It is easier to buy ready-made refractory mortar for laying refractory bricks; it contains all the necessary additives.
Advice. Check the fat content by rolling a ball out of wet clay. If such a ball, thrown on the floor, cracks, then the clay is not suitable - low elasticity (fat content). Masonry clay must be soaked for at least 24 hours before mixing the solution.
- cement M300 and sand for the cement foundation of the stove;
- doors for the ash pit and firebox;
- grate material;
- asbestos thread for sealing;
- chimney valve;
- chimney pipe – asbestos or two-layer stainless steel.
Advice. If you make the chimney removable, then in the summer you can use the hole as additional natural ventilation.

We choose a place for the stove so that the chimney does not come into contact with the roofing and the stove does not interfere with movement.
The sequence of laying a simple brick stove for a garage, dimensions 60x60 cm, this is quite enough for a standard garage:
- The foundation for a small stove should not be made strong; 50 cm is enough. If you plan to have a tall stove, you can perform additional reinforcement of the foundation cement screed.
Note. If the garage has a concrete screed, then the foundation for the stove does not need to be poured.
- after the cement has hardened, you need to lay 2 layers of waterproofing (roofing felt) and you can start laying the furnace;
- solid base of the furnace - two continuous rows of bricks;
- We expose the ash pan door, fixing it with wire on four sides for rigidity. The wire is fixed with masonry mortar;
- ordering a brick oven for a garage - the order of masonry is easier to understand by watching the video material.
During the laying process, we check each row with a water level; it is important to maintain horizontal and vertical lines. Installation of the grate additionally requires sealing with asbestos thread.
You can upgrade a brick stove to the “rocket” type, in which case the heat transfer is doubled by using the heat of the chimney pipes.
When a brick oven is built with your own hands, you cannot immediately test and heat it. The masonry needs to be completely dry.
Option two - homemade potbelly stove
If you have a welding machine, potbelly stoves, proven and simple designs, can be made in one day. To fire a potbelly stove, you can use thick-walled pipes, barrels and gas cylinders. A rectangular potbelly stove can be welded from a metal corner and steel sheets (3 mm thick).
Important rules for locating a potbelly stove in the garage

In order to avoid fire, you must follow the following fire safety rules when installing a homemade potbelly stove:
- distance to walls and flammable objects - a meter, distance to a brick wall - 0.5 meters;
- the walls and ceiling around the stove are additionally sheathed with sheets of metal;
- a thick metal sheet is placed under the stove - 10 mm or a cement screed is made - thickness 20 cm;
- It is necessary to install ventilation (forced or natural) so that if there is smoke there is no trouble. A 5 cm gap under the garage door or two exhaust vents under the roof will ensure sufficient natural ventilation of the room.
The distance from the stove to the car must be at least two meters. If you come into close contact with the hot walls of the stove, there is a risk of damage to the paint or ignition of the fuel.
An additional protective casing made of brick walls will not only create a convection flow of warm air and increase heat transfer, but also ensure safety.
Note. Only square or rectangular potbelly stoves can be covered with bricks. A furnace in the form of a cylinder requires a special design of the casing, in the form of side metal ribs. A brick casing for the cylinder will reduce heat transfer and lead to rapid burning of the walls.
How to make a simple square potbelly stove

For a standard garage, a heating device 30 x 30, 50 cm high is quite enough. The diameter of the pipe for a potbelly stove is at least 30 cm, the wall thickness is at least 5 mm. For a chimney, a pipe with a diameter of 12–15 cm and a thickness of 3 mm is suitable. To prevent the chimney pipe from quickly becoming frozen, it is wrapped on the outside with a layer of mineral wool.
Work order:
- First, we draw the cutting of the stove parts, determine all the dimensions;
- we cut out the necessary parts from sheet metal to size;
- First, we weld the walls and bottom of the oven together, but only grab them. To be able to set all sides strictly according to level;
- after checking the vertical and horizontal lines, you can weld all connections using a T-weld;
- We install the lower partition into the finished housing. You immediately need to drill holes in it to remove ash (the step between the holes is one and a half centimeters, from the walls - 5 cm);
- the partition is located no lower than 10 cm from the bottom;
- cut out a circle in the back wall to install the chimney pipe;
- firebox and blower doors - distance from the wall - 5 cm;
- when attaching the door curtains, you need to take into account that they will sag due to temperature, so we attach them 2 cm higher;
- The last to be installed are the legs of the potbelly stove - the height is at least 15 cm and the top sheet of the stove is installed.
In order to obtain maximum heat transfer, the stove pipe should not be straight. It is necessary to install pipes with two 30-degree turns and lead them through the wall of the garage. Then the combustion products will give off all the heat not to the street, but to the room.
The video shows how to make a simple potbelly stove from a metal sheet and corners and from an old gas cylinder.
Option three - waste oil stove

This heating device provides maximum heat transfer and requires virtually no fuel costs - there is always used oil in the garage. The only disadvantage of this stove is that it requires a high chimney, and combustion products create soot that will have to be cleaned frequently.
Mini wheels for cars. Let's watch the video, making such a stove is a couple of trifles.
Option four - long-burning wood stove

Maintaining a positive temperature in a garage is difficult, especially in a metal or profile structure, even insulated. Therefore, long-burning stoves are the best solution for a garage, where you just need to maintain the temperature above zero, so as not to warm up the engine every day and not spoil the spark plugs or drain the battery.
Such a stove can be made from an old gas cylinder, sheets of metal and even brick. The point is that in such a stove the access of air to the firebox is limited and the wood does not burn, but smolders, maximizing the fuel efficiency.
By placing firewood into such a stove from above, the fuel is pressed as it burns by a metal piston.
From a simple old barrel you can make a heating device for a garage that runs on sawdust, ash and construction waste.
Even if you make a long-burning stove completely correctly with your own hands, you may not achieve maximum heat and the consumption of wood will be high. The reason is incorrect fuel filling. Firewood cannot be stacked vertically in the stove - only horizontal stacking.
The video describes the reasons why fuel in a stove with wood on top does not burn out completely.
As a conclusion, is it possible to heat a garage with such a wood stove? If you follow important safety rules, then such heating devices are an excellent alternative solution for small garages without an electrical connection.

What is important to remember:
- you need high-quality garage ventilation to avoid smoke fumes and fire;
- it is necessary to protect the metal parts of the heating device with a casing made of fire-resistant materials;
- the chimney must be routed so that it does not come into contact with the wooden rafters of the roof;
- there must be at least two meters from the hot walls of the stove to the car;
- Water from the chimney must not be allowed to enter the firebox; a protective cap must be installed on the pipe;
- choose durable materials for the stove;
- a waste oil stove may explode if moisture gets into the firebox;
- To prevent condensation from flooding the chimney, it is insulated with mineral wool and foil or removable galvanized pipes with internal insulation with mineral wool are installed.
The safest option for any garage is a long-burning brick stove or one protected by a casing made of refractory bricks.