Today, the variety of products on the table is simply stunning. A wide variety of vegetables, dill, cilantro, raspberries, strawberries are not at all a curiosity in the cold season. But no matter how the store shelves are crowded with a huge assortment of vegetables, first of all in winter the hand itself reaches for the dear, already beloved cucumber. We all pounce on them in the store with the first rays of the spring sun. And many people make a business out of it.
In order for us to grow cucumbers in winter, we need, first of all, to have an appropriate building in which to do such a thing. Such a room is not called a simple greenhouse, in our case it is a permanent winter greenhouse. Or not homemade, but professional greenhouses.
The greenhouse operates in a special mode in winter. It needs to be prepared for this process in the fall, and when we start from scratch, then in the summer.

It should be noted that initially preparing a greenhouse for growing cucumbers in winter will take a lot of effort, time, and money. Pollination and ventilation are not unimportant problems. After all, in winter, bees do not fly; the temperature is as if around Taiga in the Urals.
How a winter greenhouse works:
- The first priority is to install heating. Cucumbers will not grow in the cold. The heating in greenhouses is mainly electric.
- The second difficult task is irrigation. In addition to regular, warm watering, you yourself need to additionally install water tanks in the greenhouse. Electric heaters make the air very dry, and plants need high humidity to grow.
- Soil is the third question. Without soil well enriched with organic matter, you will have cold, unbalanced soil in which plant roots will suffer rather than grow stronger. Add sawdust and manure to it, the soil will be looser and warmer.
- Lighting. In the winter season, there is much less sunlight, therefore, artificial lighting in a winter greenhouse is very necessary. Moreover, they need to be equipped in such a way that it is possible to lower and raise the lamps as the plants grow.
- Containers for seedlings. Would it be wise to “start up” the greenhouse in order to plant cucumber seeds for seedlings? It is better to do this in containers and place them in the house for germination. And after that, you can plant it in a permanent place in the greenhouse. Seeds for seedlings are sown 2-3 months before planting.
How to make a winter greenhouse: construction features
If you are not afraid of the high requirements for the construction of a greenhouse, let’s begin to figure out how to build it, where, and how best to position it.
Making a winter greenhouse, like a summer one, is a troublesome and expensive task. Maintaining it is also difficult and expensive, and harvesting will not be done right away. Therefore, you need to calculate the profitability and construction costs in advance.

In addition to the internal equipment of the greenhouse, there are several different requirements for its external decoration and the correct location. First draw up a business plan and decide what type of greenhouse your greenhouse will be.
Basic requirements for the construction of a winter greenhouse:
- When we choose a place for our future greenhouse, we pay attention to whether there is a large slope on the site. It is allowed only a little in a minimum of degrees, and in the direction of the sun.
- Do not locate your greenhouse either on a hill or in a low area. In one case, strong, cold winds will blow over it. There will be water in the lowlands in the spring.
- In the process of maintaining a greenhouse, you will need a lot of water. In view of this, try to have a water supply or well near your structure.
- Glass or cellular polycarbonate are most suitable for covering the surface of a winter greenhouse. Double thick polyethylene film is allowed only in the south, where winters are milder and warmer.
Nowadays, you can purchase materials for greenhouses and greenhouses, and practical greenhouse structures themselves, ready-made. But it is also quite possible to use a greenhouse made by yourself.
Growing cucumbers: how to prepare a greenhouse for winter
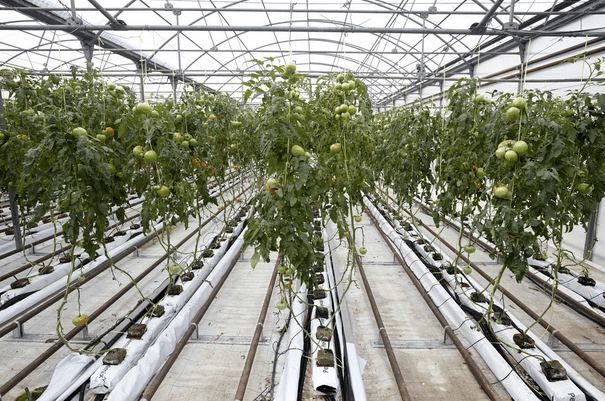
Modern options for growing cucumbers make it possible to obtain yields in a greenhouse of up to 10, or even 12 kg per 1m2. To achieve this, it is necessary to properly care for the greenhouse.
How to prepare a greenhouse for winter? Cucumbers in a winter greenhouse grow no less quickly than in open ground. The most important thing is that it always has the best temperature, watering and humidity.
If the area of your greenhouse is quite large, say 100 or 300 m2, then you need to use it to generate income. Otherwise, your huge structure will ruin you due to the costs required to maintain it. To prevent this from happening, you need to follow modern technologies that increase productivity and reduce the cost of maintaining the facility.

Basic techniques that promote high yields in a greenhouse in winter:
- Mulching. The process when the soil around the plant reduces the growth of weeds and greatly reduces the consumption of water for irrigation.
- Drip irrigation. This system is new and is starting to gain momentum. With its help, you can greatly reduce both irrigation work and water consumption.
- Soil preparation technology. Properly balanced soil enriched with essential substances is the key to success and high yields.
- And, of course, the greenhouse itself. You must properly prepare the building for winter by repairing all cracks, holes and damage. After all, in winter, depressurization occurs much faster than in summer.
The technology for successfully growing plants in a greenhouse in winter is a very interesting idea. Don’t despair if you didn’t understand something the first time. Success, especially from persistent, painstaking work, comes with experience. Don’t give up, and then one day the smell of the vegetables grown by your own hands will mix with the smell of the New Year tree.
Do-it-yourself winter greenhouse: to leave it in winter or not
In order to start building a greenhouse, you need to decide on the shape of the structure. When choosing an option, you should take into account all the factors affecting the greenhouse structure itself.
The winter greenhouse that you are going to leave in the winter should be durable, comfortable and multifunctional. As a rule, such a structure is not built for one year, so take care of its quality in advance.
Winter weather conditions are much harsher than summer ones, and this will make adjustments to the structure you are going to build.

Features of the winter greenhouse:
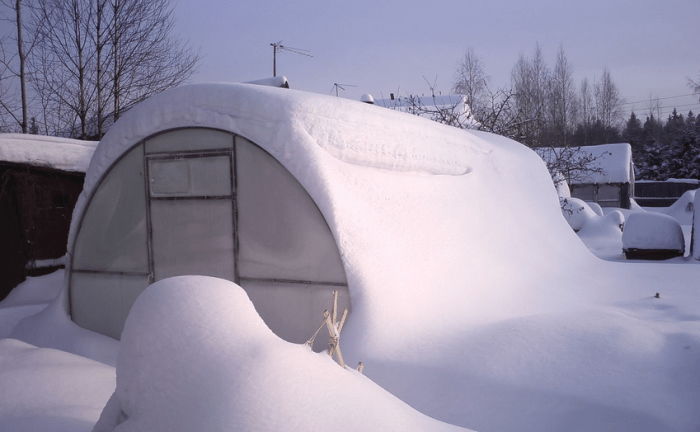
- In winter, it is common to experience large amounts of snow, which collects on the roofs of buildings. To prevent the greenhouse from collapsing under its weight, make the roof as sloping as possible. The arched option is most suitable.
- Winter winds are much colder and harsher than summer winds. Make sure that your design has a minimum of angles and even planes.
- Take care of high-quality heating. In winter the cold can be very severe and you must be prepared for anything.
- Organize watering correctly. Prevent freezing of water on the approaches to the greenhouse and in it itself.
- An important factor is lighting. In winter it is especially necessary. Because the day is shorter and the night is longer. In addition, the sunlight entering the greenhouse in winter is very dim.
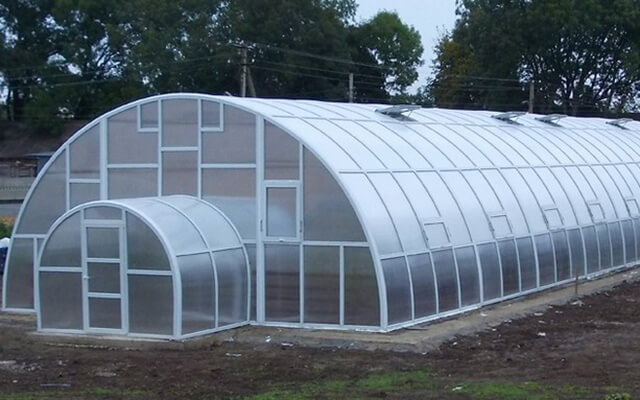
All these factors speak in favor of an arched greenhouse, which is built mainly from cellular polycarbonate. Provided that the greenhouse is high, the droplet option may be suitable for you, which is built on the same principle as an arched one, only it is sheathed by joining sheets in the middle of the roof.
Let's look at how to make a winter greenhouse: manufacturing and installation
Building an arched greenhouse will not be difficult. And especially when it is an ordinary greenhouse, which does not have a foundation. But our case is different. For a winter greenhouse, it is advisable to make a foundation.
How to make a winter greenhouse when you intend to grow vegetables in winter? The main requirement is that the greenhouse must meet all requirements, parameters and cold weather conditions.
No projects are required for the construction of summer greenhouses. They are needed for winter. You need to decide in advance what kind of greenhouse you need to build and from what, purchase the material and start construction.

Stages of construction of an arched greenhouse:
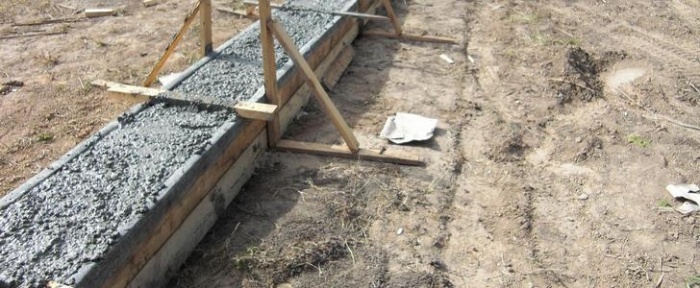
- Let's make the foundation. It must be durable because it will hold the entire structure.
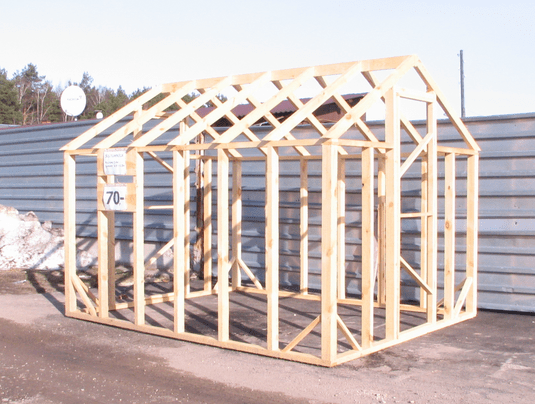
- Preparing the frame. They begin to build it from the foundation.
- We remove unnecessary parts and attach arcs in the shape of an arch to the resulting base. Gap – 2 arcs per polycarbonate sheet;
- At the ends of the greenhouse we attach racks and partitions under the doors and vents;
- We lay a covering material on the arcs and fasten it along the length of the arc at the base;
- We sew up the gables with sheets of the required sizes;
- At the racks we make homemade fasteners and canopies for doors and windows;
- We equip doors;
- We will install windows.
For strength, reliability, durability and normal operation of the greenhouse, it is necessary to build a foundation, and only then place the greenhouse on the foundation.
DIY winter greenhouse (video)
For those who have private homes, the options and types of winter greenhouses may be different. This could be a greenhouse attached to the house, built like a greenhouse or winter garden. You can also arrange a terrace where indoor flowers or cultivated vegetables will grow, and you can also store gardening tools. When choosing the shape, characteristics and design of such greenhouses, read reviews on the Internet. There you will find a lot of interesting things.
Examples of winter greenhouses (photo ideas)


![]()


Almost every gardener, even a non-professional, has a greenhouse on his property. Here he can grow seedlings or full-fledged vegetable crops. However, in the cold season this structure is useless. Therefore, many business owners, especially those who grow produce for sale, are thinking about how to build a greenhouse for winter growing.
Stages of construction of the structure
The presented structure can be erected with one’s own hands, and the work is not difficult. Before building a greenhouse for winter growing, you should understand the sequence of work:
1. Design. At this stage, you must decide on the location of the structure on the site, the organization of lighting and heating of the room, as well as the size of the structure and the shape of the roof. In addition, here you also need to draw the placement of the beds inside the greenhouse.
2. Selection of necessary materials.
3. Laying the foundation. Before you build a greenhouse for winter growing, you need to build a strong and stable foundation. The fact is that this design is permanent and will be repeatedly exposed to negative external factors.
4. Heating installation.
5. Construction of the frame.
6. Construction of the roof, cladding of the structure.
7. Lighting and irrigation equipment.
8. Delivery of soil.
How to choose the right location on the site?
Before you build a greenhouse for winter growing, you need to find a suitable place for it. It is best to build the structure on a small hillock. Here the snow melts fastest and the air warms up faster. In this case, you may not have to add additional soil to the beds.
Please note that the long sides of the greenhouse should be oriented from west to east. This arrangement makes it possible to provide optimal lighting for the structure.
What materials will be needed for the work?

Before you build a greenhouse for winter growing cucumbers or other vegetables, you need to figure out what material you will be lining the main structure with. So, the following may be suitable for constructing a frame:
Wooden beams. They are quite strong and easy to process. However, they are not very resistant to temperature changes and evaporation. The beams require additional treatment with antiseptic and fire-fighting substances. The durability of this design depends on the quality of the wood and its care.
Metal profiles or corners. This material is strong and durable. However, it will also have to be protected from corrosion.
Pipes. They are considered the most popular material for arranging a frame.
Before building a greenhouse for winter growing cucumbers, it is also advisable to understand what you will use to cover the frame:
Polyethylene film. This is the cheapest material, but it is not particularly durable. Under the influence of sunlight, wind and precipitation, it quickly loses its properties. In addition, the film will not provide the necessary thermal insulation properties. If you still decide to use polyethylene, then you will have to buy double material, the service life of which is at least 8 years.
Glass. It provides good lighting for plants and protects them from the vagaries of nature. In order to ensure maximum efficiency of this material, it is necessary to produce double glazing, and this will significantly increase the weight of the structure. In addition, you need to buy very durable and high-quality glass, and it cannot be cheap.
Cellular polycarbonate. This product is the most popular at the moment, as it has many advantages.
Advantages of cellular polycarbonate

A do-it-yourself winter greenhouse (you can develop the projects yourself or find them ready-made) is built quite quickly. Recently, cellular polycarbonate has been increasingly used for frame cladding. It has the following advantages:
1. Good appearance.
2. High impact strength.
3. Easy to install and maintain.
4. Light weight.
5. Good ability to transmit and diffuse light.
6. Excellent sound and heat insulation qualities.
7. Easy to process (even when cold it cuts and bends well)
8. Resistance to negative external factors, UV rays.
9. Ability to withstand heavy loads.
10. Wide range of permitted temperatures: from -55 to +120 degrees.
11. Relatively low cost.
Product types

You can design and install a winter greenhouse yourself. Before this, you need to decide what type of structure you want to build:
Recessed. In this case, you will have to dig a fairly deep pit.
High.
Wall-mounted (it saves space on the site).
With foil walls. This option allows you to retain heat inside the greenhouse as much as possible.
The choice of design depends on the characteristics of your site, as well as personal preferences.
Features of foundation construction

If you want to grow seedlings, you can build winter greenhouses with your own hands. You will learn further how to build a winter greenhouse. The first stage of construction is pouring the foundation. It can be timber, brick, stone and strip. The last option is used most often. To build such a foundation, you need to perform the following steps:
1. First you need to mark the area and dig a trench. Its width is 30 cm and its depth is 70-80 cm.
2. A sand bed 20 cm thick is placed at the bottom. It should be compacted very well.
4. Collection of formwork. Naturally, the foundation must be strengthened with reinforcement. To do this, lay 2 rows of rods along the trench and connect them with crossbars.
After the solution has hardened, it is fashionable to insulate the foundation. For this you can use polystyrene foam. Next, you should begin building the frame. As you can see, a do-it-yourself winter greenhouse (a review of the best technologies will help you choose the right project) can be done without any problems. You just need to stock up on the necessary tools and materials.
Frame construction procedure

If you want to get a harvest several times a year, you can construct winter greenhouses with your own hands. You will learn further how to build a winter greenhouse from metal and polycarbonate.
Most often, corners, special profiles or pipes are used to arrange the frame. Naturally, you can also use wooden blocks, but they are not as durable. In order to build a metal structure, it is necessary to perform the following actions:
Assemble the lower part of the structure directly on the foundation. It can be square or rectangular depending on the project. The base can be attached to the foundation using long bolts or anchors.
Installation of vertical racks. They can also be screwed, however, it is better to use a welding machine (if you are using angles or pipes). Racks are mounted in each corner of the base.
Assembling a copy of the lower structure. This is done on the ground. Then the product is mounted on vertical posts.
Arrangement of roof racks.
The wooden frame is made in the same way. In this case, self-tapping screws are used to secure the racks.
Sheathing of the structure

Before you build a winter greenhouse with your own hands, you must decide on the sheathing material. Nowadays, cellular polycarbonate is considered the best. It's easy to attach.
First you need to measure the required length of the sheets. Next, place the fragment on one side against the posts and align it. This requires the use of a building level. Next, screw a self-tapping screw into one of the corners. Now another alignment is performed, after which the sheet is finally fixed.
After completing the sheathing, all joints should be sealed from the inside of the room. This will prevent cold air from entering the structure.
Heating selection
In the cold season you need How to make a heated winter greenhouse, you will now learn. So, there are several heating options:
1. Biological. It works by releasing heat as plant waste rots. That is, this method allows you to make the beds warm from the inside. To arrange such heating in the designated places, dig trenches, the depth and width of which is half a meter. Place tree branches, bark, broken slate and other debris that is characterized by slow rotting at its bottom. Next, add a small layer of soil and organic matter. After this, a small layer of fertile soil is laid.
2. Laying pipes and radiators that will be connected to the general heating system. Here you need to try not to worsen the efficiency of the general building structure.
3. In this case, you will have to install a regular potbelly stove, which can be heated with wood. Naturally, the smoke must be vented outside. This method is not the most optimal, since you will have to constantly add fuel. Although this problem can be solved by long-burning boilers.
4. Infrared films. They can be perfectly used not only inside the house, but also in greenhouses.
Lighting and watering
Since in winter, plants require additional lighting for normal growth, it is better to use ordinary fluorescent lamps for its arrangement. They are economical and provide the required amount of light.
If you want to provide individual lighting for each group of plants, then use They provide photosynthetic irradiation, that is, they act in the same way as the sun's rays. On cloudy or very short days, the use of artificial lighting is mandatory.
As for watering, you can install an automatic system, which is sold at a hardware store. It must be installed at the stage of designing the location of the beds and constructing the frame.
A do-it-yourself winter greenhouse (you have already looked at the structure and heating of the structure) must be made wisely. To make it as effective as possible, use these tips:
Before entering the greenhouse, arrange a small heated vestibule so that cold air cannot suddenly rush into the main room.
The design must have ventilation windows. Their total size must be at least 1/4 of the entire roof area.
It is better to make the roof in the form of an arch.
To obtain fresh vegetables all year round, many owners of their garden plots and summer cottages are thinking about building a winter greenhouse. It has a heating system, so you can grow vegetables even in the northern regions of the country. You can build a winter greenhouse with your own hands - sketch out a project and a drawing, decide on the internal structure, prepare materials and study the step-by-step instructions for constructing the building.
All types of greenhouses function the same, but winter designs must meet the following requirements:
- provide heating of air and soil;
- withstand high humidity;
- open as much as possible, which is necessary in the warm season;
- good penetration of sunlight;
- have exhaust ventilation;
- have a drain to drain excess water;
- be mechanically strong to withstand snow and wind.
When designing a structure, attention should be paid to for the following features greenhouses for growing vegetables and herbs in winter:

Gallery: winter greenhouse (25 photos)


Project development
Before erecting a heated structure, it is necessary to draw up its design and sketch out a drawing with the expected dimensions . Project development stages:
- Decide on the type of construction, quality of the foundation, type of heating, thickness of polycarbonate for the ceiling and walls, location of the vents, and what profile will be used.
- The drawing marks the connection points of the elements and how they will be attached.
- A drawing of the heating system is made separately. Having decided what type it will be, you should draw a plan for its placement.
Polycarbonate greenhouses: design and main advantages
To make it easier to carry out construction with your own hands, it is recommended to make drawings in several projections:
- foundation - top, side and front;
- view of the greenhouse - top, side and front;
- heating system and boiler - from different sides.
If you plan to build a structure with an area of more than 10 square meters. meters, then when designing it, one should take into account the regulations specified in SNiP on work with metal profiles, as well as on wind and snow loads.
Types of buildings
Before you start designing a winter greenhouse, the types of its classification should be taken into account:

Material selection
When building a winter greenhouse with your own hands, you must take into account that the best material for its frame is Will it be wood or metal?. The bars are selected with a cross-section that can withstand snow and wind loads.
The best microclimate in the building will be provided by wood, and wooden blocks are more convenient to work with. At the same time, the metal frame will last longer.
To cover a winter greenhouse you can choose:

Artificial heating of beds in a polycarbonate greenhouse
The right material will help you build a winter greenhouse with your own hands that will last a long time.
DIY construction
The structure should be erected on a flat area that is well lit and protected from winds.
The foundation for a winter greenhouse must retain heat in any frost and be durable.
Stages of foundation construction:
- Along the perimeter of the future structure, dig a trench with a depth of at least 80 cm and a width of at least 20 cm. The depth of the trench depends on the degree of freezing of the soil, so in Siberia and the northern regions it should be much greater.
- The bottom of the trench is covered with a 15 cm layer of sand, which must be compacted well.
- The sand is covered with waterproofing, the formwork is assembled and concrete is poured.
- The structure is strengthened with iron reinforcement.
A foundation rising several tens of centimeters above the ground surface will make it possible to make high beds, which will greatly facilitate work in the greenhouse.
Frame installation
The construction of the structure should be started only after the foundation has stood well and dried.
Stages of work:

Heating system
When installing a winter greenhouse, it is necessary it is necessary to make a heating system, which can have several options:
- Furnace installation. Cheaply and easily, you can install a wood-burning stove in a greenhouse with your own hands, which will heat the air. The disadvantage of such heating is that you have to regulate the temperature yourself by reducing or increasing the amount of fuel. However, a wood stove can be made from scrap materials, such as old barrels.
- Warm beds. Additionally, you can insulate the soil using organic debris in the form of branches, tops, and leaves. Large debris is first placed under the beds, followed by small debris. Fertile soil is poured on top in a layer of 10 cm. During the rotting process, heat will be released and warm the soil.
- Laying pipes in the ground. You can run pipes from a central or other heating source and lay them in the ground, which they will heat. All pipes are installed in one system, in which water can also be heated using electricity.
- Greenhouse similar to a thermos. To save energy costs, the building can be covered with two layers of polycarbonate, and the walls can be buried to the frost line. In such a greenhouse the air temperature will be positive even in severe frosts.
- Combined automated heating. In this case, the ground is heated by polypropylene pipes laid in it, and the air is heated by infrared lamps installed on top. By connecting a thermostat to such a system, temperature control will be carried out automatically. Combined heating can be equipped with a ventilation system that will turn on when it gets hot in the greenhouse. This heating system is sold in stores, but it is quite expensive.
Winter greenhouses are designed primarily for growing plants throughout the year. As we know, in winter, vegetables, berries and herbs are very expensive, so many summer residents build structures on their site with their own hands in order to always have fresh salads and compotes on the table. But before starting construction work, it is necessary to carefully think through the design of the future greenhouse, its heating system and make an accurate drawing.
Construction device
Today, winter greenhouses can be built from various materials. Therefore, each owner of a summer cottage can choose the most suitable and cost-effective options for himself.
Winter greenhouse made of polycarbonate
Shapes and sizes of greenhouses:

The design of a winter greenhouse must withstand severe frosts, snowfalls and other atmospheric phenomena. The most durable, reliable and environmentally friendly material for constructing a greenhouse frame is wood. But such a structure can last no more than 15 years, and then it will have to be updated.

Winter greenhouse made of wood and polycarbonate
The most durable and profitable design is considered to be a greenhouse with polycarbonate cladding, since this material is of high quality, long service life and affordable price.
Any winter greenhouse must have a foundation, frame and glass roof. It is best to build such a structure from north to south. The room must have a good ventilation system to regulate heat and air conditions for the proper functioning of plants.

Winter greenhouse with glazing for a summer residence
Ventilation can be supply or exhaust. The tightness of the greenhouse is the main condition for its effective functioning. The temperature is maintained artificially.
The greenhouse can be racked, in which the plants are placed on shelves with sides, or rackless, where the plants are planted directly into the ground. The racks in the greenhouse should be approximately at a height of about 60–80 cm from the ground, and the passage between them should be at least 70 cm. The racks are made of wooden boards, plastic or reinforced concrete, depending on the design features of the greenhouse.

Winter arched greenhouse with shelving
Photo gallery: selection of project options
Drawing of a greenhouse with dimensions Scheme of a rack greenhouse Project option for a winter greenhouseTypes of structures: advantages and disadvantages
Winter greenhouses come in several types depending on their design features, type of material used, type of lighting, heating system, and foundation design.
- Capital greenhouses are built on a strip foundation. A trench is dug in the center, which is designed to “collect” cold air, which should not reach the roots of the seedlings. Thanks to this design, the inside of the greenhouse warms up quickly enough and therefore seedlings can be planted several weeks earlier than usual.
- Capital types of conventional type greenhouses are collapsible structures that can be dismantled and moved around the site. To build such a greenhouse, a metal or plastic profile, polycarbonate, and bolted connections are used. Piles serve as the foundation.
The remaining types are prefabricated structures. Only in a permanent structure can a full-fledged heating and artificial lighting system be installed.
Greenhouses may differ in such parameters as:
- Functionality. They allow you to grow not only ordinary vegetables of a given region, but also exotic ones.
- Location in relation to the ground. There can be three types: recessed, surface and arranged in the upper part of a barn, garage, closet, etc.
- Architectural solution. They can be with a single-pitched, gable, three-pitched roof, as well as arched, wall-mounted and combined.
Greenhouses also differ:
- By type of building materials. They can be built from brick, wooden beams, metal profiles or PVC pipes. Polycarbonate or glass is used as a coating. Today, combined greenhouses, in which the walls are lined with polycarbonate and the roof is made of glass, are in great demand.
- According to the type of heating system. Winter greenhouses can operate on biofuel, solar panels, and also have stove, air, gas, water or electric heating.
- By type of planting seedlings and plants. They are planted in the ground or in specially knocked down boxes placed on shelves.
Depending on the design, greenhouses are divided into the following types:

Preparatory work: drawings and dimensions of the structure
We will consider the construction of a winter greenhouse 3.34 meters wide and 4.05 meters long. The total area of the room for growing crops is 10 square meters. meters.
The greenhouse is a square room buried in the ground with shelves and a roof made of durable two-layer polycarbonate.
If there is groundwater on the site and it is close to the surface, then the greenhouse is built without deepening, and the outer sides of the structure are sprinkled with soil.
If necessary, the length of the structure can be increased by adding additional sections to the frame.

Drawing of a winter greenhouse
Structure of racks and their dimensions
Where the beam connects, a triangular-shaped support is built. The dimensions are shown below in the drawing.
Ridge posts are needed to support the timber at the connection point. Also, the support should not come into contact with the polycarbonate sheathing.
A strong support system will not interfere when a person moves around the greenhouse. It is necessary if the length of the greenhouse is more than 4 meters. If the length exceeds these parameters, then supports are installed every 4 meters.
Corner supports are made of 100x100 mm timber, intermediate supports are made of 50x100 mm boards.

Winter greenhouse support diagram
Construction of walls and thermal insulation
The pillars will be covered with boards on both sides, and insulation will be placed in the interior space.
To save money, you can take round timber Ø 120–150 mm, hewn to 100 mm. The walls are covered with slabs.
To insulate walls, use slag, sawdust or fine expanded clay. Quicklime is added to sawdust as protection against small rodents.

Winter deep greenhouse
When choosing timber and boards, it is necessary to take into account that this structure will be used throughout the year, so the lumber must be of high quality.
- For the construction of supports and other parts of the frame, it is recommended to purchase pine boards and timber (rounded or glued). This is the most accessible, durable and cost-effective material for the construction of greenhouses in our region.
You can also choose larch or oak, but such lumber is quite expensive and therefore it is irrational to use them in this case.
Polycarbonate has excellent heat and sound insulation characteristics. But the more complex its structure, the greater the mechanical loads it can withstand (snow and wind).
When choosing polycarbonate, you need to know its thickness.
- For cladding the walls of a greenhouse, it is best to take sheets with a thickness of 6 to 25 mm, depending on the intended design.
- For roofing, polycarbonate with a thickness of 16 to 32 mm is recommended, since this part of the greenhouse will bear the heaviest load.
Calculation of the required amount of material and tools
- Beam with a section of 100x100 mm;
- Board with a section of 50x100 mm;
- Gorbyl;
- Round timber Ø 120–150 mm;
- Boards for making shelving;
- Insulation;
- Foamed polyethylene (aluminum foil);
- Polycarbonate sheets;
- Self-tapping screws and thermal washers;
- Hardware;
- Screwdriver;
- Wood hacksaw or saw;
Step-by-step instructions for building an in-depth winter greenhouse with your own hands
We dig a pit 60 cm deep. Its length and width should be several centimeters larger than the perimeter of the future greenhouse. At the bottom we make markings for installing support pillars. We dig in the supports to a depth of about 50 cm.
At a height of one meter from the ground, stretch the construction rope and check the evenness using a level. We fill the supports with soil and compact them thoroughly.
We level the floor and cover the walls with boards outside and inside, starting from the bottom. We fill the space between them with the selected insulation. This is how we cover the opposite two walls.
After we have sheathed the walls, we need to saw off the excess ends of the boards that extend beyond the pillars. At the corners of the structure inside, we nail 50x50 mm bars onto the boards. Next, we will attach the sheathing to the front and back of the wall. This is how we sew up all the walls of the greenhouse. But we nail the boards to the vertical beams.

Pit and installation of supports for the greenhouse
We compact the insulation inside the walls, adding the required amount of expanded clay, sawdust or slag to the top. Then we sew up the top of the walls with boards.
We also cover the inner surface of the walls with insulation made from special foil. We place the insulation so that it extends slightly at the top of the walls, and bend it so that it can cover the boards covering the upper part of the walls.
We make the roof separately from the main structure, and then install it on the greenhouse. We manufacture all other roofing elements according to the diagrams indicated in the drawing.

Installation of supports and built
We connect the rafter parts into half a tree, and nail the lintel so that the distance at the bottom is 3 meters 45 centimeters. Since the jumper is temporary, we must nail it so that it can then be dismantled. The nails should not be driven in completely, but should be left 10 mm from the head so that they can be easily removed.
We assemble the rafters and nail them to the support as shown in the drawing below.

Roofing of a winter greenhouse
After we have nailed the rafters to the support, we remove the jumpers. We install the ridge beam under the rafters and place the front posts measuring 88 cm under it. We nail the outer rafters (20 cm) to the ridge beam. To do this, we pre-drill holes in the rafters. Then we install a jumper between the rafters, and install flashings on the side rafters, the ridge beam and on the front posts as shown in the drawing.
Reference. Strips are called wooden strips that are designed to cover various cracks.
We attach two-layer thick polycarbonate to the roof frame using self-tapping screws with thermal washers. To do this, we drill holes in the sheets larger than the diameter of the screws themselves.

Polcarbonate fastening
After attaching the polycarbonate, we need to install a ridge corner from galvanized sheet metal. We fasten it with a gasket for insulation. We do not attach polycarbonate to the side ends of the roof until we have secured the roof to the main structure.
We install the roof on the walls and secure it with 4 metal brackets. They can be made from twenty-centimeter long nails. Then we install the side parts of the roof from polycarbonate triangles.

Installing a ridge on a greenhouse
We install an insulated thick wooden door (thickness at least 5 cm).
After this, you can install wooden racks and shelves inside the greenhouse for future seedlings. They are installed on the sides of the walls at a distance of approximately 60 cm from the floor. A layer of earth is poured on them or boxes with soil are placed.

Installation of a winter greenhouse
Heating selection
The choice of heating system depends on the size of the room. For winter greenhouses with an area of more than 15 square meters. meters, stove heating is suitable. Large areas are usually heated with biofuel, electric heaters or a water loop.
Stove heating is an affordable and economical option for a greenhouse. In this case, a stove is installed in the room, which is heated with wood, coal, briquettes, pallets or gas. But since the walls of the oven become very hot, plants should not be planted near it.

Stove heating in a greenhouse
Water heating requires a water heating boiler, pipes and a tank. The pipes are buried in the ground to a depth of about 40 cm or placed immediately under the shelves.

Water heating of a greenhouse
Electric heating can be of three types: air, cable and infrared. Cable is a “warm floor” system, air is installed using fan heaters, and infrared is produced by special heating devices that are mounted under the roof of the greenhouse.

Electric heating of a greenhouse
Biofuel heating is the most cost-effective heating option. Here, the indoor air is warmed due to the heat generated during the decomposition of various organic substances.
The most used biomaterials are:
- Horse manure - capable of maintaining a temperature of 33 to 38°C for 2–3 months;
- Cow dung - can keep 20°C for about 3.5 months;
- Rotted tree bark - keeps at 25°C for about 4 months;
- Sawdust - maintain 20°C for only 2 weeks;
- Straw - can maintain a temperature of 45°C for up to 10 days.
Biofuel is placed in the ground under the top layer of fertile soil. When choosing a fuel type, it is necessary to take into account its acidity level, since it significantly affects the quality of the soil. Cow dung is considered the best as its acidity level is 6-7 pH. A more acidic environment is created by bark and sawdust, and an alkaline environment is created by horse manure. Biofuel after its use can be reused as humus.
The type of heating is selected individually for each specific case, based on parameters such as the climate of the region, planned expenses and type of plants.
- Before starting construction of the greenhouse, all wooden boards and beams must be treated with antifungal and antiseptic agents.
- Before installing the supports, after treating them with protective agents, the lower parts must be tightly wrapped with roofing material and secured with a stapler.
- It is also necessary to protect the external walls by securing roofing felt to them. And only then sprinkle them with soil.
- The roof frame, after applying a protective coating and primer, is covered with white paint intended for outdoor work.
- During the operation of the greenhouse, it is necessary to choose energy-saving lamps to create artificial lighting. They help you use electricity more economically. Their number and location depend on the dimensions of the internal space of the greenhouse.
Video: how to build a winter greenhouse with your own hands
If, when constructing a winter greenhouse, you strictly observe all technical standards and follow the drawn up diagrams and drawings, then such a design will delight you and your loved ones with excellent harvests of vegetables, berries and fresh herbs for decades.
orchardo.ru
How to build a greenhouse with heating with your own hands: instructions
Of course, the undoubted advantage of building a winter greenhouse with heating is the fact that you can build it yourself. This will help you save a lot of money and give you the opportunity to do everything exactly the way you want. Of course, in order to avoid a serious mistake, it is necessary to think through the construction plan in advance, taking into account the necessary materials and devices for lighting and heating the greenhouse.

Using a stove to heat a greenhouse
What is needed to build a winter greenhouse with heating with your own hands:
- construction plan;
- frame materials;
- material for the construction of a greenhouse;
- tool for work;
- lighting and electricity;
- heating soil, air and plants;
- irrigation system;
- ventilation, also known as the ventilation system.
The first thing you need to do is draw up a construction plan. Thanks to an accurate plan, building a greenhouse in winter will be much easier and cheaper, since there will be no costs for redoing this or that mistake. How much it costs to make a greenhouse in winter depends on the materials you choose for construction and the heating system.
Also, in order to make a greenhouse of high quality and achieve good productivity, you need to choose the right place to build a greenhouse in winter. It is recommended to choose a level place with good lighting, without much shadow, and with high-quality soil. In addition, if you plan to make a greenhouse in winter, then take care of the temperature conditions in the greenhouse itself.
Video “How to build a winter greenhouse”
In this video you will find advice from a practitioner with many years of experience in building different types of greenhouses on how to build an ideal winter greenhouse.
Construction of a greenhouse
Construction of a greenhouse is the main task for every gardener, since if the construction or diagram is not drawn up correctly, serious mistakes can be made that will lead to the greenhouse malfunctioning. The first issue to consider is the frame. You can build a frame from wood and metal; in winter, you can choose both options. However, it is worth paying attention that the metal frame will last longer and be more reliable.
How much money is needed to build a metal frame? Of course, more than for wood. And it will take more time. But still, as practice shows, most often gardeners choose metal material.

The second question that must be considered before constructing a greenhouse is what material is best to choose. There are several options for building a greenhouse in winter, including:
- glass;
- polyethylene;
- polycarbonate
How much material is needed? It all depends on the size of the greenhouse.
As practice shows, the most optimal material for building a greenhouse in winter is polycarbonate. This is a fairly budget material, however, it is of very high quality and performs well in different temperature conditions. The strength and lightness of polycarbonate have proven themselves in the building materials market. In addition, this material can easily last up to 8 years, while its quality remains unchanged. And building a greenhouse from polycarbonate is much easier and takes less time than from glass.

How to make heating
The heating system is the main issue in building a greenhouse in winter. Many gardeners solve this issue very simply. They install greenhouses close to the house or even right next to the walls of the house, and then use the heating of the house itself. Of course, this significantly reduces costs, especially during construction, but, as practice shows, this is not the most practical option.
Firstly, the steam that the greenhouse receives from the house may be distributed unevenly and rise to the upper level of the greenhouse. Secondly, if the greenhouse is quite large, then such heating may simply not be enough. In addition, if you plan to expand the size of the greenhouse in the future, then it is better not to save money and install a heating device.

There are several types of heating:
- electrical;
- convector;
- water;
- infrared;
- wood;
- air system;
- biofuel.
All of the above options, except biofuel, refer to the technical type of heating.
As far as biofuels go, it's a pretty interesting way to raise soil temperatures. However, biofuel alone will not be enough to heat a greenhouse in winter. Firstly, the soil temperature rises to 17 degrees, and in winter this indicator will not be enough. Therefore, experts recommend using biofuel as an additional method of heating the soil.

The choice of primary heating system depends on how much money you plan to spend on the heating system.
The simplest and most affordable method is the air system, however, it only heats the air, not the soil. It is in this case that a combination of biofuel and air heating would be an excellent option. Practice shows that this method is quite profitable, but not everyone will like it, as it requires effort and time.
One of the most expensive methods is infrared heating. However, it is worth it, as it has a number of unique advantages. This type of heating is absolutely safe not only for plants, but also for people. In addition, infrared light heats not only the air, but also the soil and the plants themselves. Another nice bonus is the presence of a thermostat. In this case, when the required temperature is reached, the infrared lamps will turn off briefly, and you will not need to constantly monitor the temperature and turn off the heating yourself.
Lighting system
It is impossible not to take into account the issue of greenhouse lighting. In winter, daylight hours are significantly less than in summer, but plants still need plenty of light. With a lack of sunlight, there may be low yields or even poor plant growth.

If you decide to build a greenhouse from polycarbonate, then it is worth considering that over time this material begins to transmit light worse, so lighting the plants becomes mandatory. Also, electricity in greenhouses is necessary for various devices that monitor air humidity, temperature (if these are electronic thermometers), and provide ventilation in the greenhouse.
By the way, buying a thermostat is another interesting issue. You can make this device yourself. It ensures ventilation of the room. Therefore, you will not need to open the windows in the greenhouse every two to three hours. The thermostat will do this job for you.
Irrigation system
Perhaps the last thing you should pay attention to is the irrigation system. Do not forget that in winter the temperature in the greenhouse should be the same as in summer. The outside air temperature in no way relates to the plants in the greenhouse. Therefore, it is necessary to think through and install an irrigation system in advance. The best options would be a drip irrigation system or an irrigation system.

Of course, the undeniable advantage of a drip irrigation system is the fact that it can be easily done with your own hands. This is a very practical, simple and budget option that is perfect for many plants. An irrigation system is a more modern method of watering. Irrigation nozzles are attached to the ceiling of the greenhouse and water the plants at a certain frequency. Many gardeners and gardeners have already seen in practice the convenience of this system, but still prefer to combine these two options. This is due to the fact that when watering plants using an irrigation system, water in a lower concentration enters the soil and to the roots. Therefore, drip irrigation will perfectly moisturize the plants from below, and the irrigation system will perfectly moisturize the plants from above.
Do not forget that an irrigation system requires not only water, but also electricity. In addition, the purchase will also cost quite a tidy sum, and making such a system with your own hands is not so easy. Drip irrigation can be done independently; it requires lower costs during creation and during direct use.
Which option to choose, again, depends on how much money you plan to spend to build a winter greenhouse with your own hands. Of course, at first you can do without an irrigation system altogether. However, later it will be more difficult to lay it, and at first the plants may take root poorly or produce low yields due to lack of moisture.
Video “Heating the soil in a greenhouse with air”
This video will be interesting to watch for those who plan to heat the greenhouse with their own hands. You will get acquainted with a technology in which air pipes are used as thermal insulation.
plodovie.ru
A do-it-yourself winter greenhouse is an excellent solution for any practical owner who has his own personal plot. Not everywhere the climate of our vast country spoils us with an annual good harvest of vegetables in the summer, not to mention the winter.

Anyone can build a winter greenhouse on their own, however, like any big undertaking, it will require certain skills and a capital approach. But the result will be a neat and warm structure that will delight you with a good harvest all year round, regardless of the vagaries of the weather.
Most summer residents choose a wooden greenhouse for self-construction - the cheapest and most environmentally friendly material, so we will consider this option. A wooden winter greenhouse will cost an order of magnitude cheaper than its steel and PVC counterparts - depending on the covering material, it will cost an average of 5-10 thousand rubles.
Choosing a design for a winter greenhouse
- The arched structure has a roof in the shape of an arc. This roof shape allows you to grow low-growing plants, while tall plants can only be placed in the center of the greenhouse. Plants receive the maximum amount of sunlight, and in winter the snow itself easily rolls off the roof, which eliminates sagging and collapse.
- The design of a lean-to greenhouse involves one wall adjacent to another permanent structure. This form is the most budget-friendly, allowing you to save not only money, but also space. The lean-to design is the most preferred, since there is a rule - the closer to the house the greenhouse is built, the easier it will be to heat it. Direct adjoining to a residential building will allow the use of one heating system for the house and greenhouse.
- Gable - is the most common type of do-it-yourself greenhouse. The roof is shaped like a triangle, which allows for the most efficient use of the available space.
A winter greenhouse can be equipped with shelving - then all plants will be grown in boxes and pots on shelving. If shelving is not planned, plants can be grown directly in the ground.

Selecting material for covering the greenhouse
A do-it-yourself winter greenhouse must be completely sealed, so glass or polycarbonate is chosen for the coating.
Polycarbonate is a modern, lightweight and durable material that is quite easy to install. The polycarbonate coating can withstand even the most severe frosts and does not lose its qualities. The material is significantly cheaper than glass - which is why most modern greenhouses are made from polycarbonate. Another advantage of polycarbonate is that it is easy to transport even on the roof of a car trunk, since the material is sold in rolls.
Foundation arrangement
We will consider the construction of a winter greenhouse with a gable roof covered with polycarbonate. The project for arranging a winter greenhouse with heating requires the presence of a foundation.

Construction of a strip foundation requires the following steps:
- A trench is dug approximately 20 cm wide and 50-60 cm deep, and along the edges of the trench formwork is built from wooden boards 25 cm high above ground level. At the bottom you need to make a soil or sand cushion.
- To prevent subsidence of the structure, the trench is carefully reinforced - if in the future there is a desire to change the frame to a stronger and heavier one, this will be easy to do.
- The prepared trench is filled with concrete. Each layer of concrete is carefully compacted to avoid air voids. The foundation must dry for at least a week.
- Waterproofing the finished strip foundation will protect it from moisture and extend its overall service life.
A winter greenhouse should begin with a vestibule - it is advisable to provide for it when planning the foundation. The vestibule will create an air cushion that will not let the cold inside.
Frame arrangement
Working with wood is a pleasure; it is a soft and flexible material. In order to make a wooden frame, you will need the following tools:
- electric drill or screwdriver;
- fastening elements - nails and screws;
- hammer;
- tape measure and building level;
- hacksaw;
- Bulgarian.
Materials:
- timber measuring 100x100 mm;
- bars for racks 50x50 mm;
- metal corners;
- polycarbonate coating.
All wooden materials are carefully treated with a protective coating. The procedure for constructing a wooden frame will be as follows:
- The harness is made of wood - from 100x100 mm timber. The bottom frame beam is attached to the foundation with long self-tapping screws, at a fairly frequent distance. The individual strapping elements are fastened together using a notch or steel angles. It is more advisable to fasten steel corners to roofing screws - this will give the structure additional strength.
- Vertical posts are attached to the bottom frame using metal corners - at intervals of at least 60-70 cm. The height of the posts can be arbitrary, but 1.5 m is sufficient. The vertical posts are connected at the top by an upper frame. To give the frame additional rigidity, it is advisable to strengthen the vertical posts with additional wooden supports and spacers.
- Next, the installation of the gable roof begins - for this it is necessary to make a wooden rafter system. To do this, take two 50x50 mm bars 1.2 m long, make cuts and screw them to the top frame at an angle of 45 degrees - outwardly, each pair of rafters resembles the letter A. The rafters are installed in increments of a meter or one and a half meters, then the ridge beam is nailed.
- A wooden sheathing is hung along the rafters, the pitch of which will depend on the material with which it is planned to cover the greenhouse.

Greenhouse covering
The polycarbonate covering will be attached in two layers so that there is an air cushion between the layers. This device allows you to retain heat as much as possible in the winter when the heating is on.
One layer of polycarbonate will be attached inside the greenhouse, and the second, respectively, outside. Fastening of cellular polycarbonate is carried out according to the instructions included with the material. Sheets are cut using a jigsaw or a hacksaw. The polycarbonate overlap must be at least 7 cm.
The main principles of polycarbonate installation are precise cutting to size, careful installation, installation on special fasteners and hermetically sealed seams. Polyurethane foam or special sealants can be used as a sealant for sealing joints. You can also use metal self-adhesive tape from the inside of the greenhouse and polymer film from the outside as sealing.
Heating
Heating a greenhouse can be done in two ways:
- air heating;
- water heating.
Electric air heating involves the installation of various heating devices in the greenhouse. The most budget-friendly option would be to organize heating using infrared emitters - any other project for heating a greenhouse with electricity will be quite expensive.
Infrared emitters are suspended from the ceiling and walls, and film emitters are used to heat the ground. When installing infrared emitters, you must strictly follow the instructions included with the product.
Water heating involves laying a pipeline around the perimeter of the greenhouse or between the beds. The principle of operation of water heating is the continuous circulation of coolant in a circle - from the boiler into the pipes and radiators, then back into the pipes and into the boiler.
It is advisable to place the stove or boiler with which the coolant will be heated in the vestibule.
So, now you know how to build a winter greenhouse yourself. All efforts and costs will ultimately be compensated by fresh vegetables and herbs served to the table in winter.
onavese.ru
How to build a greenhouse for winter growing?
There are places on our planet where the climate allows you to harvest two or even three crops a year. Of course, agriculture flourishes there and turns out to be much more profitable than in our temperate latitudes, where plants have time to grow and give us fruits only once a year.
But there is a technology that allows you to deceive nature and force the plant to bear fruit all year round, even in winter; it is based on the use of a winter greenhouse, which you can build (make) with your own hands. 
Choosing a place to build a winter greenhouse
When choosing a location for a future winter greenhouse, you must first of all take into account three main factors.
Firstly, the light mode. The greenhouse should receive the maximum amount of sunlight in winter. Therefore, it is best to orient the building along its length from west to east. This is especially important for solar greenhouses.
Secondly, it is necessary to take into account the directions of the “prevailing” winds. If gusty cold winds are not uncommon in your area, be sure to consider wind protection. With the right approach, you will save significantly on heating.
Thirdly, position the greenhouse in such a way that the passage to it is wide enough and optimally comfortable. This will make it easier for you to build the greenhouse itself and subsequent operation in general. 
If, to protect the greenhouse from cold winds, you decide to build an additional fence or organize a hedge, remember that the fence should not be adjacent to the structure. For example, with a greenhouse ridge height of 2.5 meters, the distance between the wall and the fence should be no less than 7-8 meters. This is due to the fact that the wind flow, having encountered a “monumental” obstacle, has the habit of rushing upward and going around the obstacle. This means that “for dessert” you will get a turbulence zone, which will actively remove heat from the walls of the structure. And the narrower the distance between the greenhouse and the fence, the stronger the turbulence will be. The ideal protection option is a hedge 15-20 meters from the greenhouse.
Choosing material for a winter greenhouse
Before building a winter greenhouse, you need to decide on the material for the frame and covering.
A permanent greenhouse must be durable, so the choice of material for the frame can be limited to metal and wood. And not with thin profiles and bars that can barely support their weight. The vertical posts and beams of the roof must be able to withstand winter loads with a reserve.
As for what to prefer, metal or wood, it is difficult to achieve a consensus here. Metal is more durable, but wood is more convenient to work with and easy to repair. But most importantly, the wood does not heat up in the heat. The microclimate in a wooden greenhouse is better than in a metal one.
You can use film to cover a winter greenhouse, but you will have to change it often. And although it is cheaper, it will require two to three times more than for a conventional greenhouse. “Eternal” glass also has disadvantages: fragility and heavy weight. 
How does a do-it-yourself winter greenhouse begin to be built?
We have a little understanding of the differences between winter greenhouses and their features. Now it would be nice to pay attention to such an issue as construction. It is quite obvious that any construction process begins with planning, with drawing up drawings. Before you start building a frame, laying a foundation and doing other work with your own hands, you need to clearly understand what we are going to do. Yes, modern technologies often simplify many things, but the need for planning does not go away. In order to make it more clear to everyone how the construction of winter greenhouses takes place, in which the soil is kept warm, we will present some algorithm of actions. 
- Design. At this stage, it is important to take into account all the details, from how the walls will be located and how the heating system will be arranged, ending with how the plants will be located inside. This also includes the selection of materials for construction. Fortunately, modern advances provide building materials in abundance;
- Laying the foundation. Here, of course, what material you build from is of great importance. In any case, the foundation for a winter greenhouse must be very reliable;

- Heating work. It is quite obvious that the soil and bushes of fruits and vegetables need heating. Therefore, the heating system must be arranged even before the installation of the frame begins;
- Construction of the frame. Before building walls, it is important to install a frame; this probably won’t surprise anyone either;
- Wall installation. In this process, everything depends on the material you choose.
Pruning currants in spring: video for beginners
Pruning blackberries in spring: rules and diagrams
Pruning cherries in spring: when to do it and diagrams
A do-it-yourself winter greenhouse is a very relevant topic for everyone who wants to eat fresh vegetables instead of canned ones in winter. If you approach this issue thoroughly, study the best existing projects, consider different ways of organizing heating and additional lighting, and the building materials from which greenhouses are built, then it is quite possible to build a greenhouse yourself, without the help of professionals.
The greenhouse frame is most often assembled from a metal profile or wooden beam, although metal pipes or a plastic profile are also used. Metal is stronger and more durable, but wood creates the necessary microclimate and is easier to work with. Before deciding on the material, it is advisable to know what plants you need to build this greenhouse to grow. Cucumbers, for example, require very high humidity, which will shorten the life of the wooden frame.
Film, glass or polycarbonate are used for walls and roofs. If we take into account the possible very low temperatures, the weight of snow, which can fall a lot in winter, then using the film is more hassle than savings. Glass has proven itself well in any weather, but its weight, increased by the weight of snow falling in winter, must be taken into account when constructing the frame so that it does not collapse under the weight of a snow-covered roof.
Light and transparent multilayer polycarbonate performs well; it should be taken with a thickness of 10 - 16 mm. When choosing polycarbonate, you should remember that if the thickness is 10 mm, you need to take sheets no wider than 105 cm, and if 16 mm, no wider than 140 cm to ensure sufficient strength.
It is imperative to make a solid foundation for a winter greenhouse, then build a frame. After installation is completed, the heating system is installed. If you build a lean-to greenhouse adjacent to a residential building, then its heating can be simply a continuation of the heating system of the house. 
To calculate the required amount of heat, you need to find the difference between the thermal conductivity coefficient and the glazing area. The difference between heating a house and a greenhouse is significant - in a greenhouse, not only the air temperature is important, but the soil temperature. Polycarbonate greenhouses running on biofuel are considered very reliable. When choosing heating devices, aluminum convectors are usually preferred; it is believed that they are able to distribute heat evenly throughout the entire greenhouse.
A layer of sand is placed at the bottom of the pit, then a layer of turf soil (or simply turf laid with the roots up), then humus. After laying all the elements of the heat accumulator and installing pipes for its ventilation, you need to lay down a polyvinyl chloride film so that the soil does not interfere with its operation. Slots are made in the film for the pipes, and it itself is attached to the walls using a construction stapler. After this, fertile soil is poured into the greenhouses for beds and infertile soil, which can then be covered with tiles - for paths. To prevent the backfilled soil from pushing the boundaries of the beds, they are tied together every meter with a special wire with a cross-section of at least 8 mm. This wire needs to be wrapped in plastic tape (or better yet, hidden in plastic pipes) so that it does not rot in the damp soil.
Construction of a greenhouse on your own
The location for a winter greenhouse must be chosen very carefully, since it is built for years. It is advisable that this be a well-lit, flat area without buildings or trees. Also pay attention to soil moisture. It shouldn't be too high.
A shallow reinforced concrete strip can be used as a foundation for a winter greenhouse. Since the foundation must be strong, it must be poured in accordance with established requirements.
The frame is assembled onto the finished base. If it is factory-made, you can use the photos and drawings attached to the design. Polycarbonate sheets are secured to the frame with rubber washers. To ensure tightness, their edges are glued with tape. To ventilate the greenhouse, it is necessary to make several windows. If you want to start growing vegetables and don’t know how to build a winter greenhouse with your own hands, you can purchase a ready-made prefabricated structure or seek help from specialists. 
The method of heating a greenhouse largely depends on its usable area. A small room can be easily heated using a conventional stove. For a larger farm you can choose:
- Electric heating;
- Water heating;
- Biofuel.
For water heating you will need a boiler, pipes and an expansion tank. Pipes can be placed under racks or directly in the ground.
Electric heating can be air or cable. Recently, infrared heating is often used. Cable heating resembles a “warm floors” system. A system consisting of heating cables is placed in a shallow pit. A layer of sand and fertile soil are poured onto it. Air heating of the greenhouse is provided by fan heaters. For IR heating, infrared heating devices are used. They are hung on the ceiling.
Biofuel is the most economical type of heating.
For these purposes you can use:
- Horse or cow manure;
- Sawdust;
- Rotted tree bark;
- Straw.
Biofuel is placed under the fertile soil layer. To heat it properly, it is necessary to provide access to air and constantly maintain the required level of humidity in the room.
It is up to you to decide which type of heating to choose for the greenhouse. It is worth noting that the choice largely depends on financial capabilities. You know how to build a greenhouse for winter growing. Now you need to figure out how to plan its internal space.
After all construction and sealing work has been completed in full, you can begin arrangement. So, it is necessary to supply water and electricity for lighting to the greenhouse. It is also important to take care of the shut-off valves, which will ensure a high-quality water supply.
When choosing light scattering sources, it is necessary to take into account the characteristics of growing the selected crops. An equally important issue is the soil. The substrate is prepared, fertilizers and special additives (feeding) are added. They will ensure fast and proper growth of all vegetables and fruits that have been selected.
Guided by the tips provided, you can build and prepare a winter greenhouse for growing various crops in the winter in just a few days. It is enough to use all available materials and purchase missing ones. You can handle all the work alone, but it is better to have an assistant, especially when it comes to installing the skeleton of a winter greenhouse.
Video “How to build a heated greenhouse with your own hands”
mir-ogorodnikov.ru
The construction of a winter greenhouse on a personal plot is a definite milestone in the practice of a gardener, when knowledge and experience in growing a variety of crops allows harvesting not only in the summer. However, you need to understand that the construction of a winter greenhouse is an event that requires knowledge, work skills, careful preparation of materials and a place for the future structure. Therefore, it would be a good idea to familiarize yourself with some options for winter greenhouse projects and useful tips from experts to make such a difficult but very exciting task as easy as possible.
Deciding on the type of structure
Today, there are so many different options for constructing winter greenhouses that in order to carefully describe the features and advantages of each of them, one would have to write a multi-volume essay. Therefore, to make it easier for the average person to understand the features of the construction of winter greenhouses, we note the most important differences between the main types of these structures.
The classic version of the construction of winter greenhouses has the following differences.
Functional Features
A wide variety of crops are grown in winter greenhouses. It can be not only traditional vegetables, fruits, flowers and mushrooms. It will be quite interesting to harvest exotic fruits and citrus crops in winter. The sequence in the construction and arrangement of the internal space of the greenhouse will depend on what is planned to be grown in the greenhouse.

Location of the building
The construction of winter heated greenhouses is divided into three types: built into the soil, built at ground level, mounted on specially equipped elevations (for example, the roof of a garage or barn).

Selection of building materials
Depending on the type of building materials used. All winter greenhouses can be divided into several groups:
- built of brick;
- built from wood;
- mounted from metal or polyvinyl chloride profile;
- glazed or covered with polycarbonate;
- combined options.
Features of planting
The construction of a winter greenhouse should take place in such a place that the future building will be in direct sunlight for most of the day. After all, they are so necessary for the normal growth and development of plants. Also, a good location for building a greenhouse will help save a fairly large amount of money that would have to be spent on additional lighting. The best location for building a greenhouse is from west to east. It is this approach that will allow you to make the most of the beneficial properties of such a meager bright light of the winter sun.
Advice ! Future greenhouses should not be located in lowlands with a sufficiently high groundwater level. Such greenhouses typically maintain high levels of humidity, which can be detrimental to a large number of plants.
Choosing the type of heating
Properly selected and properly installed heating in a winter greenhouse is the key to creating a favorable microclimate for the successful growth and development of plants. Installation of a heating system is a rather labor-intensive and complex procedure, so its implementation must be approached with skill.
There are quite a large number of methods for heating a winter greenhouse. Each has both positive and negative characteristics. When choosing a heating system method for your greenhouse, you must take into account the technological features of a particular structure, the climatic conditions of the area in which the greenhouse is located, as well as the amount of money available.

Let's take a closer look at the most common heating options in greenhouses:

Choosing material for building a winter greenhouse
Materials for greenhouse covering are selected according to the following criteria:
- individual design features of a winter greenhouse;
- good sunlight transmission;
- weather resistance;
- the ability to maintain structure and integrity even with frequent temperature changes;
- ease and simplicity of installation;
- low cost;
- duration of operation.
Let's take a closer look at the most common options for building winter greenhouses.
Glass
This material was previously used as the main type of greenhouse covering. Glass goes well with wood and metal. Glass surfaces have good light transmission and thermal insulation properties. However, today, glass as a covering for greenhouses is losing its relevance. A large number of more modern, lightweight, resistant to mechanical damage and, most importantly, inexpensive materials have appeared.

Polymer materials
This material is lightweight and has good transmittance for sunlight. However, polymer panels very quickly lose their original appearance and in the absence of ventilation indoors, excess moisture forms on the surface of the greenhouse.

Cellular polycarbonate
This material is the best today for cladding the structure of a winter greenhouse. He managed to combine the best qualities of glass and film.
We design a greenhouse
Once the materials for construction have been selected and the dimensions of the structure have been indicated, you can begin to develop a project for the future greenhouse. The easiest way to resolve the issue is to use a ready-made plan and adjust it according to personal preferences and construction conditions.
If you decide to draw up a plan for the future greenhouse yourself, you should adhere to a certain algorithm of actions:
- We schematically designate the site plan and determine the location of the future building;
- We calculate the size of the winter greenhouse.
- We develop a scheme for laying utility lines;
- separately indicate on the plan the type and dimensions of the foundation;
- We calculate the required amount of materials for constructing the roof of a winter greenhouse;
- We are thinking about ways to attach all structural elements to each other.

We are building a polycarbonate greenhouse
Polycarbonate is the best material for the construction of winter greenhouses.
The list of advantages is quite wide:
- provides good transmission and dispersion of sunlight;
- has high levels of heat retention indoors;
- the lightness, flexibility and strength of the material allows you to very quickly build a greenhouse that can perform its main functions for a long time.
It is quite possible to build a winter greenhouse from polycarbonate with your own hands. The location of the future building is determined according to the basic rules for arranging greenhouses.

Laying the foundation
In order to lay the foundation of a future greenhouse, you can use a wide variety of building materials: timber, stone, brick. As practice shows, the best type of foundation for winter greenhouses is a strip foundation.

Sequence of foundation laying work:
- It is necessary to mark on the ground the parameters of the future construction.
- Dig a trench according to the markings. The depth of the ditch should not exceed 50 cm and the width -20 cm.
- Formwork made of wooden panels is mounted along the side walls of the trench.
- The bottom of the trench is lined with sand, the layer of which does not exceed 30 cm.
- The prepared concrete mixture is poured.
Advice ! To strengthen the structure, it is necessary to reinforce the concrete screed.
We build the frame
After the foundation has completely hardened, the frame construction stage begins.
Along the perimeter of the foundation, profiles are vertically attached, which are connected by reinforcement ribs to strengthen the structure.

The finished frame of the winter greenhouse is sheathed with polycarbonate sheets. They are very easy to trim with a saw or jigsaw. The panels are attached to the profile using self-tapping screws.
Important ! In order not to compromise the thermal insulation and tightness of the structure, all connections and joints of materials must be treated with perforated self-adhesive tape.
To create a healthy microclimate inside the greenhouse and prevent the formation of condensation, do not forget about installing vents, windows and doors.

Conclusion
Building a winter greenhouse with your own hands is a difficult task, but quite realistic for those who approach the matter responsibly and seriously. It is enough to make some effort and spend a certain amount of time to have fresh vegetables and fruits on your table all year round.
How to build a stove for heating a winter greenhouse, we will find out in the next video