Many owners of country houses prefer to make a gate separately from the gate. Moreover, you can build it yourself from different materials, but most often they use wood or metal. Such a product will decorate any area, but before you begin its construction, you need to select the installation location. You also need to take measurements and draw up a diagram.
Finding the installation location
The gate should be installed so that there is a clear passage to the house. In addition, there should not be any holes near it, otherwise dirt and water will accumulate in the recesses all the time.
You can make several gates with your own hands, for example, one will be the entrance and the other will be the rear to reduce distances covered. Moreover, additional doors can be built from wood.
Design features of the gate
To make metal gates with your own hands you will need the following elements:
- The frame that serves as the base of the door in the fence;
- Sheathing;
- Canopies for fixing the product;
- Latches.
Particular attention should be paid to the sheathing, since a variety of materials can be used to construct a metal gate: profiled sheets, galvanized sheets, chain-link mesh or reinforcement. When choosing a covering, it is better to first look at a photo of how the product will look with it, since there are many of them on the Internet today.
Installation of side posts
The metal gate is mounted on posts that are driven one meter into the ground to prevent the product from sagging under its own weight. Then markings are made and the installation location is marked.
Using a grinder, you need to cut the length of the post from the workpiece, adding one meter to it. Then the surface treatment is carried out: remove traces of rust with anti-corrosion liquid and Bulgarian. When everything dries, a white coating will appear, which should also be removed with a rag.
To fill the holes you will need a liquid solution. To prepare it you need cement mix with sand in a ratio of approximately 1:3. You should get a homogeneous mixture. Add a little water to it and bring the mass to a liquid state.
The next step is to install the pillars. You need to fill the drilled holes with crushed stone or any stones - compact everything. Then the supports are poured, but be careful about their alignment. The perpendicularity of the installation should be checked with a plumb line.
Making a gate frame with your own hands
 To make the frame, as a rule, a metal corner is used. It gives the product durability and strength. Before proceeding with the construction of a door in the fence, you need to decide in advance on its dimensions. By the way, the bottom of the gate should be slightly higher than its posts You can see the photo to see what it looks like.
The frame will be based on several metal profiles, one of which will be additional. The length of the last product should be similar to the width of the metal. This profile will create additional rigidity, as it will be placed in the center. This frame will last for many years.
Sheathing of the product
Any suitable material is suitable for such purposes. In addition, the door in the fence can be made open with a pattern of bent reinforcement. But, if they make a blind gate, then use:
- Edged board. It will go perfectly with the corner base. The boards are fixed to the additional profile and frame with screws.
- Fence mesh. Most often, country gates are built from it. It is secured with wire ends or screws with a wide head.
- Solid sheet metal. It is cut to the size of the frame, applied and secured by welding. It is also advisable to use it for fixing rivets. There is no need to use too thick sheets - 2-3 mm will be enough.
It is better to sheathe the front side of the metal gate with a galvanized sheet, since without galvanization the material will quickly turn black.
Canopy fastening and latches
 Canopies consist of different parts. So, one side is attached to the door, the second should be fixed to the supporting posts of the gate, and the third should serve as a fastening part. True, such a gate will weigh a lot. Simple fasteners may not be enough to install it. The canopy must be fixed using a weld seam However, if the gate is not heavy, then you can use rivets, because with them the appearance of the product is more aesthetic.
The latch can be a metal plate. It will extend beyond the gate, thereby holding the entire structure. Some people also use a chain or hook as a latch, but it’s better to look at the photo, which looks prettier.
Decorating a metal gate
 To make this metal product not just beautiful, but also stylish, it is necessary to decorate it with forged parts. They need to be welded immediately after assembling the gate. This way you can paint it carefully. Decorative elements are sold at any hardware store. To save money, you can make similar products with your own hands using a photo from rebar or a thin profile.
If you plant climbing plants next to the gate, you will be able to create shading of the space. You can also decorate the gate with original handles, but they will have to be combined with other decorative elements.
After creating the gate with your own hands, you need to clean all welds and metal surfaces from traces of corrosion. Open everything with a rust converter, and after the product has dried, remove the film that appears with a piece of cloth. Metal elements must be well primed. On top of the primer layer, all that remains is to apply paint in several layers. The metal gate is ready!
Iron gates
Many people make gates in the fence of the house separately from the gate. DIY metal gates will decorate the appearance of any building. Here you can let your imagination run wild and apply the most unexpected solutions.
Forged elements will decorate and give solidity to the structure. And the electric drive will eliminate the need to go outside. The ease of manufacture allows almost anyone to do this. With a personally chosen design, you can emphasize the individuality of the construction and add your own style.
This design has many advantages:
- High strength makes it very different from other materials;
- The possibility of using decorative elements will highlight the entrance to the site;
- Installation can be done by anyone;
- The work process will not take much time;
- Simplicity of design.
Do-it-yourself metal gates can be made in many types and modifications. There are many decorative elements that will decorate the completed work. Forged elements will complete the design of the structure. Therefore, you should first be clear about what you want to get in the end.
First you should select the installation location, take all dimensions and display it on paper in the form. Carefully calculate the material that will be needed during work.
Materials
Try to choose metal blanks with a high carbon content. This material is less susceptible to corrosion and will last much longer.
- Profile or pipe for making posts, with a diameter of at least 100 mm;
- Metal sheet with a thickness of at least 1.5 mm;
- When purchasing stiffeners, take into account that if they are made of the same material as the frame, allow for this in the dimensions;
- Angle or profile pipe with a cross-section of at least 25 mm;
- For anti-corrosion treatment you will need gasoline or a special liquid;
- Mixture for priming metal surfaces;
- Dye;
- Gate lock (see or electric drive.
The right tool
It’s also worth preparing the tool in advance so as not to be distracted while working:
- It all starts with marking, for this take a nylon thread;
- Welding, power 220 W;
- A sledgehammer or hand drill will help to hammer in the posts;
- To fasten metal, you should take a screwdriver;
- Grinder, will solve problems with cutting and stripping metal;
- Metal scissors will help in cutting sheets;
- Shovel.
Attention: Select the correct dimensions of the product, take into account the weight of the structure. There should be free movement of the gate in winter too. Excess weight of the structure can lead to sagging and improper operation.
Installation of the structure
A do-it-yourself metal gate can be made at home, with a small amount of tools. This will save the owner money. When the idea is transferred to paper, the material for work is available, you can begin the manufacturing process itself.

Side posts
A do-it-yourself metal gate is attached to posts that are mounted into the ground at least one meter (this will prevent the structure from sagging under its own weight).
We make markings and mark the installation location:
- Using a grinder, we cut off the length of the post from the workpiece, plus one meter;
- We carry out surface treatment: remove traces of corrosion using an angle grinder and anti-corrosion liquid. After drying, a white coating forms, remove it with a rag;
- We drill (using a hand drill) or dig holes in the ground at the places where the markings were made. The diameter of the hole should be 10 cm larger than the diameter of the pipe;
- Prepare a liquid solution. We take cement grade 300 and mix it with sand in a ratio of 1:3. Make a homogeneous mass and add water, bringing it to a liquid state;
- We install the pillars in the prepared holes and fill them with crushed stone (you can use any stones from the site). We compact the crushed stone;
- We fill the pillars.
Attention: Care should be taken when placing pillars. Use a plumb bob to check that the installation is perpendicular before pouring. Incorrect installation will lead to incorrect operation of the structure and require rework.
Installation of brick pillars
A metal gate with your own hands can be attached to pillars that are made of brick. To do this, metal products should be faced with brickwork. It will turn out securely and beautifully. Emphasizes the good quality of the structure. Reduces the possibility of sagging.
- As indicated above, we prepare the solution, only we make it not liquid;
- We start laying the first row with a whole brick, the second row with three quarters (this will make the combination of rows more rigid);
Every summer resident tries to make his plot well-groomed and comfortable for relaxation. The easiest way to “revive” and distinguish your dacha from other gardens is to equip a beautiful gate. It is the entrance composition that attracts attention in the first place and creates an impression of the site as a whole. Few people will be surprised by similar factory designs, and experienced summer residents prefer to design and equip the entrance complex with their own hands.
Let's look at the features of various gates, and also provide detailed instructions for planning and assembling fences made of wood and metal.
What should a country gate look like?
There are no clear requirements and standards for the placement and dimensions of the gate. When designing, it is important to take into account the purpose of the door, the presence of a fence on the site, the size and design of the site itself.

The nuances of arranging a gate for the entrance to a garden plot:
The width of the canvas is about 1 m. As a rule, this is enough to carry large items and pieces of furniture into the estate. A large fence requires strengthening of the support beams and the use of more durable fittings.
The height of the structure is limited to 2-2.2 m. This value depends on the height of the existing fence and the purpose of the sash.
Experienced summer residents agree that the optimal location of the front entrance is close to a residential building, so that the gate can be seen from the window.
Basic criteria for choosing a wicket
Let's consider the types of garden gates based on their main design characteristics: purpose, design and material of manufacture.
Purpose of the enclosing door
Conventionally, all country gates can be divided into three groups:

Design features of the gate
Based on the design of the frame and the connection with the fence, the following types of country gates are distinguished:
- free-standing fencing;
- wickets that are part of the gate;
- fences adjacent to the entrance gate.
According to the degree of openness of the door leaf, they are distinguished: curtained, free and combined.
Blind gates protect the country estate from prying eyes and drafts. This option is very popular. To make the fence attractive, the canvas is framed with decorative elements made of wood or metal.
Free wickets partially block the view of the site. To create an openwork canvas, artistic forging is used - the elements are made in the same style. Simpler products are made from wooden picket fence or metal mesh chain-link. Translucent models of gates are made of polycarbonate.

Combined entrance gates are created from several different fabrics. The bottom of the gate is made blank, and the upper part is decorated with forged inserts.
Fabric material
The most popular materials for arranging gates are metal, wood and polycomposite. Let's consider the features of using each of them.
Metal gate for the dacha it is considered the most durable, wear-resistant and mechanically strong. The disadvantage of the model is the difficulty of making it yourself. To implement the project, you will need specialized equipment and welding skills.
Types of metal fences: gates made of corrugated sheets, forged products or the use of sheet metal.
Features of fences made of corrugated sheets:
- the profiled sheet is made of steel, coated with a protective layer of zinc and polymer - this ensures the material’s resistance to corrosion;
- rigidity of the canvas due to the presence of rectangular waves;
- ease of fixing sheets to a metal frame - fastening is carried out using special rivets;
- affordability and ease of use.

Corrugated sheets also have some disadvantages:
- there is a high probability of dents appearing due to mechanical damage;
- the formation of corrosion due to violation of the integrity of the top layer;
- "rustic" appearance.
Forged Products, on the contrary, are distinguished by sophistication and exclusivity. But for the presentability of the design you will have to pay a relatively high price. Forged elements make the gate very heavy. Some summer residents are alarmed by the transparency of such a fence, but this drawback can be easily eliminated by installing a polycarbonate “curtain”.
Sheet metal gates are practical to use, but the material is difficult to process independently.
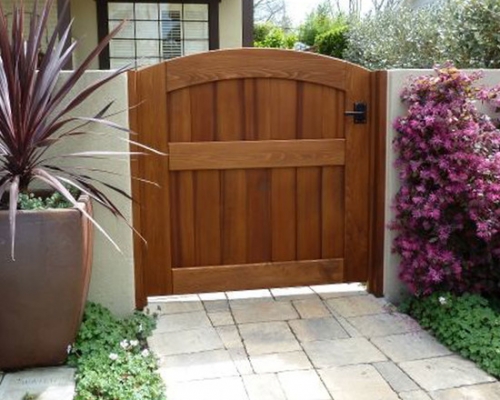
Wooden gate for a dacha it is appropriate if the fence on the site is also made of wood. The fence is organically combined with gabions, natural stone and brick. Advantages of wooden models:
- ease of wood processing;
- the possibility of making your own gate;
- availability and environmental friendliness of the material;
- beautiful appearance.
Disadvantages of wooden products:
- exposure to moisture, rotting and burning processes;
- the need for regular treatment with protective agents and paintwork materials;
- service life is about 5-8 years.
Polycomposite and plastic models appeared on the market recently, but have already gained popularity among summer residents. Wickets are available for sale in various sizes, textures and colors. Assembly and installation of the fence does not cause any difficulties.
Wooden gate manufacturing technology
To work, you will need a hacksaw, a screwdriver with bits and drills, a level and a tape measure. From the materials you need to prepare:
- corners;
- loops;
- self-tapping screws;
- boards for door trim;
- thick wooden beams for the frame;
- support beams.
Advice. It is better to buy lumber ready-made - dry, planed boards of the same thickness on a planer.
When choosing wood, it is advisable to give preference to:
- larch and cedar - dense material resistant to weather conditions;
- spruce or pine - affordable wood, easy to process;
- oak - durable, hard raw material with a beautiful texture;
- laminated veneer lumber assembled from hardwood.
Step-by-step instructions for making a garden gate:

Step-by-step installation of a calico made of corrugated sheets
The requirements for a country gate are fully met by a fence made of corrugated sheets. You can prepare a drawing and assemble the gate using it yourself.
Drawing development and materials procurement
Having examined the ready-made drawings of a garden gate, you can easily draw up your own plan, based on the parameters of the site and personal preferences.
The diagram should indicate:
- total length of support pillars;
- depth of the foundation for the racks;
- distance from the ground to the door leaf;
- width of the gate;
- frame design, number of jumpers;
- location of hinges and bolt.
Important! Support pillars must be buried below the freezing level of the soil. On heavy soils, a depth of 0.7 m is permissible, and on light, heaving soils - at least 1 m.

Based on the developed drawing, materials are selected:
- metal profile for pillars - two sections of 3.3 m each;
- blank plates for supports - two squares 80*80 mm;
- profiled wall sheet - 1*2 m;
- metal profile for frame 40*40 mm - 5.5 m;
- two hinges, a lock and a latch.
Additional consumables: waterproofing film, sand-cement mortar, metal primer and paint, rivets for fixing the corrugated sheet.
To assemble and install the gate with your own hands, you will need the following tools:
- grinder and drill;
- welding machine;
- hacksaw for metal;
- drill for digging a hole.
Installation of support posts
Pre-clean and level the area, mark the place for the support beams - the distance between them should be 4-5 cm greater than the width of the gate.
Procedure:
- Drill holes with a diameter of 40-50 cm.
- Cover the bottom of the blocks with waterproofing film.
- Build a “pillow” of crushed stone.
- The edges of the metal posts that will be immersed in the ground should be cleaned of rust and treated with a primer.
- Place the beams in the holes, level the supports and secure the position with stones.
- Fill the hole with cement-sand mortar.

After a day, check the parallelism of the beams by measuring the dimensions of the opening at the top and bottom.
Creating a frame and canvas
Sequence of work:
- Prepare the components of the frame - cut a pipe with a cross-section of 40*40 mm according to the drawing.
- Place the pieces on a flat surface and secure the structural elements with clamps.
- Check the evenness of the assembly.
- Seal the elements with a weld seam and once again check the evenness of the diagonals and the perpendicularity of the corners.
- Install the crossbar and reinforce the frame with metal corners.
- If the assembly is completed correctly, perform final welding.

“Try on” the frame by aligning the frame to the support posts. Mark the places for the hinges - the distance to the edges of the canvas should be about 25-30 cm. After welding the hinges to the frame, sand the welding seams, coat the frame with a primer and paint.
Frame covering:
- Cut the profiled sheet.
- Secure the metal sheet with rivets. A weak fastening will lead to loosening of the canvas during the wind, and a strong fastening will lead to its deformation. Therefore, you need to screw in the screw carefully.
Final assembly of the structure
Hanging the finished canvas onto the support posts is done after the foundation has completely hardened.
The order of assembling the gate:
- Place the fence in the opening, placing a 10 cm thick wooden beam under the canvas.
- On the beam he will mark the places for the counter loops.
- Weld the hinges and hang the gate.
- Check door movement. Spontaneous opening or closing of the calico is unacceptable.
- Place a limiter on the back of the hinges so that the door only works in one direction.
Gates for a summer residence: photo ideas for decorating the entrance ensemble
The fence and the fence act as a single decorative element thanks to the pattern applied across the entire fence fabric.

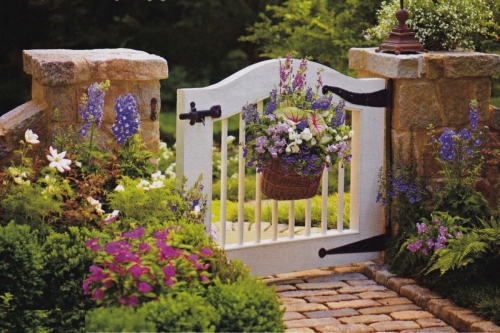
A low fence in the Provence style is suitable for separating a garden from a garden plot. The white gate looks great against the backdrop of lush greenery and natural stone.
The original and at the same time simple shape of the entrance door emphasizes the laconicism and sophistication of the Japanese-style garden.

An unusual solution - a combination of forged elements and natural materials. Artfully crafted grape bunches are complemented by natural vineyard branches.

Eco-decor made from untreated wood is appropriate for a small country estate. The gate doors, like the fence, are designed in a rustic style.
Reading time ≈ 3 minutes
After making the decision to fence off the area using a fence made of corrugated sheets, the need arises to install a gate. It can be done without any problems if you follow the instructions suggested in our article.
To make a gate with your own hands, you will need the following tools: a welding machine, an angle grinder with cutting and grinding wheels - a grinder, a drill-driver, a gun for installing rivets, painting brushes, a screwdriver and a level.
Blueprints
Step-by-step instructions for making a gate from corrugated sheets
This instruction presents a method for welding a gate frame directly on the support posts.
1. Initially, you should mark the place for the future gate, leaving an opening of the required width in the fence between two posts, to which you will subsequently need to weld pipes - the basis of the frame of the future gate. Thanks to this scheme, the future gate will fit perfectly in size. In this case, problems that arise when the structure is manufactured elsewhere will be eliminated.

2. The question of how to make a gate is easily resolved. Its frame is made of the same square pipes as the fence frame. To avoid deformation of the gate frame, the pipes are welded to the fence posts.


3. After this, the upper part of the hinges is welded to the vertical post of the gate frame.


To ensure structural rigidity, a cross member from the same square pipe must be welded in the middle of the frame. The horizontality of the crossbar should be checked using a level.


4. At the next stage, the frame of the swing gate made of corrugated sheets should be cut off at the places where the pipes are attached to the posts. It is necessary to cut off all excess pieces of pipes, carefully welding all joints, and clean the welding joints using a grinding wheel.


5. Using a grinder, you need to clean the installation sites of the lower parts of the hinged hinges on the fence posts. First, you should weld the lower part of the upper hinge, after which you can hang the gate frame and weld the lower part of the second hinge in place.


6. Making a gate from a metal profile requires checking that it opens correctly: if everything is done correctly, it opens freely.

7. It is necessary to remove the gate and weld the hinges on the fence posts on all sides, cleaning the weld seams. When welding hinges, it is necessary to protect the corrugated sheets from sparks and scale from the welding arc.

8. Using a grinder, you need to cut out a place for installing a mortise lock, having previously marked all the dimensions on the gate post according to the drawings.


9. The photo shows how, by installing the gate frame on the hinges, you can mark a place for installing the lock strike plate on the fence post. You will need to secure the striker to the fence post using a drill/driver. Next, you should check that the lock is working correctly, after which you can begin painting the entire structure to protect it from rust.
Gates and wickets are a necessary addition to their corrugated sheet fence. The gate provides access to the site for cars and special equipment, and the gate is intended for those who came on foot. Unlike a fence, the design of gates and gates turns out to be more complex, so a separate drawing is developed for them and a special calculation of materials is made.
We would like to offer you several ready-made drawings of gates and gates made of corrugated sheets, which you can adapt to your conditions. The height of the fence and gate must correspond to the height of the fence.
Main types of gates for country and country houses
- hinged - are two hinged doors that open inward or outward. They are simple and cheap to install, however, they can damage the car when entering, especially if there is strong wind. Also, a significant space needs to be cleared for them.
- sliding or sliding gates with a guide rail - the door moves on a roller mechanism along the fence line. The complex design and special expensive fittings make such gates not the most affordable. But they provide a higher level of comfort: an automated drive makes it possible to open them without leaving the car.
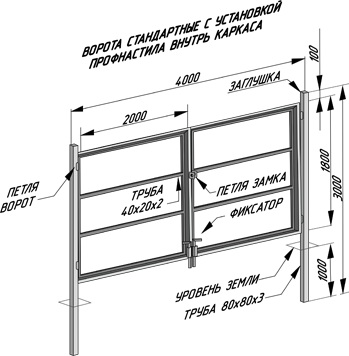
Drawings of swing gates and wickets
When drawing up a drawing, it is important to determine the width of the gate and wicket opening, the height, as well as the frame model. Do not forget that when designing a gate, you need to correctly distribute the load along the leaf, because it is attached to the side hinges and their weight rests entirely on the support posts. For this reason, gate posts are often made of thicker profile pipes or laid out of brick.
The metal thickness of the profile pipe must be at least 3-4 mm. Accordingly, the foundation under the gate supports must be quite reliable. Weak supports will lead to sagging of the sashes and deformation of the structure from wind loads and the gravity of the sashes. For the frame, you need to use a lighter profile pipe to prevent overload on the sashes, but a frame that is too thin will not withstand wind loads.
Pay attention to the choice of gate width. The optimal width is 4 meters; it allows both cars and trucks to easily enter even from a narrow street. Remember, the wider the sash, the greater the load it creates on the supports (in accordance with the law of leverage).
Schemes of gates and wickets made of corrugated sheets with a parallel frame
1. Before us is a “classic” and well-balanced drawing of a gate with a wicket. The height of 2 meters corresponds to the traditional height of a fence made of corrugated sheets. 60x60 posts should cope with a 40x20 pipe frame. The frame itself is not overloaded, is easy to calculate, and does not require a lot of materials. It has only one drawback - the lack of diagonal rigidity. It is compensated by the presence of two horizontal strips of a profile pipe, which form three sections 60-70 cm wide on the sash.

Another characteristic feature is the presence of a top crossbar. It provides a more balanced load distribution and prevents the pillars from moving towards each other; however, in order to successfully enter the site for tall vehicles, it must be removable.
2. Another version of the drawing. This time without the crossbar. Please note that the support posts have a larger diameter due to the absence of a crossbar.
3. Swing gates with a built-in wicket. This scheme is perfect for those who have limited space to enter/enter the territory. A width of 4 meters accommodates both a gate and a wicket. However, it is worth understanding that the presence of a gate increases the weight of the gate, which means the cross-section of the side post must be at least 10x10 cm and it is better to place the gate closer to the post (according to the law of leverage, it will put less load on the gate support).

Schemes of gates and wickets with diagonals
The presence of diagonal frame elements increases the rigidity of the structure and makes it resistant to various types of deformations, however, it should be remembered that additional lines are an additional load and it is important to choose the right pattern. So, instead of two horizontal slats, it is better to use one. Options for the location of diagonal strips are shown in the drawings below. The cross-section of support posts for a fence with diagonals must be at least 80x80.
1. Diagonals from the extreme corners to the middle or vice versa. Such schemes look quite nice. One looks like a snowflake, the other forms a diamond-shaped pattern.


Length of the hypotenuse: where A And b- sides of a right triangle.
2. Diagonals from one corner of the sash to the other. The scheme allows you to minimize the load on the sash and at the same time impart the necessary rigidity, however, welding such a diagonal is not very convenient.

3. Small diagonals at the corners of the sashes. It looks quite beautiful and creates a minimum load, but such doors have a high windage capacity, which means they can suffer from wind loads.

In the following video you will receive valuable tips on how to prevent support posts from bevelling under the weight of the sashes:
Drawings of sliding gates made of corrugated sheets
The most optimal option for a sliding fence, which you can build on your own, is a design with a guide rail. It is enough to simply select kits of fittings and automation systems. The gate includes a retractable leaf with a bottom rail that moves on a special roller system. In order for the structure to be balanced when closed, an additional triangular console is welded to the side of the frame.

As you can see, the gate frame consists of a frame and a console, which are made of a thicker profile pipe (60x40). It is also better to make the internal elements of the console from this pipe. Inside the gate frame, the frame design can be made in different versions (with rectangles or triangles. The main thing is that the pipe is a lighter pipe (for example, 40x20). Also, do not make the grille too thick. The installation procedure for a sliding fence is presented in the following video:
We hope that the following drawings will help you make your own gates and wickets from corrugated sheets that will be comfortable, reliable and durable.